Hello. This is Andreas from the San Francisco Bay area. I never thought I’d build a kayak, but here I am. This post is for people who may be curious about building a kayak but like me were not sure they could pull it off. I am (was?) a novice woodworker and am still a beginning paddler, and as you can see in the pictures below it all worked out quite well. Here’s the story of my build and what I learned along the way.


I mostly sail and windsurf, but kayaking has been on my mind for some time. A week-long kayak camping trip around the San Juan Islands in Washington got me hooked. Ever since that trip, I’ve thought about all the interesting places I could camp with a kayak. Without a boat or a place to store it, these thoughts remained only thoughts. A few months ago I decided to finally do something about it.
Why skin-on-frame
I briefly thought about buying a fiberglass ocean touring kayak, but the high cost made me consider building something instead. I wanted something not too expensive, not too hard to build, not too heavy, and not too long. It didn’t need to be fancy but should work for day trips in the bay and weekend camping.
Skin-on-frame kayaks popped up in my search results, but I immediately dismissed them. These boats can’t possibly be durable or efficient. My prejudice was reinforced by skin-on-frame specimens that looked like awkward, heavy contraptions built out of a 1960’s issue of Popular Mechanics. They were made of plywood and pine, covered in cotton canvas, sealed with latex wall paint, topped with rectangular coamings that would never hold a spray skirt, and shaped into boxy hull designs.
So my attention moved to stitch & glue boats. I was smitten by their beauty, promise of light weight, reputed durability, and ease of building. I wanted to build a Pygmy or CLC stitch & glue boat. I spoke with builders and found out these boats have an almost religion-like following. I was ready to take the plunge myself, but my enthusiasm wore off as I continued to research them. I learned they require crazy amounts of time for beginners to build and much of it spent sanding, which I absolutely hate. Many builders never finish their boats. I also learned and confirmed that builders without glassing experience may end up with a kayak 10-20 lbs heavier than expected. You can find unfinished builds and heavy first-time-builds on Craigslist for less than the price of a kit. I’m still smitten by these boats, but building one was not for me at this time. Cedar strip kayaks were out of the question for this first-time builder, too.
When I gave skin-on-frame boats a second look, I was surprised to find modern touring designs in “fuselage” frame kayaks from designers like Kudzu Craft and Made Kayaks. I also found interesting “techy” varieties like Airolite, O Six Hundred, and Yostwerks. All of these had promising designs, and the YouTube video from Kudzu Craft really changed my perceptions about the durability skin-on-frame can have. If you doubt the durability of this kind of boat, you must watch that video as well as this one. I was wrong to prejudge skin-on-frame. They met all my criteria, but for some reason these particular ones just didn’t inspire me to build.
That’s when I stumbled across Cape Falcon, Seawolf, Brinck, and Skinboat School. While I have no interest in building a replica traditional qajaq or baidarka, there’s something intriguing about adapting traditional techniques like lashed framing and steam bent ribs that inspired me. I can’t really explain it rationally, I just knew these were the kind of boats I wanted to build. Ultimately, I went with the Cape Falcon F1 because I really love what Brian is doing here – the experimental design, the constant revisions, the online course, the blending of modern and traditional without being purist, the flexible system, etc.
The F1 fit all the criteria – light, durable, relatively quick and forgiving to build, not too expensive, short enough to fit in the garage, big enough to fit camping gear for a weekend trip, and no drive to Washington state or Oregon for a class required.
Preparing the parts and forms
Success = Still Having 10 Fingers


Being a less experienced woodworker, I didn’t own a table saw and was completely terrified of using one. It didn’t help to learn that my 9-fingered granduncle hadn’t lost a finger in WWII as I always thought, but he lost it to the table saw he bought after he came home from the war. I hope it doesn’t run in the family. I found a table saw on discount at Home Depot for less than the cost of renting one for 24 hours, which was nice to keep costs down.
I watched all of Brian’s videos with table saw technique and safety tips multiple times, and I watched dozens more on YouTube about kickback, the dangers of ripping thin stock, etc. It wasn’t until I fired up the saw – with goggles, full face shield, multiple plywood push sticks, anti-kickback pawls, riving knife, guard, cell phone nearby, and no gloves – and cut my first piece of wood, that I realized my fears were completely overblown… as long as I didn’t get complacent.
The two best bits of advice I got were
- For every cut, do a dry run with the table saw unplugged, so that all the details like where the runout would go, etc. are thought through in advance.
- Almost any through-cut typically done with the saw’s safety features removed can also be done with those safety features in place. Safer methods might be slower or involve extra steps or jigs, but that may be worth it to the beginning woodworker.
If you are a confident woodworker you might find all this talk silly, but if you fear the table saw or have limited woodworking experience like I did, don’t let that stop you from building. I went from being a terrified, neurotic newbie to confidently – yet safely – milling all the wood to exact dimensions in a weekend. All ten fingers are still intact. Not even a single close call!
Preparation took longer than the build
The actual building process was very fast, but procuring the lumber for the first time took many weeks of searching and driving around because I didn’t know the right lumber yards. If you live in the San Francisco Bay area, I can recommend the Lumber Baron for their large western red cedar selection, albeit they seem to only stock absolutely flawless, beautiful, knot-free, tight vertical grain, old growth cedar at commensurately high prices. If you know good places to get suitable boat building lumber in the San Francisco area, particularly bending oak, please comment on this post.
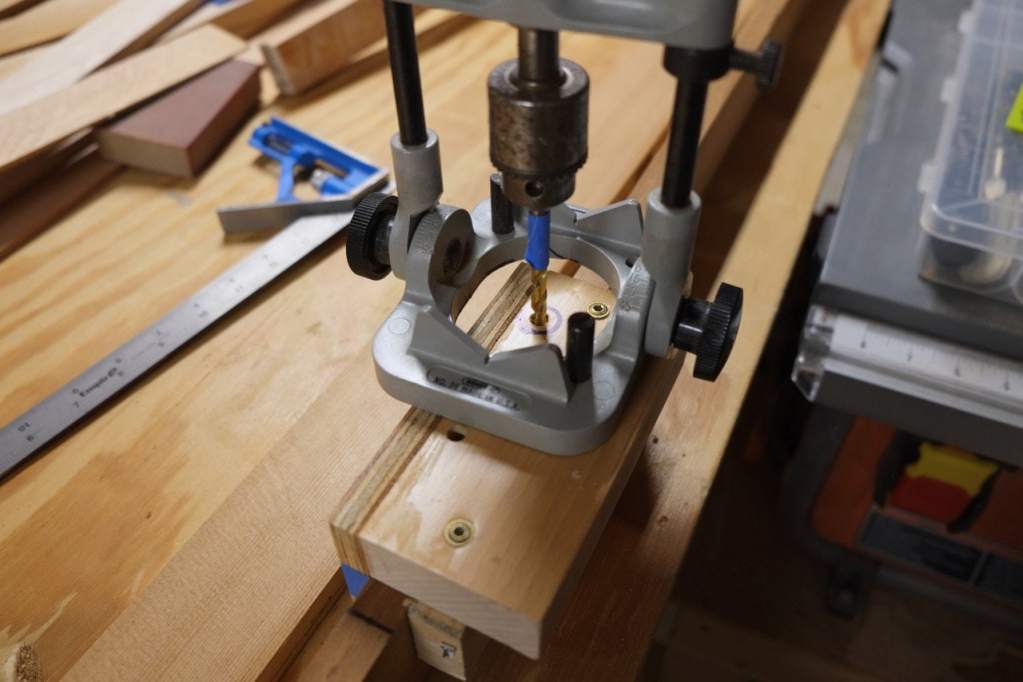
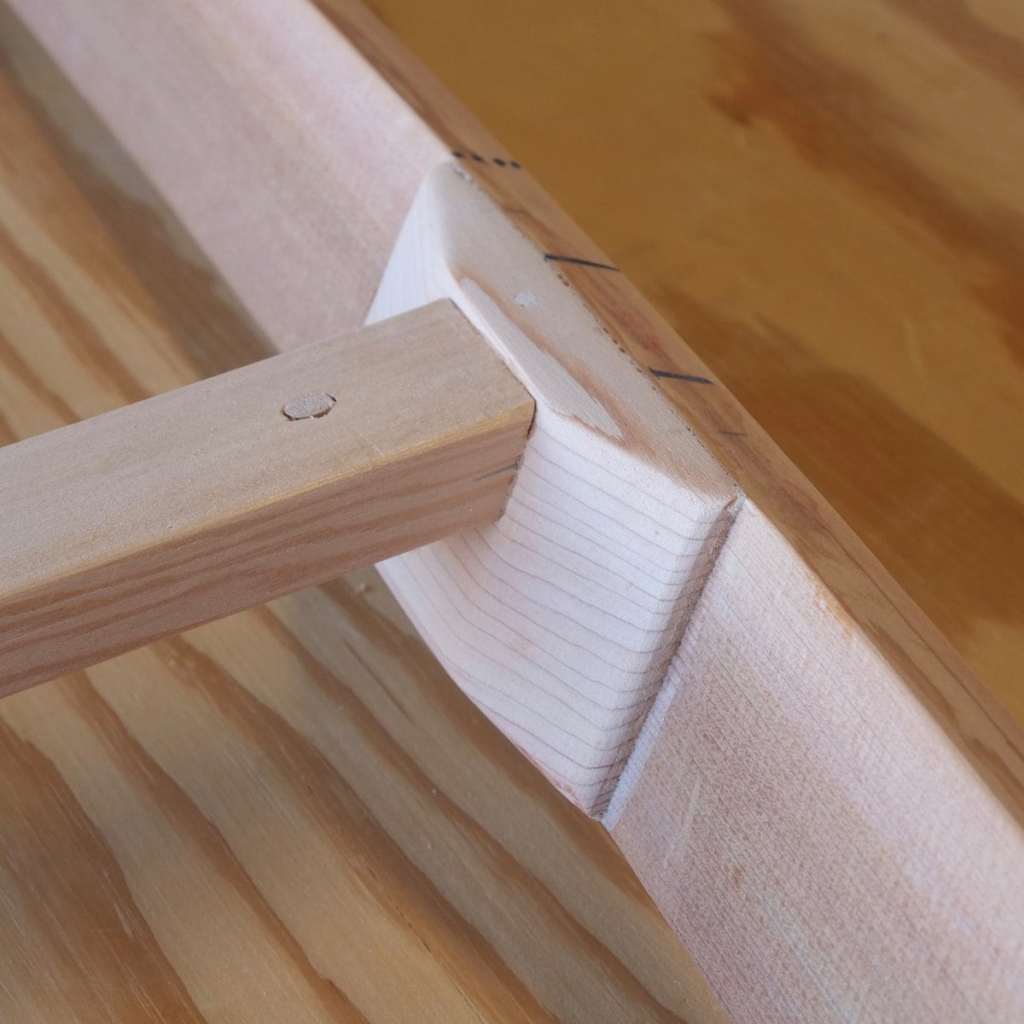
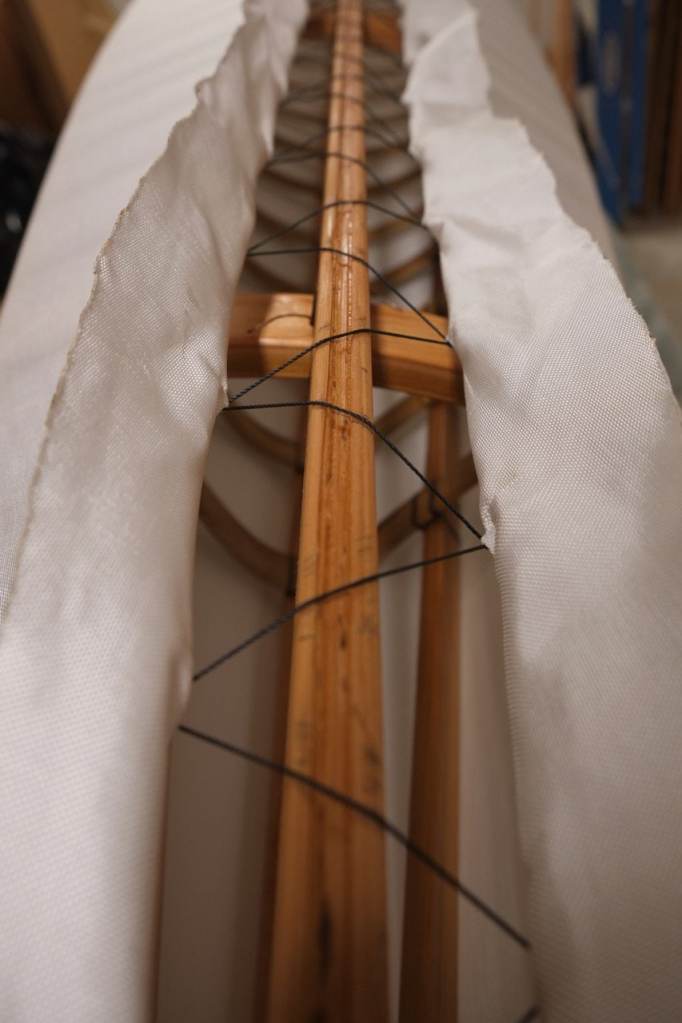
Mortising the gunwales by hand drill took quite a bit of time.


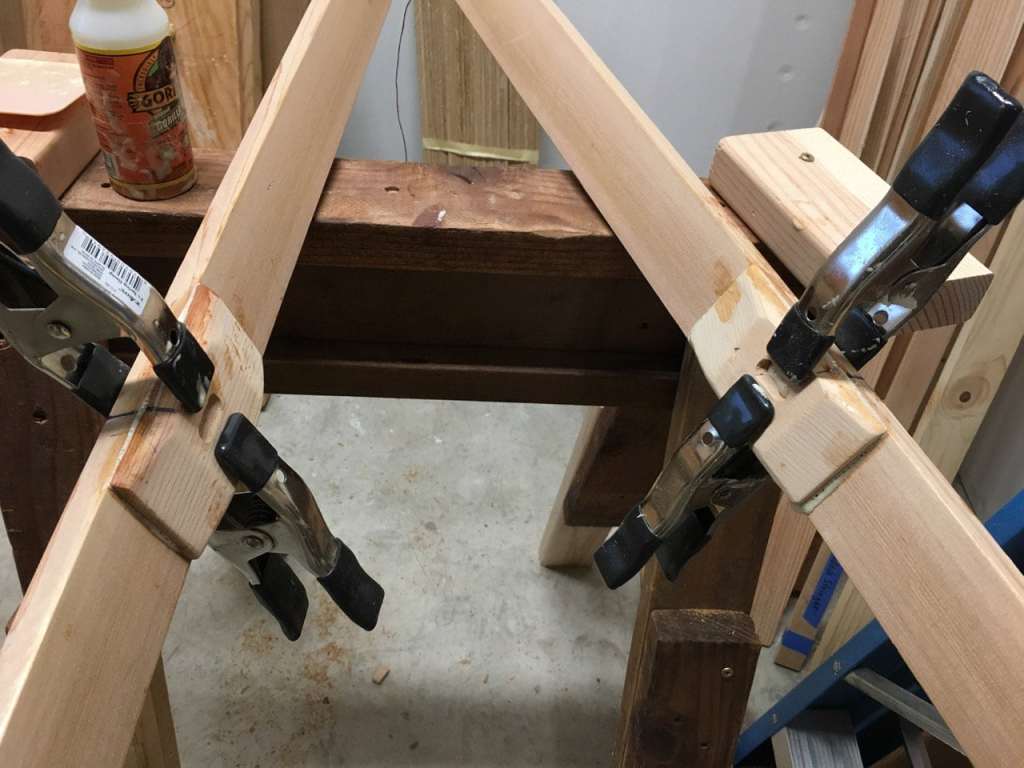
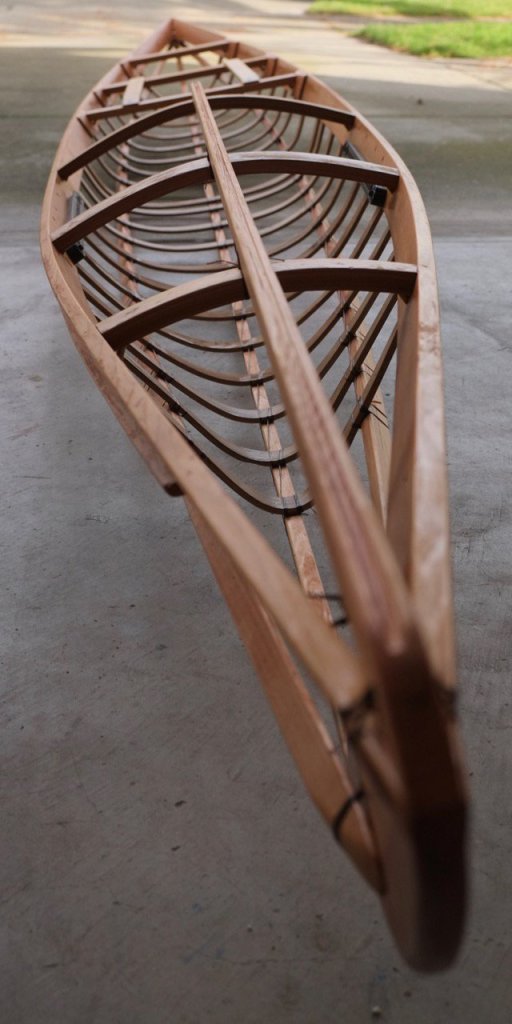
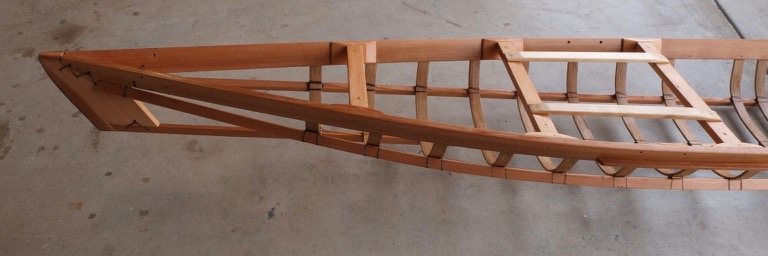
The Build
The build itself came together surprisingly fast. I couldn’t believe how much progress I made with just 30 minutes here and there plus a few hours on the weekends.


Oops!
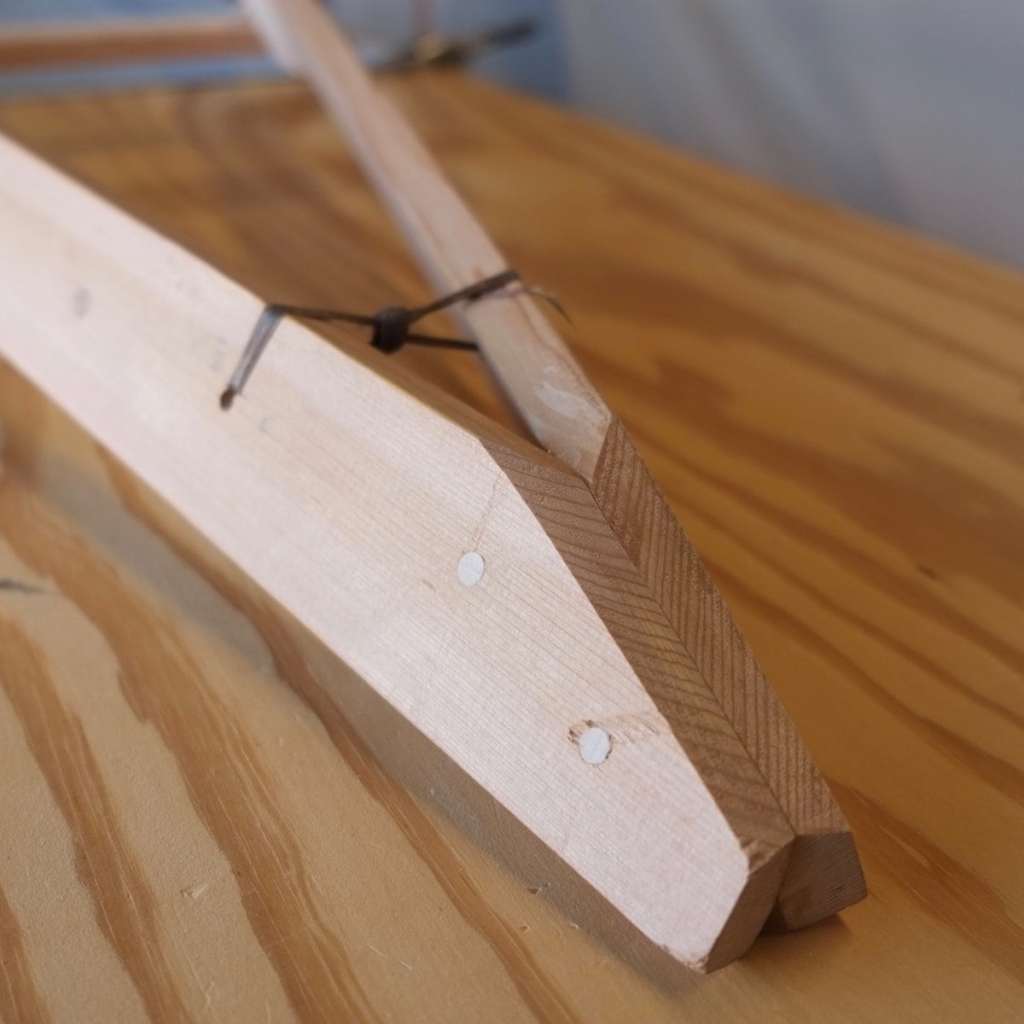
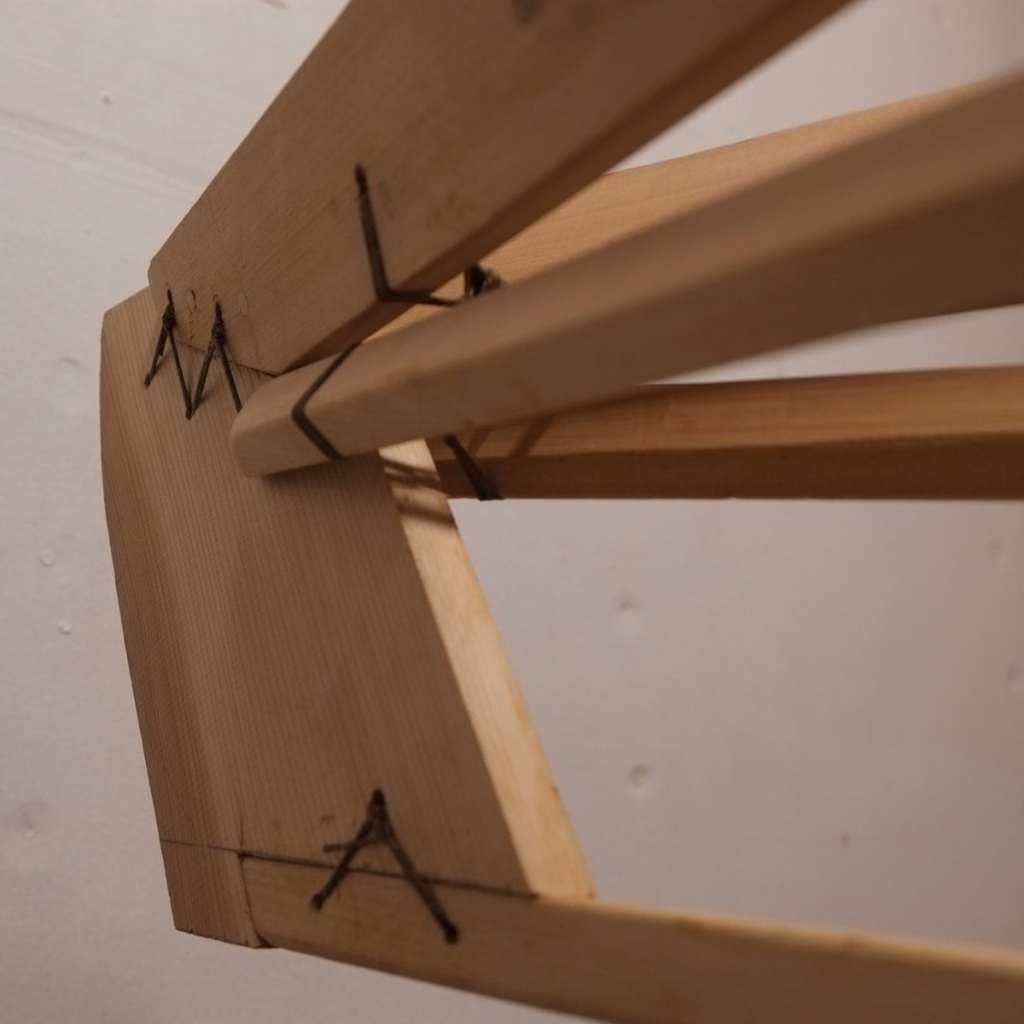
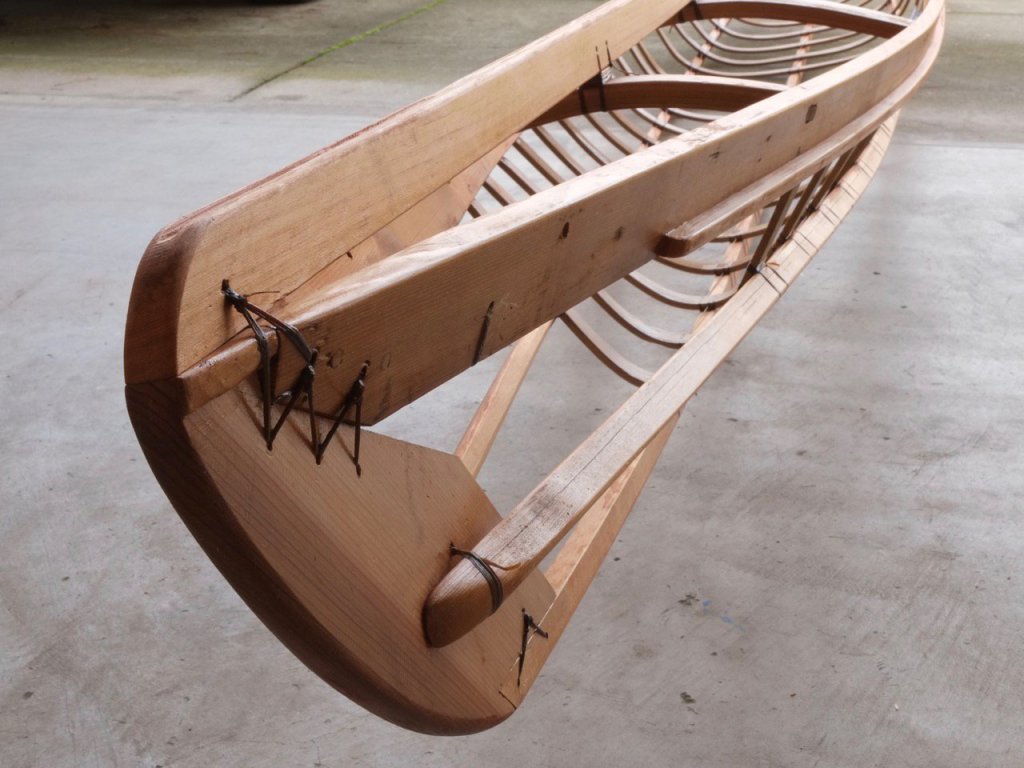
One problem I ran into along the way was that I accidentally changed the orientation of the gunwales after cutting the deck beam mortises, and I discovered this mistake after kerfing and lashing them together. That meant that the aft deck beam mortises were at completely wrong angles. My solution was to glue wooden pads to the inside of the gunwale and re-cut the tenons and mortises to fit. This will make the kayak heavier, but oh well.

Finishing the Frame
To me, oiling the frame was a tedious and messy PITA, and you have to be careful about spontaneous combustion from the oil-soaked rags. I tell myself that it will help the frame last longer, even if Brian says otherwise, because that’s the only way for me to justify the amount time involved. The results do look nice, though.

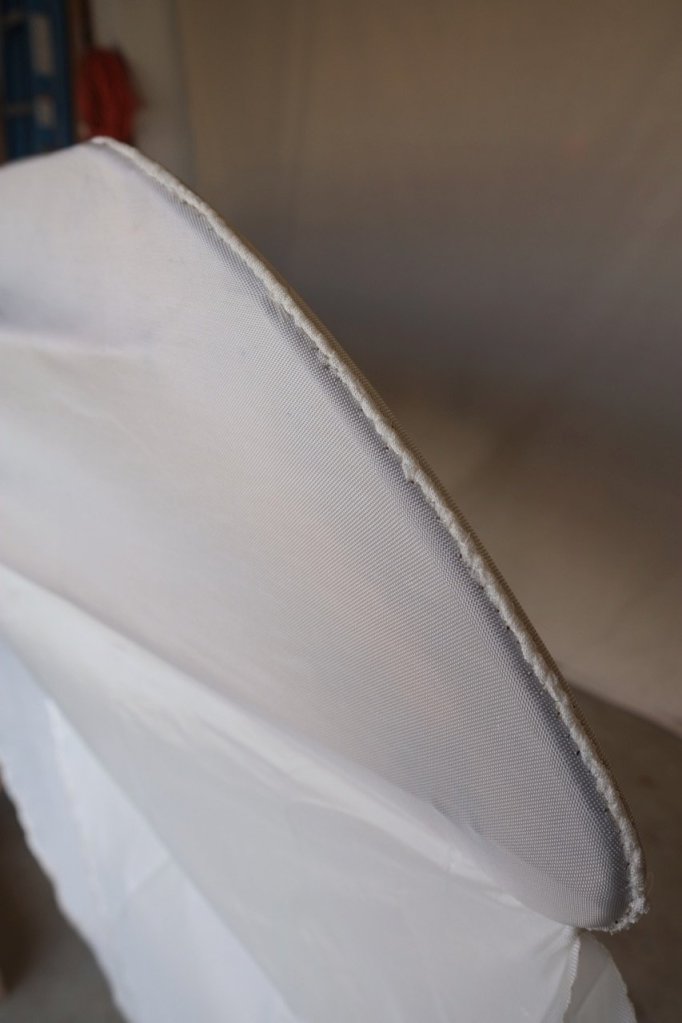
Skinning
Updated Spirit Line Polyurethane Tips
Here’s information Corey provided over the phone that is not on his website as of this writing. I’m just passing along what he shared with me.
- The “6 and 3” instructions were meant for the scraper or squeegee technique you can find on Corey’s website.
- Corey says to avoid using “6 and 3” batches when using foam rollers. With batches that large you have to work really, really fast to use it all up before it starts to thicken. With the scraper technique you can dump the entire batch onto the boat in seconds, but with foam rollers it takes a minute or two – not seconds. You have to saturate the cloth only with thin resin that hasn’t begun to thicken yet. The more it thickens before being applied, the more you risk delamination a few years down the road.
- Corey recommends small batches of “4 and 2” – 4 fluid ounces of Part B and 2 ounces of Part A. The smaller quantity is easier to successfully roll onto the boat before it begins to thicken. Do not try to cover the entire side of the boat with one batch or try to stretch the mileage of your batch. Just apply a single perfect coat for as much or as little as one small “4 and 2” batch will go and stop. Then mix another batch of “4 and 2” and continue where you left off. Repeat until done.
- If using earth pigments, pre-mix them into Part B, preferably the day before. With the roller technique you can achieve a very consistent color compared to the scraper technique where you will get some mottling.
- Avoid touching up spots later. Do it only once, and do it right the first time. Use small batches.
What I actually did
I used earth pigment instead of dying the cloth which worked really well and allowed me to skip a step. As Corey predicted, with rollers the color turns out very even and pleasing.
For the hull, I went with Brian’s “6 and 3” technique. As Corey predicted, it was challenging to apply the entire first 6:3 batch with rollers before it started to thicken. I knew from the video I had to work fast, but my fast wasn’t fast enough. With my second 6:3 batch, I worked much, much, much faster – almost frantically. That turned out great.
For the deck, I tried Corey’s suggestion of doing sections of 4:2 batches, which was easier and more forgiving. Of course, doing it this way is slower because of more batches and mixing. The results of both methods look the same in the end. To me the choice comes down to whether you prefer to work quickly or prefer to have more leeway.
There were crystals in my Part A some as small as grains of sand and some up to 4mm diameter. They fell in from the crust around the lid when I opened the container, and now they are all over the skin. I didn’t bother to strain them out, hoping they would dissolve. They did not.


Paddling Impressions
Another Oops!
The first time out, I took the F1 down to a dock in calm water where there is never anyone around. Except this time there’s a guy standing on the dock smoking and staring at me the entire time I clumsily try to get from the down dock into the kayak for the first time. The dock felt much higher off the water than I expected. I also wore shoes while trying to slide into the cockpit, which was a big mistake. As I lowered myself from the dock and tried to slide into the cockpit, my leg got stuck crosswise between some ribs. As a result, I was unable to sit down further or to pull myself back out. When I tried to get back on the dock, the kayak, which was stuck to my leg would come up out of the water and pull me back down. I was mortified, but at least if I flipped over and got stuck under water the onlooking smoker could help or call someone. I desperately pounded my fist against my wedged ankle as hard as I could, and eventually my shoe slide past the rib allowing me to escape. Never again with shoes.
Handling
The F1 feels surprisingly fast! It takes almost no effort to get up to speed and keep going. There’s an optimal speed where everything feels just right. Trying to go much faster feels like someone cranked up the resistance to 10, but at a good cruising speed it’s almost effortless. The boat tracks very well at any angle, and also turns very easily even without edging. I also love the fact that on land I can easily lift it with one hand because it is so light. It will get a lot of use.
Practicing
Once the weather warmed up, I took the F1 out to a nearby sheltered beach inside the bay to practice low bracing, self-rescue, and attempt rolling. I donned a wetsuit, threw on an old spray skirt someone gave me, and got to it. Now I finally tested the limits where the F1 will capsize, and I got quite comfortable with the low brace. While the F1 felt tippy the first time out, I found there is quite a bit of stability there, and it’s actually hard to tip over by accident.
Self-rescue in light chop was surprisingly easy using the method where you strap down the paddle 90 degrees abeam to act as a stabilizer while you slide your body up the stern. That was without any flotation in the boat and without a paddle float. Before I go further from shore or go somewhere with an offshore wind, I will need to put in some flotation. But it gives me great peace of mind to know I can self-rescue easily, at least in calm waters.
The wind picked up during this session perhaps to 10 kts, and it was a tough slog to make way into the wind. Clearly I still have my work cut out for me in terms of paddling skills. Speaking of which, I tried rolling, which was a complete fail. Still, as long as I pay attention to conditions and have flotation in the hull, I feel pretty comfortable and confident paddling the F1.
Lessons Learned
What Wish I had done differently
- I wish I had worn extra long gloves when applying the polyurethane. I wore regular length nitrile gloves and got an itchy contact dermatitis from uncured part B on my wrists. Two weeks later, there was still some part B on my skin I wasn’t able to scrape off without bleeding. This stuff sticks like tar, and it itches like hell.
- I wish I had strained the polyurethane part A to remove the crystal chunks that form around the lid. There’s no way to remove the crystals that now adorn my kayak without reskinning, but it’s just cosmetic.
- I wish I had filled part A and part B into secondary containers with pour spouts. It’s hard as heck to pour precise amounts from the original containers without dripping and spilling.
- I wish I had used a cheap trim router to cut the mortises. I tried to save money by using only a hand drill. It was a lot of work and resulted in ugly chewed up mortises. I photographed the only ok looking one. What I should have done was drill one hole per mortise and then use a cheap $30 trim router from Harbor Freight to finish each mortise cleanly and quickly.
- I wish I had double-checked the orientation of the gunwales before lashing them together. Doh!
- I wish I had used the welted cord technique on the aft deck. I liked how the foredeck stitching turned out, but the aft deck stitching looks ugly. It wasn’t the extra practice that made the foredeck turn out better. It was the foredeck stringer that made the difference. Without a middle stringer in the aft deck, there’s nothing to guide the stitches but my unsteady hand. I think the welted cord stitching and stretching technique would have worked better in the aft.
- I wish I had borrowed a planer from someone. I got by using a hand planer, but it took a full day with many passes and uneven results. It would have been better to borrow a full size planer for 2 hours and get it all done perfectly and fast.
- I wish I had used stronger thread for sewing the skin. The upholstery thread ripped again and again. There were sharp polyurethane-reinforced “thorns” of thread tails at every spot where I had to restart. I suppose I could simply not pull as hard, but Skinboat school uses more durable unwaxed artificial sinew where this isn’t a problem. It leaves a heavier chunky stitch, but that wouldn’t bother me.
- I wish I had left a more convex bend in ribs 12-16. When I steamed the ribs, I bent ribs 12-16 to almost flat, letting them rebound to about 5mm convex. When I stretched on the skin, the convex bend on the ribs under the coaming disappeared and these rib are bordering on turning into a concave “W” shape. Maybe I should have not bent these ribs so aggressively. A rounder, less rectangular shape with a full 10-15mm of convex curve would have given me more margin of error.
- I wish I had watched all the videos on 2x speed all the way through before beginning to build. Sometimes it would have been helpful to know ahead of time what happens 5 steps later. I would also take notes on paper next time versus watching the videos and doing things from memory.
- I wish I had not prejudged skin-on-frame kayaks. In hindsight, even the heavy canvas covered kayaks I initially disparaged earn my respect because they are fit for their purpose and make good use of otherwise scrap material.
- I wish had taken off my shoes before getting into the kayak. Getting my leg stuck was bad.
What I would do again
- I would buy the accessory kit again without hesitation. It was extremely convenient to have all the accessories in one place and not have to track them down at multiple suppliers paying shipping each time. And, making my own coaming would have added a lot more time and equipment to the project. It would have been awesome if there were a kit that included all the milled cedar parts ready to be scarf joined, because then I wouldn’t have needed to buy a table saw. But, I’m actually happy this project forced me to buy a table saw, because it opened the door to a long list of of non-kayak woodworking projects I’m excited to try.
- I would buy the bending oak stock again, but only because I have not found a local lumber yard with suitable bending oak. The bending oak stock from Brian was really good. Steam bending was easier to learn than I expected. I only cracked 2 ribs, one of them while trying to tie a knot.
- I would use earth pigments again instead of dye. It was very easy to do. No mess or extra steps. Maybe next time I’ll mix in some glitter or reflective glass beads. Or, maybe not.
- I would build a boat again. This project surprised me in what I learned. Aside from woodworking skills like cutting my first mortise and tenon joints, using a table saw, learning how to sharpen and setup a block plane, I also got a lot of practice letting go of mistakes, imperfections, and over-engineering. This isn’t fine furniture, and if people can build kayaks from bits of driftwood then the system must be quite flexible and forgiving. The very idea that the joints should be lashed or at most pegged made me fight my instincts to use epoxy and screws to hold everything perfectly in place. It was also very satisfying to see the finished kayak. I still can’t believe I built that.


September 1, 2019
Congratulations! and thank you for the thorough write-up and tips that you’ve put here, very useful to add to Brian’s treasury of experience! I’m at the early stages, budgeting and testing steam-bending different woods, but want to build an F1 over the next few months and your blog is encouraging me yet further.
I recommend you keep on practicing your support strokes and especially sculling for support, a useful repertoire to complement rolling practice and buiild your confidence.
Happy and safe paddling!
Greetings from Scotland!
September 2, 2019
Chris, thank you for the kind words and advice. Glad you found the post helpful. Best of luck with your build!
March 3, 2020
Thank you for noting some of the parts you struggled with during the build. This is a great site for those of us who are new to building and want to avoid errors (many thanks to Cape Falcon for hosting these student essays/builds). I live in West Virginia now, but I got involved in sea kayaking in the Bay Area when I volunteered with Environmental Traveling Companions. We’d take physically challenged people (people who were blind, parapalegic, and so on) out in the bay for an adventure that would have otherwise been difficult for them. I miss kayaking AND giving disabled people the opportunity to get out on the water in an active way. I’ll put your lessons to good use, I hope, doing that with kayaks I build.
June 3, 2020
Enjoyed reading this, thank you! I live in SF and am building a boat up in Tahoe. Maybe I’ll see you on the bay one day! I’d love to know where you’ve enjoyed paddling.,,
May 8, 2021
Thanks for the excellent write-up. How much pigment did you use? The note on the pigment products page on Corey’s website recommends using “as little color as you can live with.”
May 11, 2021
Hi Joe, I just played it by ear and don’t think you have to worry about it too much. I followed the instructions on Corey’s site, starting with one teaspoon, adding portions of a teaspoon at a time, and dipping scrap cloth until the color looked like I wanted it. I used burnt sienna. I could have used a lot more and it would have been fine. Good luck.
May 12, 2021
Good to know. Thanks for the reply
July 19, 2022
Great write up of your build. I admire your tenacity and spirit. Your table saw advice is sound and well thought out! Also, FYI,Golden State Lumber in San Raphael carries clear red cedar up to 20 feet in length in 1x and 2x stock. It is expensive! I can forward prices if interested. They can transfer to a store in Concord which is closer to me so I don’t have to strap to the top of my subaru! Just have to go there and pay first!
Best,
Keiith
November 26, 2022
Thanks for sharing your build. I didn’t learn much from others only talking a out the finished product and not the detail steps. This is great it worked out for you recovered from the hiccups. I am just starting my build after waiting 1.5 years from buying the kit and cedar. Moving to a new place has been a lot of other work distractions. A lot of the details are missing, like cutting up a 1×12 cedar board. I have all the tools so good there. Just experience doing all these tasks. Yes and thanks for the tip on planning for the next steps so you know whats coming and the reminder to put the goop on fast.