Update November 2020: Further paddling impressions – performance in rougher waters, rolling and rescues, an expedition. (below). (List of materials suppliers is at the end of the blog, below.)

Preparations: Oct/Nov 2019
After nearly three months of researching local sources of supply, negotiating access to large enough workshop space (not enough room at home, or I’d have to remove the windows to get the boat out!) and budgeting, I’ve committed to the build! I’ve managed to find reasonable local sawmills who were more amenable than the bigger commercial outlets to selling the quality of timber and small quantities that I’ll need and have had some very helpful information from other F1 builders online. All this has to fit around work in a school, so this may take some time. Luckily, Scottish winter weather and short days are there to urge me into the workshop!
The initial wood prep is done, now I’m making the more detailed measurements from the plans and beginning to trim things to size, ready for steam-bending the cockpit coaming.


I’m converting dimensions from Imperial, which I grew up with, to Metric, to which I am now accustomed. When I’m at a later stage of actually fitting things together, I’ll post a list of the conversions for those of you struggling with this aspect of translation.
I’ll be using hand tools for much of the build, apart from the main processing work. When making the drilling jigs for the mortises, I made another jig for drilling the angled hole in the Deck Beam Mortise jig with a pillar-drill (drill-press?), as shown in the photo below. Before starting to drill into the jig, I marked a start position and used a 6mm chisel to cut out a small flat area for the drill bit to bite into without skidding along the inclined surface. As these will be used in a shared workshop, I wrote on them to stop people throwing them in the firewood bin!!

Back at home, I’ve completed the coaming and deck beam jigs. I’ve put a sheet of plastic over them to prevent glue sticking as I have no wax coatings to hand just now, I find this works well for other gluing operations that I’ve had to do, like making table-tops.

Next job: planing the coaming tapers…
14 November – the laminated deck beams are almost made, the final one is resting in the jig as I have only enough spring clamps to make one at a time. The cedar I have is relatively high in moisture content, it’s certainly not kiln-dried, and this has helped with bending the strips on the jig. An earlier test with kiln-dried pine strips resulted in a fair amount of cracking sounds and felt like it was on the limit of what that wood would take. I noted that another builder had to soak and steam the wood first for this operation. For a future build I would look for both air-dried cedar and set the saw about 0.5mm finer to cut 3.5mm strips rather than the 4mm+ that I did with this batch.


Last Sunday I made my first cockpit coaming from the test strip of oak out of the batch that I’ve cut. I steamed it for 12 minutes in a length of black pvc downpipe that I salvaged recently, tied to a plank with cable ties to prevent it wriggling free as the heat animated it; a wise move!


I was pleased with the success of this test, a small amount of breaking in the outer part of the tightest bend forward on the coaming but repairable and I plan to fix the rim over it to restore strength. I learned a lot about the handling logistics of this, such as marking and staying clearly aware of which tail to bend in first. I fumbled this a bit and had a struggle to re-shape them in the correct order. As Brian says, it’s vital to organise things and keep calm and efficient during this time-critical phase.
The 16″/405mm stick to brace the lower part of the coaming out during this process is necessary – I forgot to make and use one on this until too late and in trying to fit it later, cracked some of the glue in the tails. I’ve made a repair, re-gluing and clamping the tails together and the overall shape is I think pretty good for my first effort. Lessons are to use more glue, quickly, during the bending phase and to fit the spreader stick immediately after taking it off the jig, while still cooling, to keep a better shape.
I have enough oak for a few coamings, so intend to make several and select the best to take through to the next stage.
The mountains are covered in snow and will likely tempt me out there one day this weekend coming. On the other day I plan to continue the remaining timber preparations before moving it all to a workshop where I’ll have space to scarf the timbers to full-length.
18 November
I’m having to plane the coaming/rim tapers by hand as the power-planer I’d hoped to borrow is not available and, as it’s a tool I’d rarely use otherwise, I can’t justify buying one just now. Slow but satisfying work and I should be ready to bend another coaming or two and fit a rim over the next weekend. I prefer using hand tools for a project like this anyway, so I’m happy enough with this.
23 November
First “proper” coaming made – green oak, steamed for 12minutes – the grain on this one is better than on the test piece above and only one bit of cracking happened near one of the tails – repairable as part of the overall gluing of the tails. This time I used more clamps and 2 G-clamps to exert more pressure to close up gaps, plus a strap to hold the overbend with a spreader piece this time.

I’ll have a go bending the rim on tomorrow, which I’m rehearsing as I don’t have an assistant on hand!
24 November
Bending on the rim, a successful first attempt! I rehearsed the moves thoroughly from the videos and laid out clamps on a block of wood to make it easier to grap them single-handed without straining. The hip-restraining move worked well to hold one end while I applied a couple of clamps on the other side. No signs of breakage either!

I steamed the wood for 13 minutes, a bit of guesswork based on the fact that the actual wood volume is less than the coaming but is slightly thicker. This batch of oak seems to bend really well so far and I’ll see how a test of spares for ribs goes later on today.
I added a twisted belt to hold the sides in slightly to prevent too much outward springing. This seems to work as well as a clamp.
Finally, as I have a second coaming prepared, I bent that onto the jig, ready for adding the rim for that one in the next few days. I reduced the steaming time to 11 minutes and it still bent as well, or better, than the previous two which had 12 minutes steaming. As I have enough wood for several, I plan to make them up anyway for possible use in subsequent builds.
Time for a stroll outside, down to the estuary (Forth), to allow the smell of steaming oak dissipate from the house!
15 December
After a fortnight break due to work and a bad cold, I’ve moved operations to a workshop that is linked to the Transition Stirling Tool Library, for whom I do some volunteering. At last I have space to make up the full-length timbers, scarfed together from 9ft/2.7m lengths. A stroll by the estuary solved the question of whether to buy a sheet of ply or a long plank to make up a workbench; I spotted a perfect length of 2×6″ timber among the flotsam, which is proving ideal – a sign of encouragement from the river spirits?!
I had done a couple of strength tests of scarf joints in scrap pine and from this decided to cut the gunwale scarfs across the long axis of the cross-section, so that the stresses of the gunwale bend are spread out lengthways along the joint rather than shearing across it. This is probably a bit unclear as a description so hopefully the photos will clarify it:


I’ve made up the gunwales and cut the mortises using a power drill, chisels and the jigs that Brian details in the plans. If I were making them again I would use a really hard wood like oak for the rib mortise jig as the wood I used wasn’t quite hard enough to resist the cutting action of the drill bit shaft and some of the holes were less well-placed than I’d have liked. I used a 6mm drill to start with and then a 7mm bit during the tidying up phase, which seems to have produced reasonable mortises for the rib stock that I have; a test piece fits in reasonably snugly but also easily enough to allow for quick insertion during steaming. I made sure to take more care about precision cutting for the deck beam mortises this afternoon and I’m pleased with these.


I was on a bit of a roll, today, and decided to push on to put the gunwales together. I took the sharp edges off with a block plane and used a smoothing plane carefully to shave down the small step at the scarf joint on the outside where the gunwales make contact with the skin. Then I fitted the forms and straps and took the first step in making the shape of the boat! I’ve finally moved from preparation to making. After kerfing the ends, a neat technique, and adding lashings and pegs, I left it with the deck beams laid out and marked for the next stage of cutting tenons and fitting them into the gunwales, which I hope to be able to do after work during this week.

19 December
Last night I fitted and pegged the deck beams, then scarfed the keel sections together. This evening scarfing the stringers, tidying up the ends of the gunwales and making the cuts in the stems to fit the gunwales. My Japanese saw is proving a very good investment.

20-21 December
A hectic few days with the end of the school term, replacing my old, faithful but sick car with a younger model and finishing the stringers and keel and preparing the ribs for steam-bending. I now have a “Stegosaurus” in the workshop!


Brian’s measuring-stick system for the ribs is very easy to use and I got the job done in about a couple of hours, making sure to test the fit of both ends of the ribs in each mortise and make any adjustments (sanding block or belt sander) and numbering each one clearly at both ends.

22 December
A long day in the workshop today, setting up to steam bend the ribs and get the keel and stringers on before the Christmas and New Year break. I had to remake the front four ribs a few times as they kept on breaking despite the care I took over selecting them. In the end I used a couple of test pieces that had bent perfectly; worth keeping them after all! Otherwise it all went pretty smoothly and I was able to maintain calm despite the setbacks.
The rest of the tasks worked out well and the overall symmetry looks OK to me. I needed to put in a few shims when tying on the stringers but this was easy enough, I just held the sinew fast with a clamp while I sorted out a suitable “beaver snack”, as Brian put it in the video!
The ends of the stringers remain to be shaped and lashed to the stems and I may need to put back a wedge on the aft stem as I might have trimmed too much of a curve in it but that’s just a case of glue and dowels, to be sorted after the holiday.

It’s been a good day. Happy Christmas and New Year to you all.
4 January 2020
Two good afternoons of work on the frame. Stringer ends shaped and lashed in place, the stern stem rebuilt by adding a wedge that I cut on the bandsaw after clamping the spare piece of stem blank in place and tracing the edge to ensure a perfect matching cut. I glued it in place and reinforced it with two 6mm dowels, the holes drilled first in the wedge then completed into the stem after gluing it on.


I remedied a mistake from earlier in the build: I’d forgotten to add the second, larger, set of diagonal pegs on the deck beams. I used 8mm dowel all round and, as it’s too late to be able to fit the forms to hold things in place, kept everything pulled together with cam-straps in place around the gunwales at the deck beams either side of the one I was working on to prevent any unwanted movement in the mortise and tenon joints, should the small pegs give way. It all seemed ok but it underlines the need to double check the plans and videos.
After a frustrating morning trying to find screws of the right size equivalent for the ends of the footrest rails, I decided to get 4 x 6mm diameter, 40mm long screws from B&Q and hacksaw them to length; given that cedar is a very soft wood, I reckoned that a point isn’t critical. The slide lock footrests I managed to find are identical to the make that Brian suggests but are sold under a different brand in UK – https://www.whitewaterthecanoecentre.co.uk/slidelock-footbrace-2893-p.asp
Alternatively, for the more fiddly twist-lock footrests: https://www.northeastkayaks.co.uk/p-h-plastic-twist-lock-footrest.html The video instructions were spot-on and I got the rails adapted and fitted easily. I used a combination of a power drill with its clutch set very low and a normal manual screwdriver to fit the bolts and screws, as it is very easy to strip out the soft wood with an impact driver. The bolts on these footrests need a “fat” phillips driver head, by the way.
Secondary stringers went on fine and I decided to fit the aft deck stringers early, as I had them available. After trimming the end blocks and tidying them up with block plane, chisel and sandpaper, avoiding the lashings!, it was finally time to award myself a beer and pizza to enjoy at home!
5 January
I’ve completed the frame! Foredeck stringer cut, planed and sanded, lashed on and stems finished, deck line holes drilled, frame sanded and rounded and a light coat of thinned Tung oil (Tung oil: white spirit 50:50) painted on and wiped down before putting the frame on a rack to dry out for the week until I’m ready to start putting on the skin.
I had to make one repair to a gunwale that had a knot hole right on the edge, which I cut out in a rectangle with a chisel and filled with a tightly-fitting scrap of cedar, clamped in hard for a couple of hours, then carefully trimmed and smoothed out.


I put the cockpit coaming on the frame for the photos to see, at last, a real kayak shape, the grain nicely enhanced by the oil. This is a good moment, especially as I go back to work tomorrow at the start of the new school term and will have less time available until weekends. I have a real feeling of achievement at having got this far with it. Time now to get in a few additional materials, ready for the next big stages.


11 January 2020
I had planned to fit the skin fully this weekend and paint on the coating next but a number of issues have meant I’ve put this back a bit to make sure I’m properly prepared and not trying to rush the process; the impatient part of me protested but the reasons are sensible and it’s the right decision. However, I was able to make a start by sewing the stern and bow parts of the skin, with the little pocket at the bow end. The whip stitch method that Brian has demonstrated very clearly works well and I’ve learnt a couple of new ways of beginning and ending sewing which will help me in other projects.
One factor I was concerned about was not leaving the uncoated skin on the frame too long while there may be enough residual oil that might soak into it and impair the coating adhesion – I want a boat and not a sieve after all! The workshop is fairly cold, especially with our recent weather, and I’ve found that even thinned Tung oil takes a while to dry (or is it cure?) fully, so another ten days will do no harm. It will also give me time to ensure I’ve properly assembled all the little things I need in place and to revise and rehearse the steps so I can get on with the jobs in the times that I have available around work.
I tried using a butane gas-powered hot knife that I’ve borrowed, which is very easy to use and did a good job of cauterising the edges of the fabric. You have to remember that it is a miniature gas torch when operating and be aware at all times of where it is sitting in between cutting, there is a small and effective wire stand in the box that you can lie it in while it’s on. Never leave it unattended or you may start a fire! It’s a good tool though and makes a good soldering iron (and other things) too. It’s made by Portasol, available for reasonable prices too. I believe Dremel make something similar.


I now have a real day off! The sun is out, the rain has cleared for now, time for a short trip on the bike while we have blue skies. I’m looking forward to getting the boat skin laced and sewn on though. More soon.
24 January
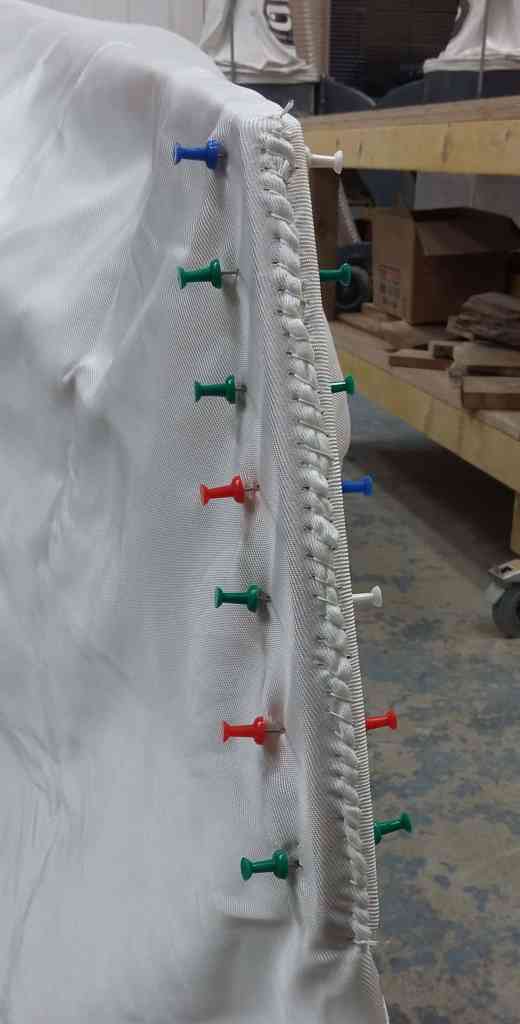
The skin is on the bones. I’ve had two long evenings putting on the skin and sewing it up. I got the sewing and cockpit lacing done this evening and she’s now sitting drying out overnight after being sprayed and ironed.
I wasn’t able to get seine twine but used doubled #4 waxed whipping twine, which seems to have worked well.


25 January
Painting on the urethane coating – today I got the hull done, mixed with some Burnt Sienna pigment that gives it a nice colour and, being a natural earth pigment bought from the Greyfriars art shop in Edinburgh, fits with the ethos of the project too.
I’m letting it cure overnight as the workshop is a bit cool, rather than mess around with balancing the boat on screws.
The tape I tried to apply wouldn’t adhere to the nylon but there wasn’t much runaround of goop so it wasn’t really a problem.
Tomorrow, the deck, tonight, a rest.

25-27 January
Painting the urethane coating onto the skin – following the excellent instructions, the only difficulties I had were the temperature, I needed to turn on the heating fans to get to a reasonable, still cool, ambient temperature for the coating to cure in a sensible time, and not having really the right kind of measuring jugs – in a future build, get the ones for mixing resins as they are graduated for smaller volumes, the measuring jugs I was able to get are not accurate enough nor do they measure down to 2 or 3 floz (us), so I had to do some conversion and cunning workarounds. Thus I used a little too much in the mixes for the hull and had just enough to put on the second deck coat, only just! Because of my concern over this, I put a bit too little on the inside of the coaming and I need to add some more sealant of some kind to feel fully happy with this bit.
Apart from that, she’s looking good overall. I fitted the deck lines and end loops today and the back band on temporary bolts. I was using 1 metre lengths of leather (couldn’t get the 2m lengths easily), so had to tie both ends of each off. I put a wire “needle” through the end of all of them, just the same piece of wire bent in half and pushed through a small hole in the end of the strap made with a thin nail and a hammer. They were a tight fit, so pliers were necessary and I found it easier to fit them and tie the knots by inverting the boat on the stands and kneeling with my head and shoulders up inside the cockpit to reach inside with both hands to do this.
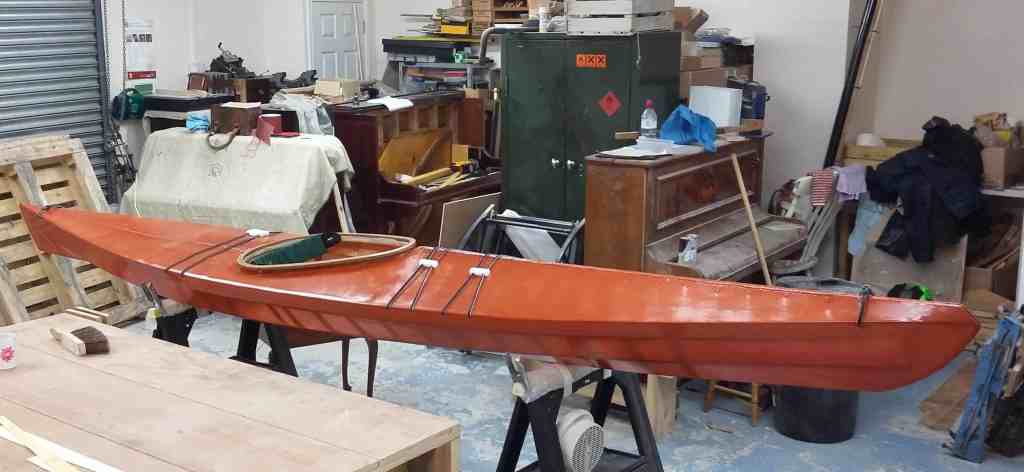
A few small jobs remain, as well as a few purchases after the next pay day (buoyancy bags, spraydeck..) After that…. ready for sea-trials and naming!!
She’s home, now, carried home with surprising and relieving ease on the car. She is so light I can hardly believe it! Loading and unloading are easy and I feel none of the potential for serious back-strain that I am aware of with loading the plastic sea-boats from the club, or even fibreglass boats. This, of course, is one of the features that has drawn me to skin-on-frame boats in the first place.
She fits exactly into the narrow hallway here, just blocking the living room doorway so not a regular storage option! The coating will have a chance to finish curing more quickly in the relative warmth here and I can complete the final finishing jobs like sealing deck lines and backrest bolts, installing rub strip and peripheral lines, indoors.
It’s a good feeling, still a little hard to believe, to have essentially completed the kayak build and to have a boat that I have made myself. While money and lightness were important factors, it’s about much more than that, as somebody said in a conversation a month or two back, the boat has a story to it, something I wouldn’t have in what Brian calls a “commercial “ boat.
I’ll post some more photos once she’s on the water and follow up with a paddling report. For now here’s photos from the workshop. Now to celebrate with pizza and a fine Scottish ale!

Finishing touches, finding and filling pinhole leak points where stitching has opened up the fabric, installing the seating mat, securing it with toggles and elastic, adding the rub strip, preparing for the launch.. exciting!

Toggle & bungee cord to secure edges of the mat 
1 February 2020 – Launching and initial paddling impressions:
A few people from the club were gathering today at Aberdour beach, near Burntisland on the north side of the Forth estuary (north from Edinburgh), to try out a number of boats made by Tiderace and this was a good opportunity to take the F1 out for her maiden voyage. It was not the most promising of days, south-westerly up to Force 6, spells of heavy rain and overcast were all accurately forecast but the bay remained reasonably sheltered and the beach is an easy place to launch and land.
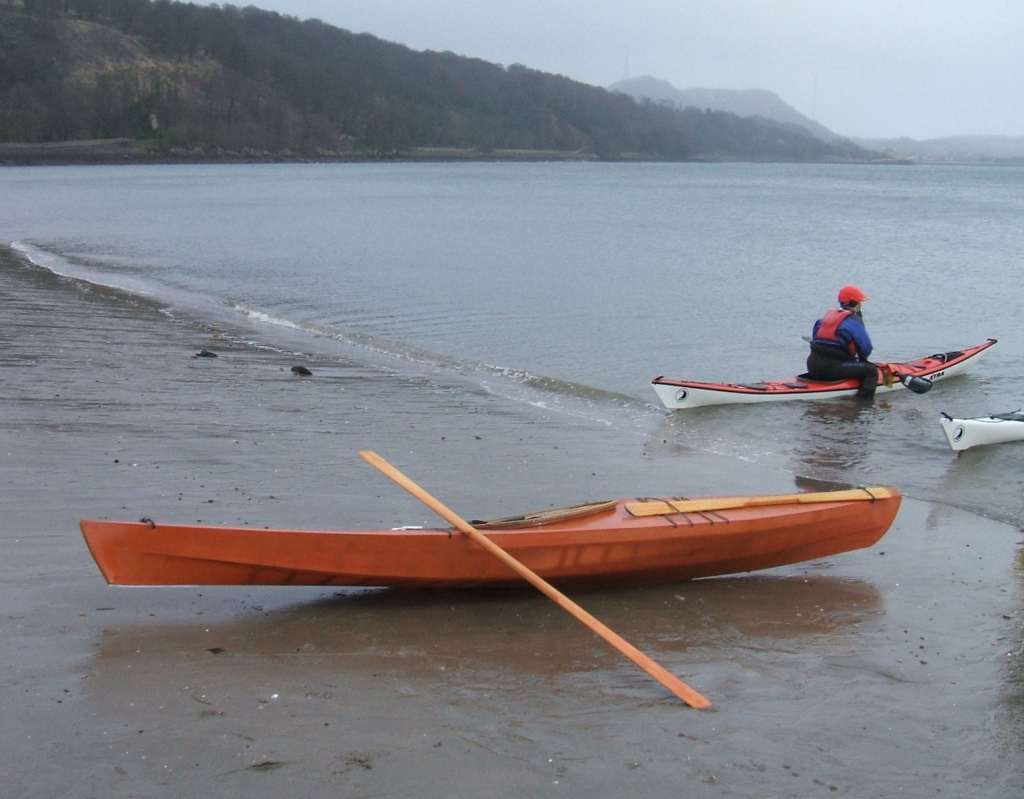
Despite the gusty wind, I could unload the boat easily from the roof of the car and it was easy to carry her to and from the beach single-handed. She sat nicely on the water with less tippiness than I’d anticipated from others’ comments as she settled onto her chines. The seating is very comfortable and warm and the back-band gives good support, helping with a surprisingly positive contact given that I haven’t yet installed knee/thigh pads. She feels stable and responsive and sits easily on an edge to enhance turns.

Directional stability is good and I didn’t notice any real weathercocking in the gusts of wind, despite having no luggage to act as ballast and sitting high in the water. I took her out to the edge of the bay to get into the real wind and small chop (about a foot of short wind-swell) and she remained easy to handle and turn. Small swells rolled into the bay and she picked up these easily. I’m not a fast paddler but she seemed to keep a good speed too; as my fitness builds again after the December lull, I’ll look forward to seeing how she is to paddle as part of a group of “conventional” paddlers.
I still need to fit peripheral deck lines and get buoyancy bags to fit her, as well as a few more bits of personal kit that have had to await the next pay day, but these are easy matters. I feel really happy to have completed the build and finally got on the water with a craft that is well-designed, has a lot of local material and components from a variety of small businesses and that I have made myself, along with the paddles.
My reasons for doing this are many, the labour involved in preparing and making is for me part of the enjoyment, not a cost, so when I look at the financial aspects, she is a good deal but this is about much more than trying to save money. It’s about things like breaking out of the increasing dependency on highly technical and impersonal production methods and systems that reduce my involvement in the craft to entering a PIN number on a pad and making very minor adjustments. It’s about having a more complete and deeper involvement in the origin and refinement of the boat as I find my own solutions to needs and problems. It’s about learning to accept and adapt to the particular features and constraints of a boat without bulkheads and other built-in conveniences but that I can lift easily myself and in which I can still explore, adventure and develop my skills and share this with others. It’s about taking a variety of raw materials and create something graceful and beautiful because her form follows her function.
I’ll follow this up with a subsequent report on my experiences in a few months’ time. Meanwhile …
Thank you, Brian, for a thorough and excellent design and tutorials, and the others, especially Anthony Mace of Shipshape Boatbuilding, for your encouragement and advice.

September 2020 – Further paddling impressions – performance in rougher waters, rolling and rescues, an expedition or two.
Until the interruption of the Covid-19 lockdown in the UK, on the 23 March, my plan had been to go through a series of rolling, capsize and rescue drills with the F1 as part of a general build-up to longer trips. The lockdown pushed this back a bit, I had to be inventive with practice rolls while not allowed on the water and can report that the F1 rolls very well on a lawn!!
Buoyancy/Gear Bags:
The enforced break meant I had time to finish fitting out the boat, including having a go at making a set of inflatable gear bags, based on the concept of the Trak bags recommended by Brian. These were a partial success, in terms of making loading for an expedition much easier and helping to trap additional air in the boat, but I couldn’t get the good airtight seal on the roll closure that I wanted and solving this would have cost as much in the end as buying professionally made bags. So I have purchased a pair of the Trak 40 litre expedition bags, which have a drysuit zip closure that is much easier to open and close in the confines of the kayak than a roll closure: I felt they were worth the extra cost but the 60 litre roll-close bags are a good deal and slightly larger too: . I’m very pleased with these, the quality is excellent and they make both loading and buoyancy much easier. Trak have said they are planning to make a bag specifically for the F1 at some stage, so watch their space. I think a bag of between 50 and 60 litres would be ideal, to fill out as much space as possible, but the 40 litre bags seem adequate to me in my boat and I can fit enough for a 2-3 day trip in them. [https://www.trakkayaks.com/collections/bags-backpacks/products/trak-40l-expedition-gear-floatation-bags-set-of-2] (update, see below).
When packing for my first expedition, I referred to Brian’s packing system and modified it for Scottish conditions with a system used by Roddy McDowell of Bute Kayaking [https://youtu.be/rvD59n3AWRY].

A packing tip: I cut a length of wood about 600mm x 20 x 20mm (2ft-ish x 1″ square) as a push stick to assist with getting the rear bag into the space, I leave this inside the bag so it’s available during the trip.
Trolley:
As restrictions lifted, I was able to launch her on the River Forth estuary, about 500m from my door, and to help with this I made a small, stowable, trolley – nearly all of recycled materials, even the wheels were provided by the River!! I’ve made a short YouTube video on this, with free download of sketches available here. The trolley fits neatly behind my seat and is simple and light. While the kayak is wonderfully light, it’s still easier to tow down to the river on wheels, especially when it’s windy.
Performance:
The more I use the F1, the more I like her, I have been out on a few trips with other club members in “standard” sea kayaks and have no problems keeping up with the group – often I have to ease my paddling cadence to stay with them. I do not consider myself either a fast or particularly strong paddler.

We’ve been out in winds up to Beaufort Force 4-5 gusting 6 and short period, choppy waters which everybody found challenging and my F1 handled it very well. I find a quartering wind and sea the hardest to keep a course in, when she does try to drift to across the wind, but when I packed the boat to trim for these conditions – more weight aft – I found that this eased considerably. All boats benefit from adjusting trim in strong winds so no surprises here. Using the Greenland paddle made it easier for me to do sustained extended strokes on one side when necessary and I’ve felt very confident in the boat’s stability even in some steep choppy waves. On larger, rolling swells, she sits well and I felt at ease out on more open sea such as a trip out to Bass Rock, off North Berwick.

My first surf landings and launches for about 15 years were successful and the bow shape really helps going out through the waves, not least in keeping me drier than I remember from other kayaks in the past.

I planned a 2-night trip on the West coast which went very well, I could fit all my gear, fuel and food in quite easily, once I’d sorted out my system, and this should be easier still with the Trak bags referred to above.
Rolling:
The F1 rolls surprisingly easily, which I wasn’t expecting with the flat rear deck and sharply defined gunwales, as always it’s essential to practice what should be regarded as a basic skill for kayaking. I can’t lie fully flat on the rear deck as easily as I’d like due to the buoyancy aid (PFD) and the lower seating position, but this doesn’t seem to hinder my rolls. I can do a passable storm roll (forward finishing position) and will improve this over time but find the layback roll easiest to do most of the time. Here is a link to a video clip of me rolling her in the rain: https://drive.google.com/file/d/1RMBE-Zj8LBmMPK55RcrzYdgIn_rRsSWd/view?usp=sharing
I have still not fitted extra thigh pads as the knee grip I can get either side of the coaming works well for now, especially if I get a good brace against the footrests. They might be useful in more sustained, rougher conditions though.
Rescues:
I fitted perimeter deck lines and these are definitely useful, I think most clubs, coaches or guides would insist on them for their trips, at least here in UK. When practicing a rescue, they made it easy to deal with the boat and would be even more important in rough conditions. Having these and big buoyancy bags has clearly reassured the nervously skeptical group members I’ve paddled with!!
I’ve tried a couple of self-rescue techniques, with and without paddle floats, and re-entry and roll and all were as easy to do as with any other boat. Video link here: https://drive.google.com/file/d/1RXtVT6KW9sF5UXs6BC4Y67jMbnTcjqeC/view?usp=sharing
Finally, I tested both rescuing another boat and being rescued by my companion on a trip the other day and both went well. The rescuer found it straightforward to do – though the backrest can snag slightly if they try to slide the F1 right across their boat as it projects a little above the cockpit coaming; that’s just something that you can brief people about. The boat will hold more water from the stern than a bulkheaded kayak but I could still paddle the boat without undue instability with this in and it pumped out quite quickly, so I don’t consider this a major disadvantage, just one to practice and be prepared for; as Brian says in his videos, use your judgement and keep a good margin of safety. Video of the X-rescue of F1 here: https://drive.google.com/file/d/1RJ-Ymcl3h61-tuOzGnBJeIZ2ToDcLIpU/view?usp=sharing
I plan to put some of this together in a YouTube video in due course and to add video of rescue practice once the opportunity arises again, including going through these drills with a fully laden boat.
Update 16 November 2020 – I had a lovely overnight trip up the northern half of Loch Etive, a sea loch just north of Oban, in very mixed weather, back in October. This was the first chance to use the Trak expedition gear/buoyancy bags with a full load. They worked very well, easy to pack with the system referred to above and retaining pressure when inflated very well. I take the precaution of bringing a standard buoyancy bag, deflated, as a backup anyway, a good practice even with composite bulkheaded boats.

I really like the F1 kayak, a sound design and handling and the lightness and ease of lifting leaves me with more energy for paddling, which is surely the point?! I recommend this boat strongly to anybody who wants a good value, light-weight, manoeuvrable, stable boat and wants the satisfaction of building it themselves and reducing some of the potential environmental impacts of these things. It’s been a very worthwhile investment of time, learning and money, recommended!

Suppliers of parts and materials include:
- Green Oak for ribs and coaming, Douglas Fir for paddles: Scottish Wood www.scottishwood.co.uk
- Cedar for the rest of the frame: Central Scotland Sawmill
Niddry Mains Farm – EH52 6QW Edinburgh – 07886 556409 - Bronze nails – from Bosun’s Locker, Port Edgar, South Queensferry, and from Duncan Yacht Chandlers, Glasgow. They also stock proper graduated pots for mixing resins and a variety of other useful chandlery.
- Slide-lock Footrests (Palm): Cornwall Canoes www.cornwall-canoes.co.uk/equipment/kayak-foot-rests.htm
- HDPE rod for toggles and strip for the back-band: Direct Plastics Ltd www.directplastics.co.uk/hdpe-sheet
- Ridgerest mat – Nevisport
- Artificial Sinew: www.artisanleather.co.uk/artificial-flat-sinew-sewing-thread.html
- Latigo leather strips: www.titandogleads.co.uk
- Burnt Sienna pigment powder (mixed into the urethane): from Greyfriars Art Supplies, Edinburgh.
- Upholstery Thread and various needles: Pembertons, Stirling. www.psmc.co.uk
- Urethane coating and ballistic nylon skin: skinboats.com, via www.shipshape.works Ant very generously sold me these as a set and shared his experience of making and teaching this construction.
- Other sundries: Wickes, B&Q, even better if you can find a ‘proper’ old-style small hardware shop near you.
- Spraydeck/skirt, pump, buoyancy bags: from LOMO, Glasgow. The spraydeck I bought from them to fit the F1 cockpit was the Big Deck model, you need to check the waist size as they can be very tight. I have about a 31″ waist and bought the Small/Medium. https://www.lomo.co.uk/index.html.
- Expedition gear/buoyancy bags – with drysuit zips, inflatable – from Trak, see above. Recommended for maximising use of the storage space while keeping additional buoyancy. I made a pushing stick about 60cm long from a piece of scrap pine about 20x20mm, with smoothed corners, to help push the aft bag into position, the stick stows easily in the gap between bag and hull.


November 24, 2019
Well done. After the coaming bend, the ribs are easier. Of all the operations, I had the most trouble with the coaming and coaming rim.
January 2, 2020
Chris, she’s a beauty.
January 31, 2020
Excellent work sir. You really nailed the shape of the boat.
April 13, 2020
Chris, I really enjoyed reading about your build. Thanks for posting. You kayak looks great!
November 15, 2020
Well written Chris!
I just finished my own Cape Falcon build and bought LOMO buoyancy and other bags for it. Great Scottish products, super value for money and good company to deal with!
https://www.lomo.co.uk/
November 16, 2020
Good news, Tibor, and congratulations, which design did you build? Lomo are good for most stuff and thanks for the reminder to add them to the suppliers list, which I’ve just updated. Enjoy your boat, best wishes.
November 17, 2020
I built the West Greenland Stretched. If you filter by design here on the site or click the link you’ll see it: https://builds.capefalconkayaks.com/2020/10/tibors-w-greenland-kayak/