Start up trials


The build starts


Impossible to get dowel of this size locally so it’s a DIY job on the lathe!

 Shortening an elm cockpit,
Split the glue joint
Then Soaked the ends Soaked ends ready to go in the steam box
 Loose ends jammed in the steam box
 ribs, soaked and ready for steaming, note test pieces underneath
 ribs, soaked and ready for steaming
 Rib steaming in progress. the first 4 ribs all cracked even after 3 goes!
 repairing cracks in ribs, gorrilla glue and duct tape
 Bow for marking curves made of masking tape and a thin lath
 Ready for the keel
 Stem and stern clamped in place to check fit and mark for lacing holes
 Stem
Stem Stern
Stern
 Note rib is made of 2 laminates
 The original cracked and had to be replaced
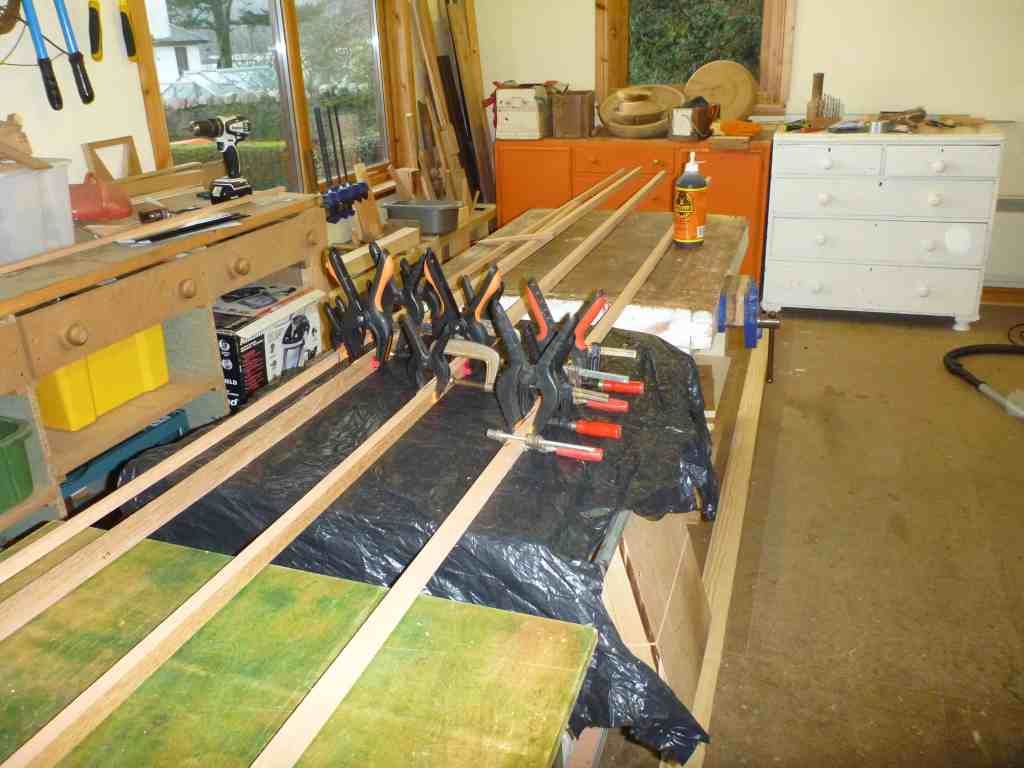
 Lining up the stringers, quite a struggle to bend them into place
 Winding sinew on the lathe
 more bending of the stringers, the clamp setup made it easy to adjust
 Did the lashing in 2 stages, bow first and then the stern section
 Checking the ribs don’t poke out beyond the stringers
 Glueing the secondary stringers
 Glueing blocks at the stern
 Footrest made from a cedar block; the face next to the gunwhale is cut at a 20 degree angle
 Footrests in position set by sitting in the boat
 Hefty stainless screws to fix the footrests
 Screws set at different angles through into the footrest
 Bits and pieces used for a back rest
 The D rings are fixed to the gunwhales. The tape either side of the back rest will lock in.
 Elm bends easily but the grain was so distorted that the lip was made up of 3 – 4 mm strips
 Elm coaming glued and screwed
 100 watt soldering iron with adapted blade
 Sewing the stern
 Hull after coating with Danish oil
 Hull after coating with Danish oil
Now for the “loop and gloop” stage.
The skin is Ballistic Nylon, high tenacity, greige fabric, 850 den, 310g/sqm, white from Extremtextil, Dresden and the gloop is Lechler (Como, Italy) LS140 (29140) Isolak High and Hardener (29340).
The materials were bought in a rush before Brexit so I have no idea how they compare to the recommended Corey products used by Brian. So I asked advice from Brian also from Franz (Bavaria) who did use similar products. What follows are some pictures of tests and the final result.
 Bow and Stern sewn, ready for cutting surplus material
 Stern laced, lots of wrinkles and holes
 Lacing holes getting larger as I increase the tension
 Test piece from offcut sewn onto a tray with moderate tension
 Test piece wetted. It sagged in the middle from 15 mm when dry to 20 mm wet.
Note the remains of the crease mark from when the material was folded. Ironed but still damp
 Dry. Not quite drum tight but a lot better than at the start. Still a bit of the crease mark showing.
 Aft deck before shrinking
 Aft deck before shrinking and after removal of the lacing. After wetting and ironing dry all of the wrinkles and sagging disappeared.
 2 part urethane mixing setup. Note two cups premeasured and marked for 90 and 180 ml.
 Hull after two coats of urethane. I did four eventually. I think the temperature was far too low, maybe 10 degrees C or less, it was minus 2 or 3 outside! Perhaps this is why I have a matt finish rather than gloss. But it has dried hard.
 cockpit – finished boat
 cockpit, deck lines and backrest – finished boat
 bow and foot rests – finished boat
 Stern and back rest – finished boat

The Launch
A mild day after a long spell of cold weather so the launch is “go”. The F1 has had a few days for the paint to cure but it still reeks. The boat weighs 15 kilos. ready to go, except there are no bouyancy bags. It is easy to lift one handed though I am surprised how far forward I have to hold on the coaming to get the balance. I’m lucky, I can put in in front of the house, down the garden and over the railway.
 F1 Launch, Corpach Bay
 F1 Launch, Corpach Bay
 F1 Launch, Corpach Bay
 F1 Launch, Corpach Bay
 F1 Launch, Corpach Bay, Caledonian Canal, Ben Nevis and Fort William in the background
 F1 Launch, Corpach Bay
 F1 Launch, Corpach Bay
 F1 Launch, Corpach Bay & The Corpach Wreck
First Impressions:
A very comfy sit, the matting, back rest and foot rests are all spot on. The full length keel makes it a bit wobbly to start. As there was noone else on the water and with no bouyancy bags I didn’t test the limits but the secondary stability with the hard chines seems good. It paddles easily with no hint of the side deck getting in the way. Directional stability is good, no problem drifting in a staight line while taking photos. On return after two hours on the water the boat was dry inside apart from a few drops carried in from my feet.
Verdict – excellent – can’t wait to try in more testing conditions!


November 29, 2020
Well done Paul, looks like the Elm has bent nicely, was it green or had it been dried? It’ll be good to see your progress. You’re in a good place to launch and get some superb trips. Best wishes,
Chris.
December 5, 2020
That looks like good progress, by the way, it appears that you’ve had to saw the deck beam free from the jig. I prevented this by putting a plastic sheet, with holes for the pegs (i just cut ‘x’s in the plastic), over the board to stop glue adhering to it. It was just a sheet of thin stuff, large plastic bag really, a bin bag would do.
How has the cockpit worked out? I have some oak left over for both the coaming and added rim that you could have if you need it.
February 7, 2021
Good effort, Well done paul. that looks beautiful.
I’m interested in making a greenland paddle myself and a skin on frame kayak myself and would love some advice from your own experiences. Here’s my email address incase you want to get in touch and help me out
curtisfinlay15@gmail.com
February 7, 2021
Hi Jason. Thanks. I made my paddles just by copying others I had seen, and before I had seen CFK’s excellent videos. Unless you have ready access to Cedar I would recommend starting with a bit of cheap spruce or pine from your local builder merchants. That way you can make mistakes and try out the dimensions to suit you. But watch the videos they will short circuit a lot of the potential errors.
Cheers
Paul
March 7, 2021
Hi Paul,
great to see your F1 on the water. I hope my comments helped a little.
Nice images. Next time I come to Scotland I have a kayak on the roofrack.
Cheers,
Franz
March 23, 2021
Paul, I’m currently building an F1 in Dublin and am struggling to find a suitable fabric coating. I’m investigating your Lechsys finish and am wondering how it has performed? There are plenty of 2-pack urethanes out there, but I’m worried mostly about flexibility. Coelan seems madly expensive… Any advice welcome.
Best, Aidan.
March 23, 2021
Hi Aiden, Thanks for your comment. It’s early days yet, I’ve only had my F1 on the water 4 times since the first launch in mid February. I’ve only capsized it once in white horse conditions when I couldn’t get the spray deck on quickly enough. So the boat has been thouroughly soaked inside and out, though the 3 times I did stay upright there was virtualy no water inside. The drain plug in the stern works well and I would say it is essential. The skin has remained tight although I left the boat outside for a few days in damp conditions after my first trip and the skin did slacken off a bit. So I have since kept the boat hanging up inside the workshop between trips. As it is my first experience of skin on frame I can’t compare the flexibility with any other material, although I can say the set is softer and not as brittle as epoxy resin. Cheers Paul
March 23, 2021
Thanks a mill Paul – sounds like you have no major complaints so far. Next trick is to get it from the UK to Ireland with Brexit barriers in place! Best, Aidan.
July 29, 2021
Hi Paul, great build and photos. I hope you get good use of your nice canoe over on the west coast. I am in a similar position as you looking for 2 part poly finish options. How is the Lechler product holding up? Any good for abrasions resistance and toughness?
July 29, 2021
Hi Iain
So far so good with the Lechler coating, though I haven’t used the kayak as much as I had hoped. I am concious that the boat is not as tough as plastic and much more care is required launching and landing. I put gorrila tape on the bow which is sacrificial. It usually only lasts for a single trip especially if there is an onshore wind.
March 23, 2021
Hi Aidan,
I used the same fabric and PU coating as Paul and am rather satisfied with it. Just stay away from using colored PU. My paint dealer made me a testpiece with colored and uncolored Lechsys and the colored was significantly more brittle because the color is a powder, no a liquid. The uncolored was soft enough.
A couple of weeks ago I met a guy with a Greenland kayak (replica from Harveys book). He had used Coelan on it. Felt pretty good I must admit. Almost rubberlike and really smooth. Would I used it? If the price was comparable, definitely yes, but sadly it isn’t. Lechsys is OK, just give the bottom 4 or 5 coats.
Cheer, Franz
March 23, 2021
Many thanks for the information Franz. I’ll avoid the pigment – I am planning to use the Jacquard acid dye, so hopefully that will work. And, yes, Coelan sounds really good. But not good enough for the price!
All the best, Aidan.
March 24, 2021
Ah, yes, what I forgot: For the first coat I used foam rollers like Brian does and found that they make quite some foam with the Lechsys PU. Then I used short haired fur rollers (hope that is the right term). Worked quite a bit better. Using a plastic scraper like many of the youtube guys do is probably worth a try, too
March 24, 2021
Franz – thanks for that advice, which I will follow. I just need to source the product in Ireland now… Best, Aidan.
April 11, 2021
Hi,
I’m thinking of building a cfk but can’t quite decide between a west Greenland and an F1.
Does anybody have experience of both? and what’s the general opinion please
Jim