I started this project in late October as a way to take my mind off of all the stuff that’s been going on this year. I was going to take a week off of work and see if I might get it built in that time, but life got in the way and I’ve only been able to put in a little time now and then.
I’ve earned a living for forty-five years doing various types of woodworking in my small shop. The shop is well equipped, and I’ve adapted some of the steps to take advantage of the tools I have on hand.
I found a fairly straight 4×6 at the lumber yard to use for laminating the gunwales, and used a hand plane, a string and a level to true it up.Ripping 3/4″ cedar for the gunwales. I was lucky to find a couple clear 1×12’s at a local discount lumber yard, hence the decision to build an 11′ 8″ canoe. Though I have a table saw, I don’t have room in my small shop to rip 12′ boards, so I’m doing it on a bandsaw.
Laminating the gunwales. 50 spring clamps.
I ran the laminated stock over a jointer planer and then through a planer to clean off the excess glue and true it up, then ripped that in two on the bandsaw and planed each of the gunwales to thickness with the planer.
Routing the rib mortises using an overarm router with an X-Y vice clamped to the table. Stepping on the pedal raises the table with the gunwale into the router bit.
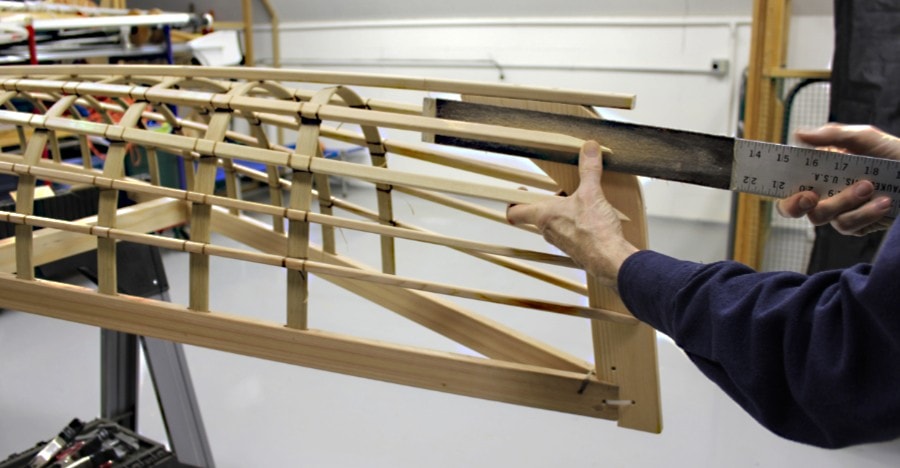
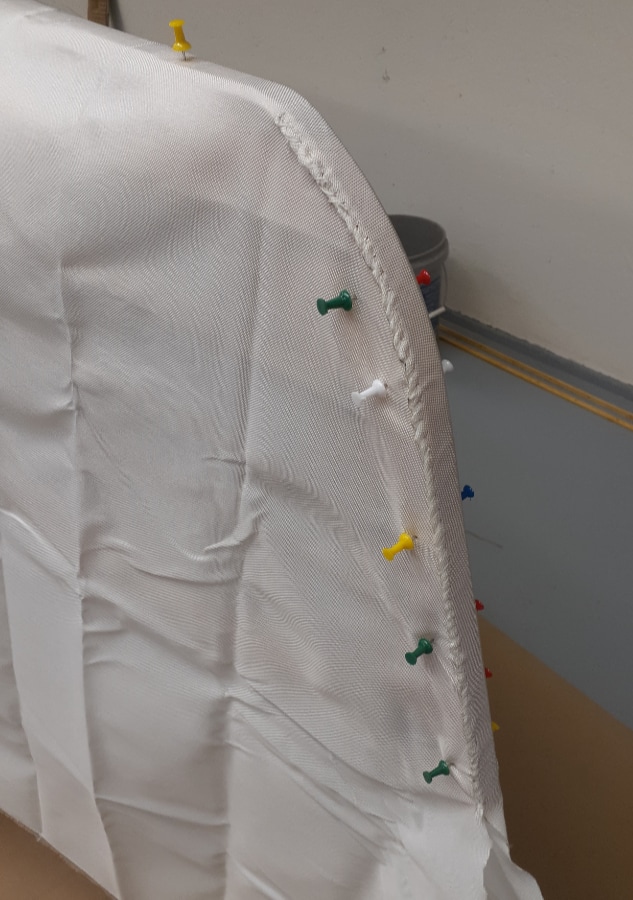
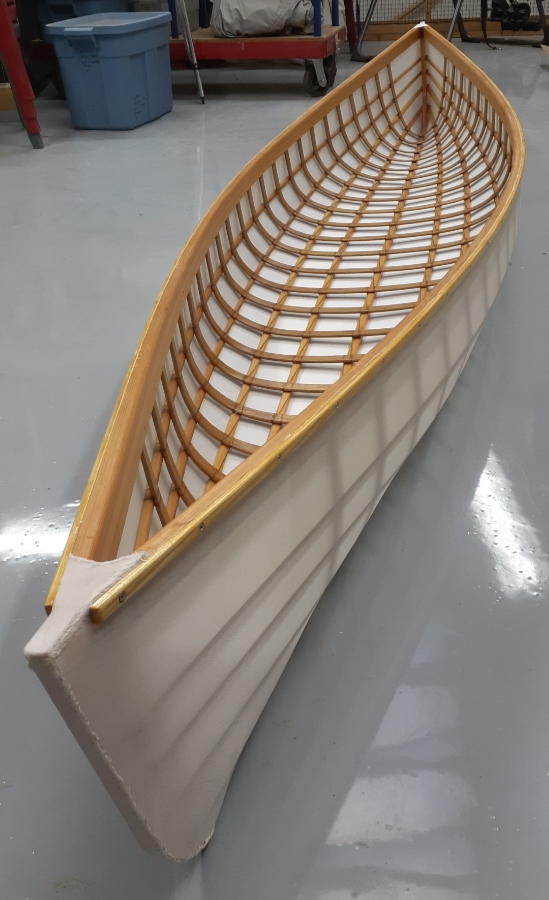
Rounding the edges of the gunwales.Assembling the deck.With the deck lashed together and leveled on the beam I used for laminating the gunwales, I used a square to scribe a line for trimming the ends.Scribing a line on the top of the gunwales, square to the center line of the canoe.Squared off end of the gunwales, ready for the stem.5/4 local white oak. Jointing the edge straight prior to ripping the ribs.Here I’ve already ripped the ribs to thickness and run one edge over the jointer to make them straight and square. The saw is set up for ripping the width of the ribs.Rounding over the edges of the ribs using a power feeder on a router table.Milled rib, ready to bend.Ribs cut to length and in order.The gunwales with stems and keel, ready for the ribs. I put a spring clamp over each rib mortise, because when I was test bending a few ribs and inserting them into the the gunwale, the gunwale occasionally cracked. I found that I if I put more twist into the ribs as I was bending them, making the ends of the ribs parallel to the mortises, I no longer had the problem.My steam box, hooked up to a wallpaper steamer. The oak I got for ribs, though not kiln dried, had been sitting in an open warehouse for years so it was pretty dry. Before bending the ribs I spread them out outside, under cover, so that they might soak up some moisture during a couple rainy winter weeks. I found that steaming each rib about ten minutes made them reasonably flexible. Bending the ribs. I only broke one rib. I replaced a couple that didn’t have a good shape to them. (If you’re wondering about the mask, this was the winter of 2020 when the covid19 virus was going strong and before there were any vaccines.) Bending the ribs. This is in my friend Mark’s shop. Once I got to this point in the construction, I didn’t have enough room to work in my own little shop. Nice to have room to move!The ribs are all bent and the stringers are clamped into place.Lashing the stringers to the ribs.Spools of artificial sinew for lashing.I’ve roughly sawn the ends of the stringers to length, trying the get the angles so that they fit well against the stem. Some fit better than others. Here I’ve taken a piece of course sanding belt and attached it with double-stick tape to a yardstick. Pushing the stringer against the sanding belt as I moved the yardstick back-and-forth shaved wood off of the stringer until I got a good fit. Once the stringers all fit well I removed the stems so that I could trim the height of them a little, to adjust the rocker.The frame, almost finished. The keel still needs to be cut to length and shaped to blend in with the stem, and the temporary thwarts need to be removed.Finished frame.The frame with a coat of oil finish, ready for the skin!Nylon fabric draped over the frame. The fabric has been cut at the stem, and is ready for stiching.Stem sticthed up. I left the front of the stem flat so that I can install a UHMW rub strip.The fabric is stretched tight and sewn at both stems, and stapled to the gunwales. The varnished ash gunwale wear strips are ready to be screwed into place.
I made a tip for my old soldering gun for cutting the nylon fabric at the stems and along the gunwales. I made one out of copper wire, but it turned red-hot as soon as I pulled the trigger; too hot. This one is 1/8″ brass rod. I pounded a section of it flat and then bent it to fit the soldering gun. The brass tip heats up to a good temperature. It cuts/melts the fabric reasonably quickly, and didn’t scorch the wood gunwales unless I moved too slowly.Ready for coating.I coated the canoe with the 2-part urethane from skinboats.com, 3 coats. I’m happy with how the urethane went on and flowed.First time for the boat in the water. I hadn’t added the pad eyes for the backrest yet, as I wanted to get in the boat, in the water, to see where I should sit to get the fore-and-aft balance right.The final setup. The flotation bags, when fully inflated, were a bit too big for the canoe. I found that it worked well to lash them in place when they were only partially inflated, and then inflate them until they were firm. Also visible in the picture is the UHMW wear strip on the stem. UHMW (ultra high molecular weight) plastic is very tough and abrasion resistant.I’ve experimented a bit with the shape of the backrest, to get a comfortable fit. This one is made from pine, rather than ash or another hardwood, since it wasn’t intended to be the finished rest. The pine rest seems to work fine though, and I plan to just go ahead and use it.
Thanks to Brian and Liz for the plans and the great videos. I really enjoyed building the canoe, and I’m thrilled with how it paddles! I’m sure I’ll build a kayak one of these days.
Hi Louis,
The only reason I used the bandsaw for ripping the gunwales was because I don’t have room in my shop to rip 12′ boards on the tablesaw. My bandsaw is in a spot where there is enough room for ripping longer material. If I had the space to rip the long boards on the tablesaw I would have, mostly because it would cut faster than the bandsaw.
It would be okay to rip everything on a bandsaw, with a few caveats. One, a bandsaw will leave a rougher surface than a tablesaw. A tablesaw, set up properly and with a good blade, will leave a reasonably smooth surface. Not so with a bandsaw. I ran all the pieces I cut on the bandsaw through a planer to smooth them. Also, as you may know, when ripping on the bandsaw the blade may tend to “drift” and not cut to an accurate dimension. I made all the pieces I cut on the bandsaw a bit oversize and then ran them through a planer to get accurate dimensions. If you have a good sharp blade on your bandsaw and don’t feed the material too fast, you can probably get a surface that’s smooth enough that a few strokes with a hand plane or a bit of sanding smooth them out.
Hope that helps. Let me know if you have any other questions.
Nice looking boat! Your tip about using course sandpaper double sided taped onto a yard stick to get an accurate fit between your stringers and stem is brilliant. I found this task troublesome and did not do a very good job of it. The Japanese saw I ordered to complete this step arrived about 4 weeks late. Enjoy paddling.


February 1, 2021
Nice Ken.. You’re lucky to have a nice shop with tools to fill the time. Have a good launch.
July 22, 2021
Really nice job, Ken.
I am curious. You ripped the gunwales on your bandsaw and the ribs on your table saw. Why not use the bandsaw for the ribs?
I do not have a decent table saw and am planning to rip everything (gunwales, stringers, ribs) on a bandsaw. is this a bad idea?
July 22, 2021
Hi Louis,
The only reason I used the bandsaw for ripping the gunwales was because I don’t have room in my shop to rip 12′ boards on the tablesaw. My bandsaw is in a spot where there is enough room for ripping longer material. If I had the space to rip the long boards on the tablesaw I would have, mostly because it would cut faster than the bandsaw.
It would be okay to rip everything on a bandsaw, with a few caveats. One, a bandsaw will leave a rougher surface than a tablesaw. A tablesaw, set up properly and with a good blade, will leave a reasonably smooth surface. Not so with a bandsaw. I ran all the pieces I cut on the bandsaw through a planer to smooth them. Also, as you may know, when ripping on the bandsaw the blade may tend to “drift” and not cut to an accurate dimension. I made all the pieces I cut on the bandsaw a bit oversize and then ran them through a planer to get accurate dimensions. If you have a good sharp blade on your bandsaw and don’t feed the material too fast, you can probably get a surface that’s smooth enough that a few strokes with a hand plane or a bit of sanding smooth them out.
Hope that helps. Let me know if you have any other questions.
Ken
July 24, 2021
Many thanks, Ken. Very helpful info.
Enjoy you new boat!
August 2, 2021
Hi Ken,
Nice looking boat! Your tip about using course sandpaper double sided taped onto a yard stick to get an accurate fit between your stringers and stem is brilliant. I found this task troublesome and did not do a very good job of it. The Japanese saw I ordered to complete this step arrived about 4 weeks late. Enjoy paddling.
August 2, 2021
Thanks for your comment Corey.