


Late Summer and Fall of 2021: Sails!
Note on BLOG organization. I’m going to start putting recent updates here at the top, and if you’re interested in the build process, continue reading further down below. It’s just getting a bit long.
So, I sewed the first sail for the smallest of three canoes in mid-Sep. I tested it out in a couple of small local lakes. I made two more sails for the other boats, and was able to test those just briefly in Oct before the weather got too cold. Sizes range from 1.2 square meters for the smallest, and 1.7 square meters for the largest.
In summary, they are a blast for some downwind running, especially with two catamaran’d boats. However, I have absolutely no prior experience in sailing, and my initial attempts at any kind of crosswind sailing were just some fun “messing about”.
All in all very glad I bought the materials, and they are quite quick to put together. I used a vintage Singer sewing machine from the 1950’s that I picked up a couple years ago from a thrift store.
We’ve also catamaran’d all three boats a couple of times. It’s pretty easy to just overlap the boards and use longer bungees. But as one might suspect, it’s a bit slower and a little less maneuverable.
A great end to the first paddling season.
Looking forward to possibly making a rowing rig, and trying canoe camping next year!
INTRODUCTION
I completed a build of 3 Cape Falcon Kayak ’66 Canoe’ boats in spring of 2021. They are full-size, solo, single-blade-style canoes, with recurved stems which nest together. Measurements are the same as the M, L & XL size single-blade solos in the “Sample Canoe Sizing” plans (13′-8″, 14′-8″, 15′-8″), except widths are 27″, 29″ & 31″, respectively.
The full build process with many pictures & time-lapse videos are detailed below. Final boat specs/weights and initial impressions can be found after the build blogs. Then there’s a bunch of photos/videos of initial paddling and a summer 2021 trip to Grand Teton & Yellowstone parks at the bottom.
BACKGROUND
I’ve been a ‘maker’ of many things all my life. I’ve made several telescopes, created workbenches, toolboxes and ‘fine’ furniture, done minor brazing on bicycles, and built my own roof rack, among other things.
As far as boats, I previously built a Guillemot Kayak’s ‘microBootlegger’ in the winter of 2009-2010.
I built a Yostwerks ‘Sea Pup’ kayak for my daughter in the spring of 2016.
WHY CAPE FALCON KAYAKS 66 CANOE?
The microBootlegger is a beautiful canoe, is fast, and is ‘comfortable’ as a solo, sitting ‘pack canoe’ style on a seat no more that 2-4″ off the bottom of the hull. Taking small children is pretty easy, but with two adults it becomes uncomfortably tippy. It is also ~50 lbs empty, and while that’s still light compared to plastic or aluminum canoes, it’s not insignificant putting onto a roof rack.
In addition, both of my youngest daughters were becoming more and more hesitant to go out in the Sea Pup, because it was cramped and very tippy.
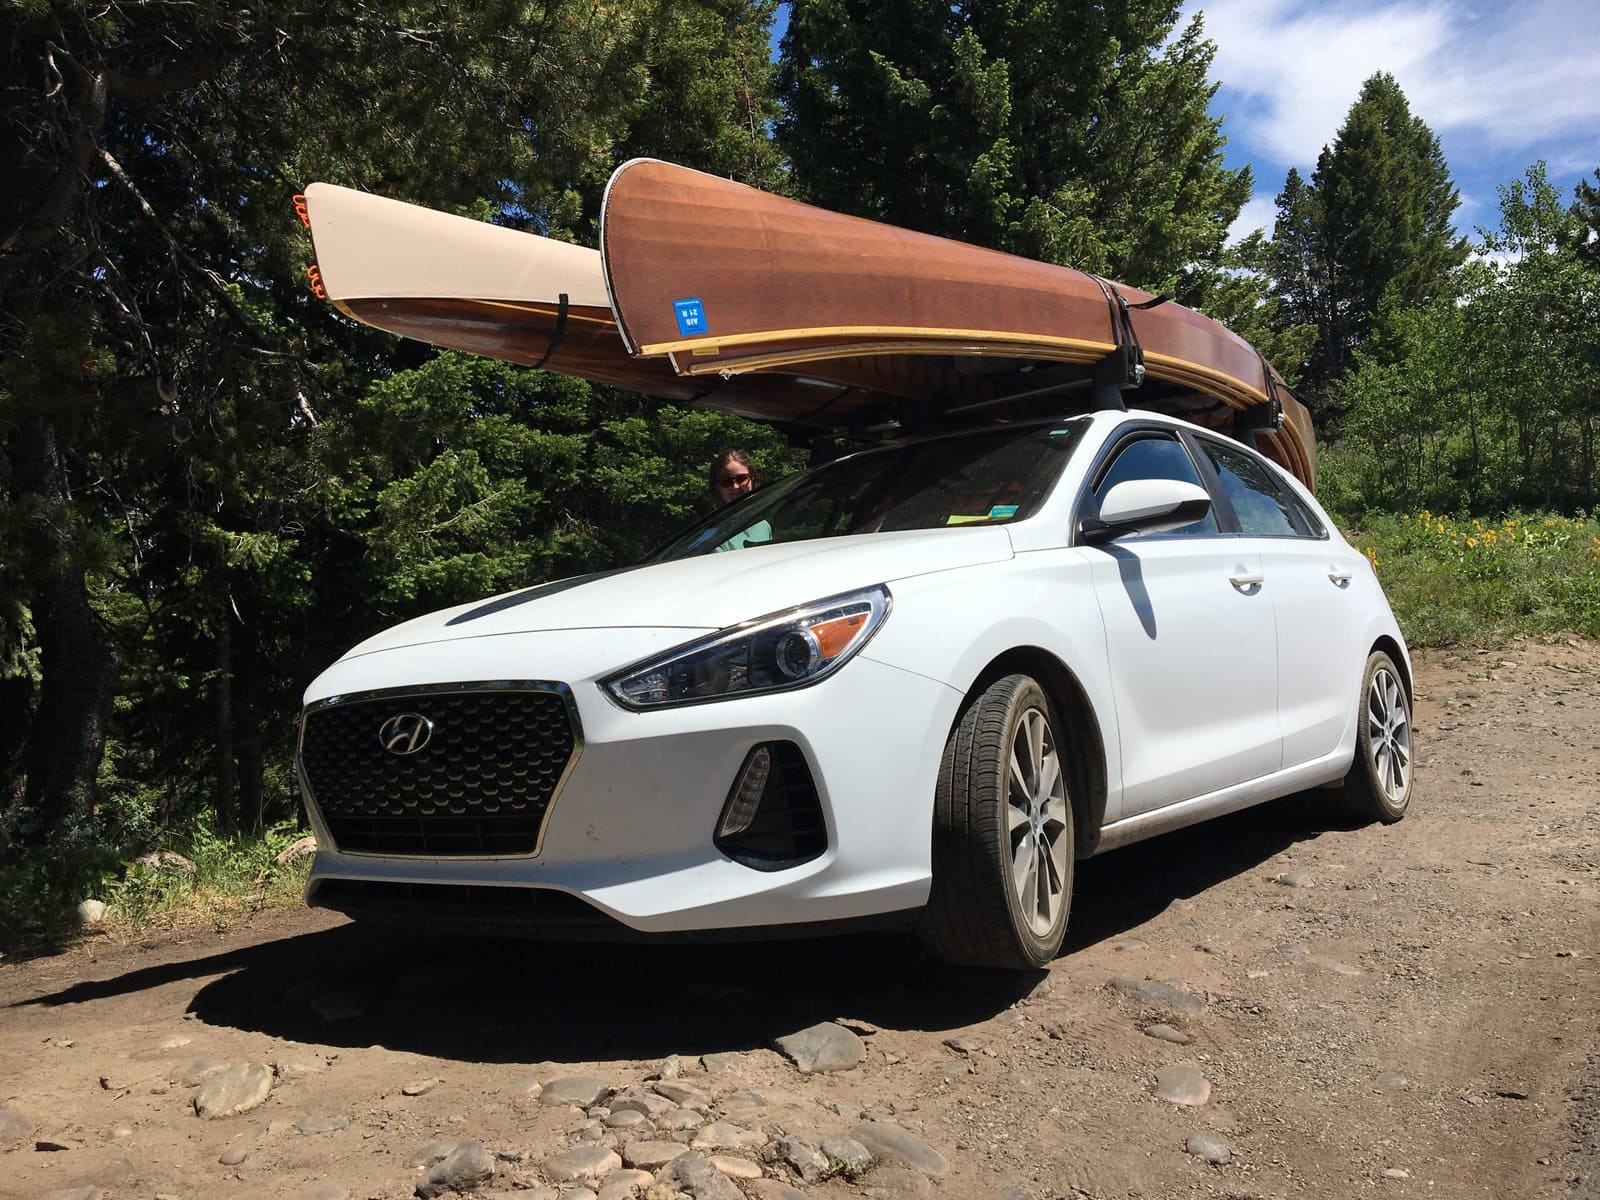
Lastly, I have a small hatchback vehicle, and would like to keep it that way, for ease of loading/unloading. Being able to transport THREE canoes easily on my existing vehicle/roof-rack, rather than purchase/build a trailer is a HUGE benefit.
In summary, the comfort of regular canoes over small kayaks fits our easy-going, relaxed paddling style in our local rivers and lakes. The light weight of skin-on-frame construction allows my daughters to each load/unload and handle their own boat independently. Lastly, the option to catamaran all three and sail together is so exciting, all of us can’t wait to try it!
THE BUILD
Jan 8 – Mar 6:
I began purchasing materials late Dec 2020, and began building in Jan 2021. I hadn’t originally planned to create a blog, so didn’t take ton’s of pictures early.
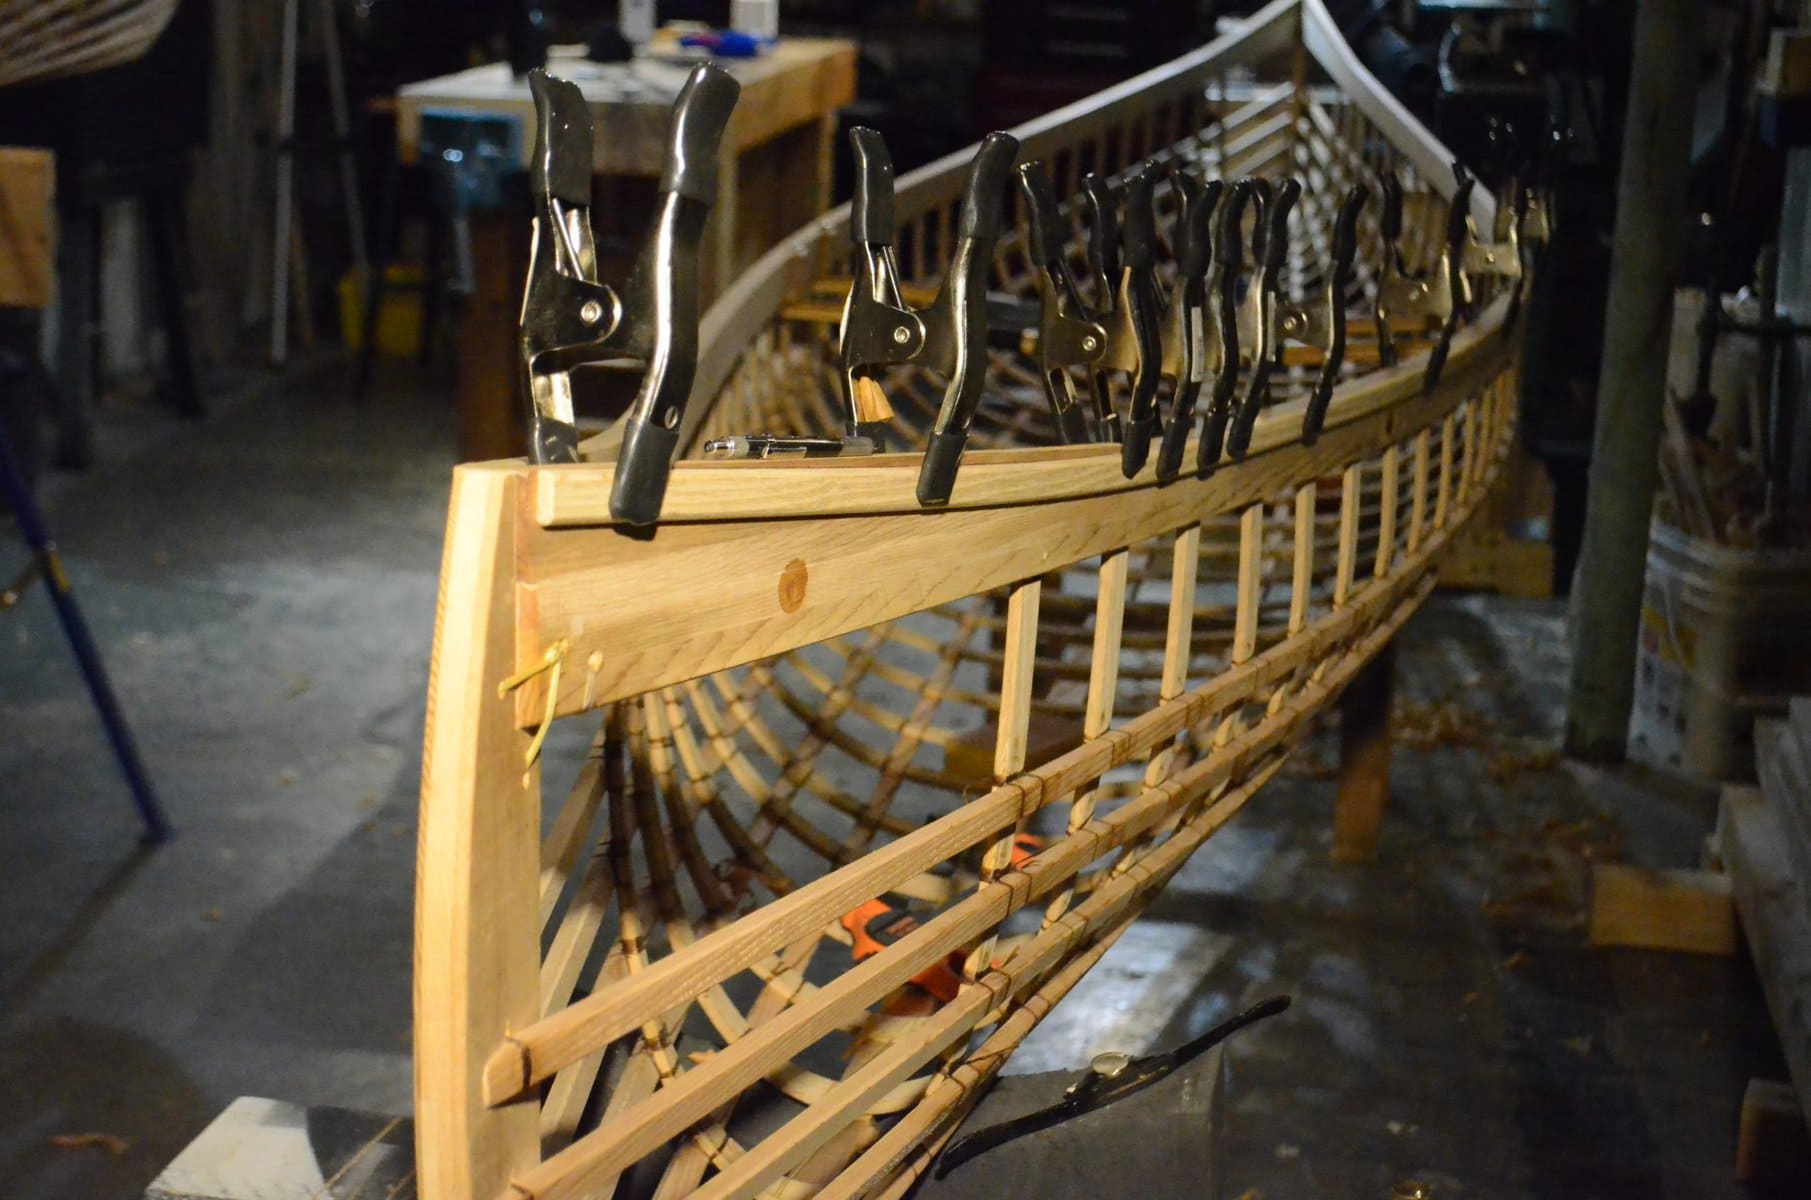
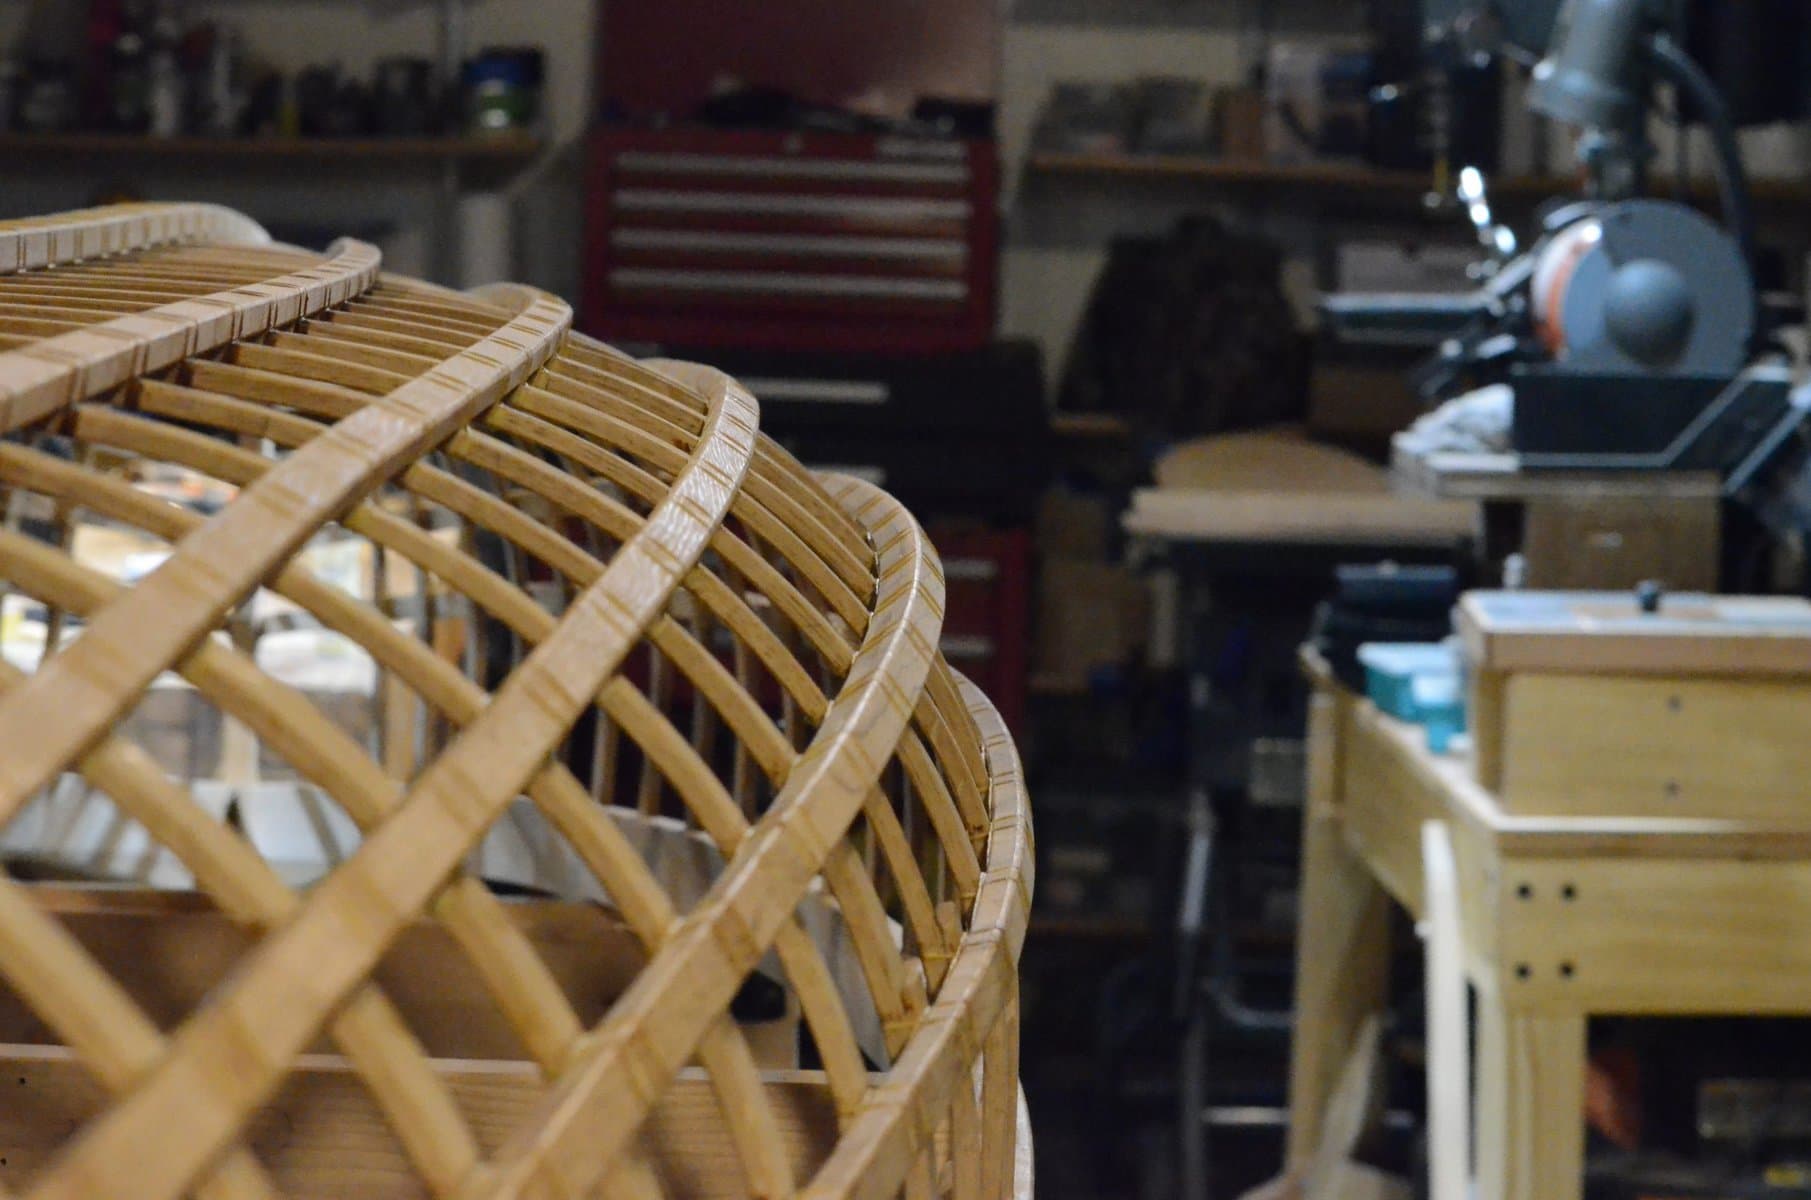
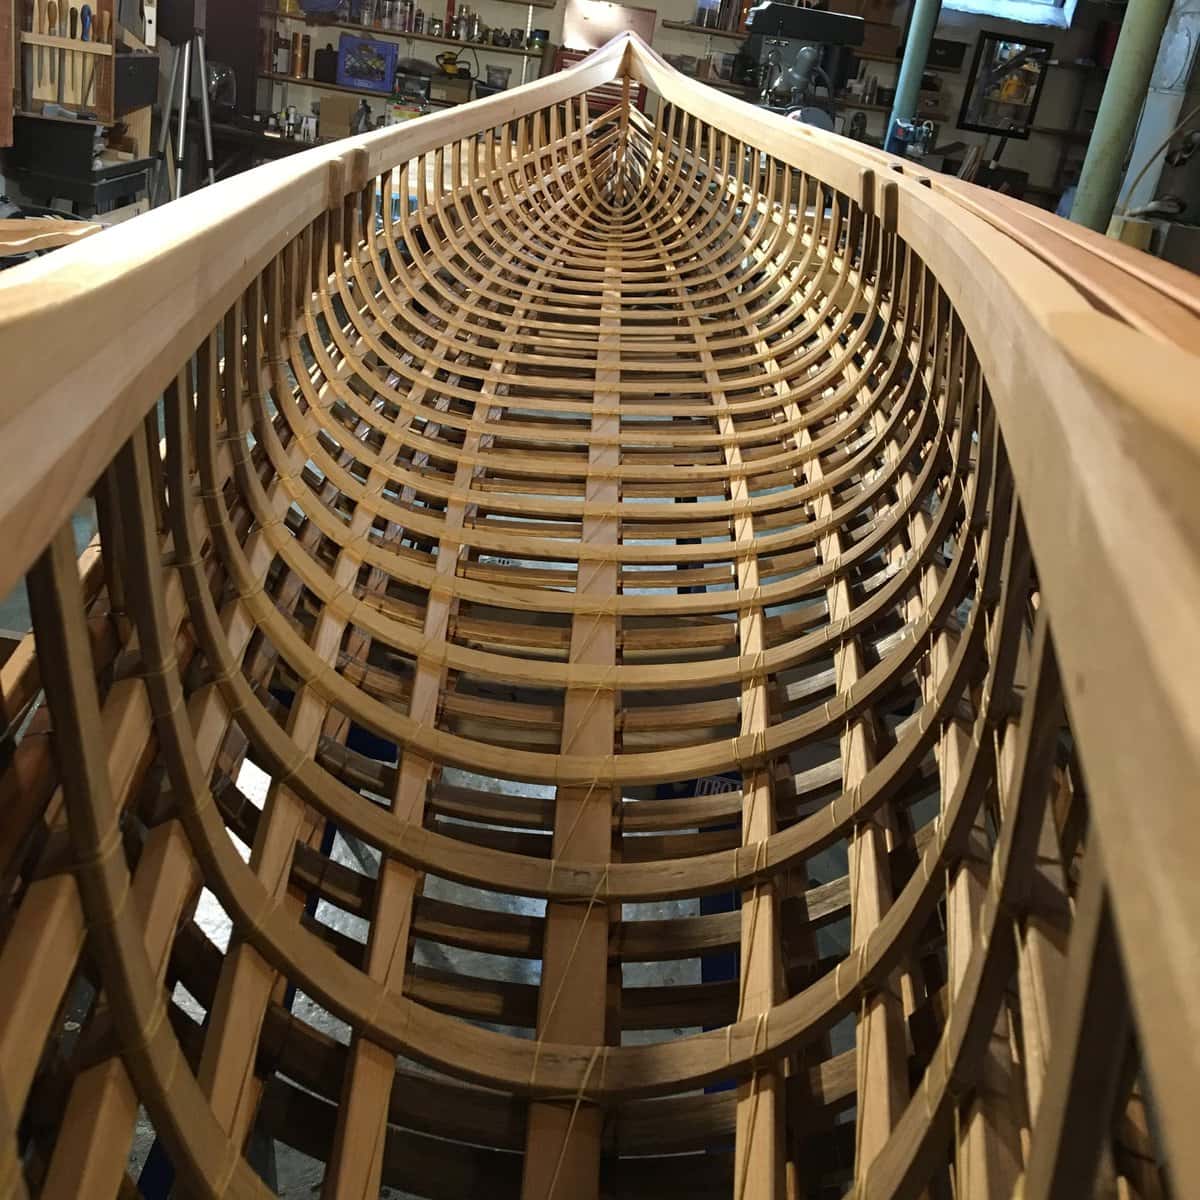
Putting together the decks goes fairly quickly. Steaming ribs and lashing stringers on one canoe takes a whole Saturday (~6-8 hrs). I ribbed and lashed the XL canoe Feb 20, ribbed and lashed the L canoe Feb 27, and finally ribbed and lashed the M canoe Mar 6th.
Here are a few pictures from my Instagram account:


Mar 7 – Mar 14:
During this time, I’ve completed more minor tasks, like installing seat-mounting blocks, sheer risers, trimming, gluing and lashing keels, etc.
— Half-Lap built-up stems —
Rather than use a wide board for the stems, I chose to build them out of two pieces, glued with a half-lap joint. This is pretty simple, provides better grain orientation, but doesn’t take as much effort as a bent-lamination. The series of photos below shows one of the stems pretty well, This particular piece of cedar has color gradations that makes the joint slightly easier to see:


Due to further requests for more info on this method of making a stem, I created a set of diagrams, and a short video on the layout and cutting of such a half-lap joint.

Video showing layout and cutting of an example half-lap joint. On much smaller sample pieces, than the normal 1×6 cedar boards I would usually use for an actual stem:
Some other miscellaneous photos of progress during this time:


— Seat Mounting Blocks —
I chose to put hickory seat mounting blocks on my XL canoe, because I thought the color blended well with the cedar. Both my daughters chose a dark wood, whose species I’m not even certain of (just had it in my miscellaneous wood bin):
— Symetry ??? —
As I’ve taken some photos, I’ve begun to notice some lack of symmetry on some of the stringers, and even that my two stems in this one boat are not quite parallel. I’m not too concerned about this….I doubt it has significant impact on performance, and will not even be noticeable once the boat is skinned.


Mar 15-17:
I’ve spent each evening cleaning up glue lines from the sheer mounting blocks, and plugging the screw holes. Honestly, this is taking quite a bit of time, but is my own fault.
First, the sheer blocks are slightly narrower than the gunwales because I cut the gunwales on the table saw at a full 3/4″ wide. However, I made the sheer blocks from a single 1×6 cedar board. For some reason these boards come at exactly 11/16″, not 3/4″, so there’s a little ledge on each side that needs planing, sanding, etc.
Second, the screw holes really don’t NEED to be filled. I’m just doing it for my own pickyness. And even at that, they had drywall screw in them, so the through hole is 1/8″, easily plugged with a 1/8″ dowel….but the countersink divot in the board is much wider. I thought of getting a plug cutter and cutting 1/4″ plugs. In hindsight, it would have been much less work, that mixing up epoxy, and filling the gaps with pure epoxy that didn’t harden flat, and I had to make a second application.
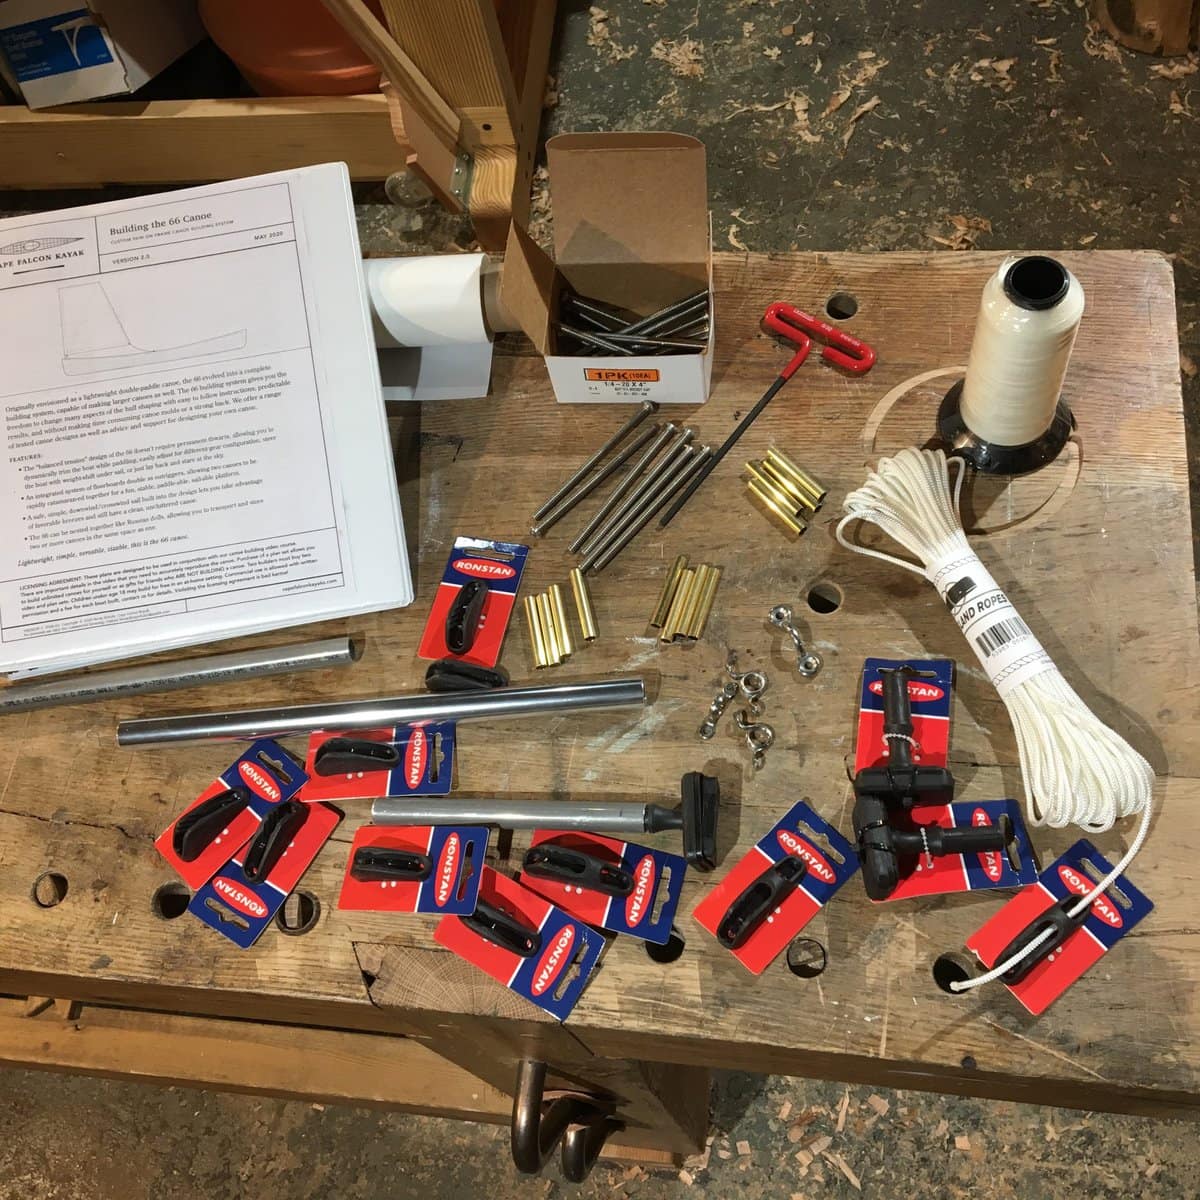
Anyway, I’ve also been ordering and collecting the parts and materials for the masts, sails, and associated hardware:


May 18-22
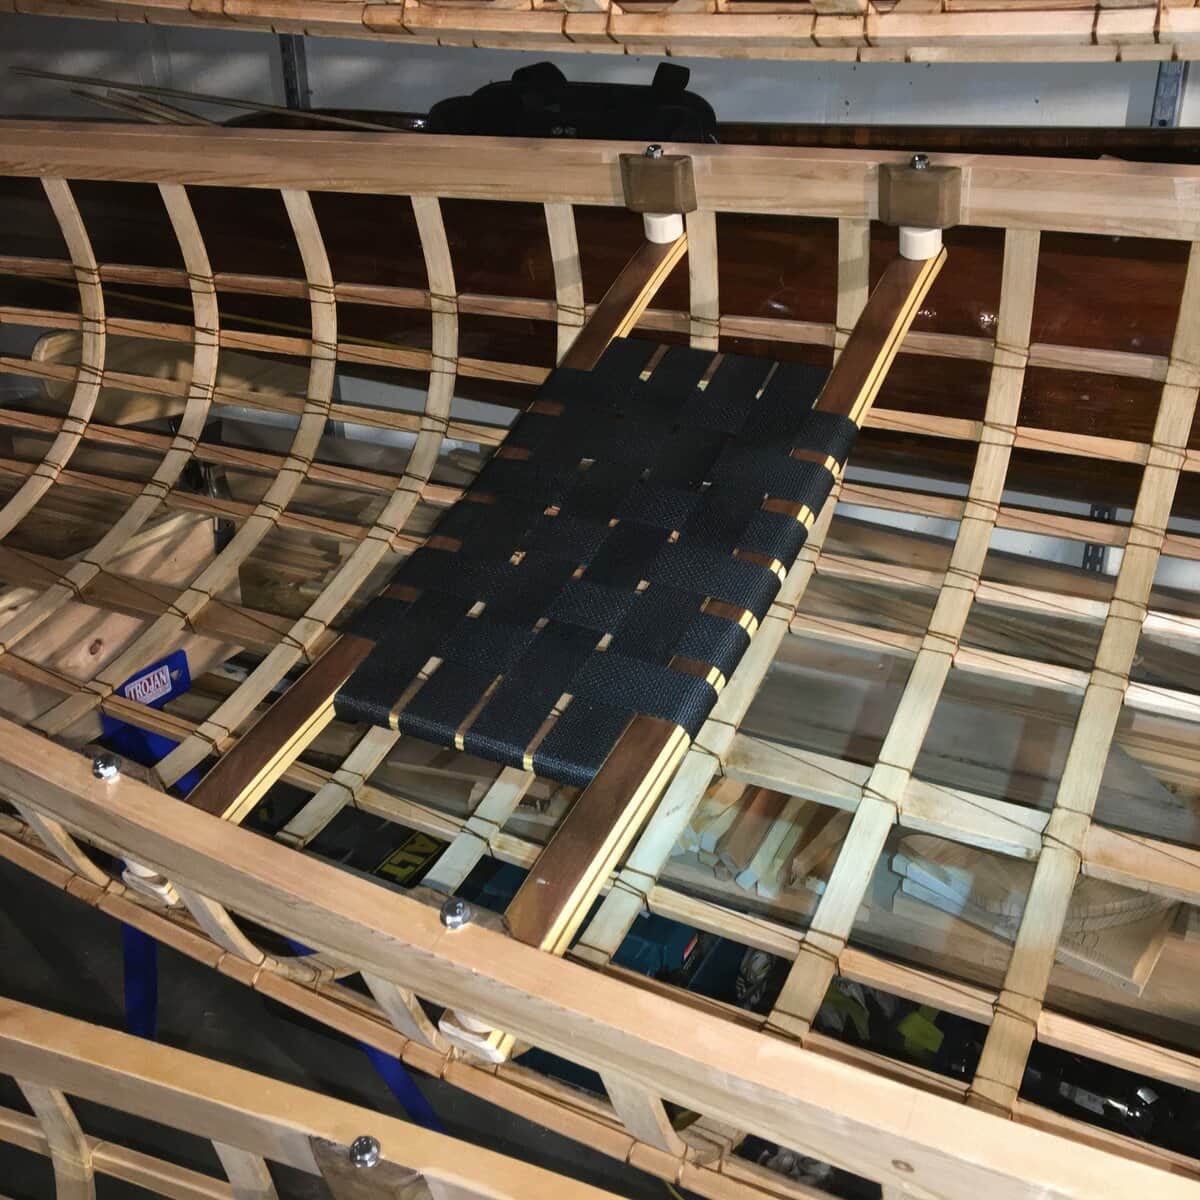
–Seat Mount modification —
So, I really, REALLY wanted to use button-head bolts for the seat mounting…however, it seems that they just don’t make partially-threaded button-head bolts. The only bolts with a solid shank and partial threads at the end are the hex-head, or socket-head cap screws. Anyway, I figured that a fully-threaded bolt would probably chew up the inside of the seat mouting holes, so I drilled them out a little larger, and epoxied in brass tubing inserts. In hindsight this is probably overkill, and I may not choose to do this on the other two. I don’t have any pics yet of the installed brass inserts, but here is the mounted seat, with 4″ long bolts, and 1 1/4″ seat-drop blocks:

— Sheer Riser-Blocks —
I shaped the sheer riser blocks with a block plane, spokeshave and sandpaper. It really helped to brace the canoe against a wall or workbench, to keep it from sliding away from me.
I made my rub-strips 3/4″ wide, instead of 1/2″ wide. In some photos I saw Brian had a dark brown 66Canoe with a bright white ash rub strip. I just liked the high-contrast and thought I would maximize that just a bit. It wasn’t until after I cut and rounded the rub-strips that I realized that it might prove difficult to bend those rub strips up the sharper curve of the sheer blocks.
So I clamped them to the gunwales, and used the curve of the rub strip to mark the sheer blocks, and shaved it down to that. Below are photos of an unshaped sheer-block, marking the curve with the rub-strip, and a final shaped sheer-block:


— Widened Stringer —
At one point Brian suggested I might want to widen one set of stringers to add a little more secondary stability. This was because I had already bent all the ribs.
I decided to give this a try, and removed the second stringer down from the gunwale, and laminated on a 5 foot section of cedar that was tapered in thickness toward the ends. The resulting maximum cross section of this stringer was now about 5/8″ x 5/8″, instead of the usual 7/16″ x 5/8″.


The finished XL frame, ready for oil:


May 23-26
— Finalize Frames & Oiling —
This past weekend, I finished up small details and oiled all three frames.
This consisted of finishing the sheer block shaping, adding the mast mounts, fixing a wobbly stringer and my bow shaping and sanding the top and inside gunwale surfaces.
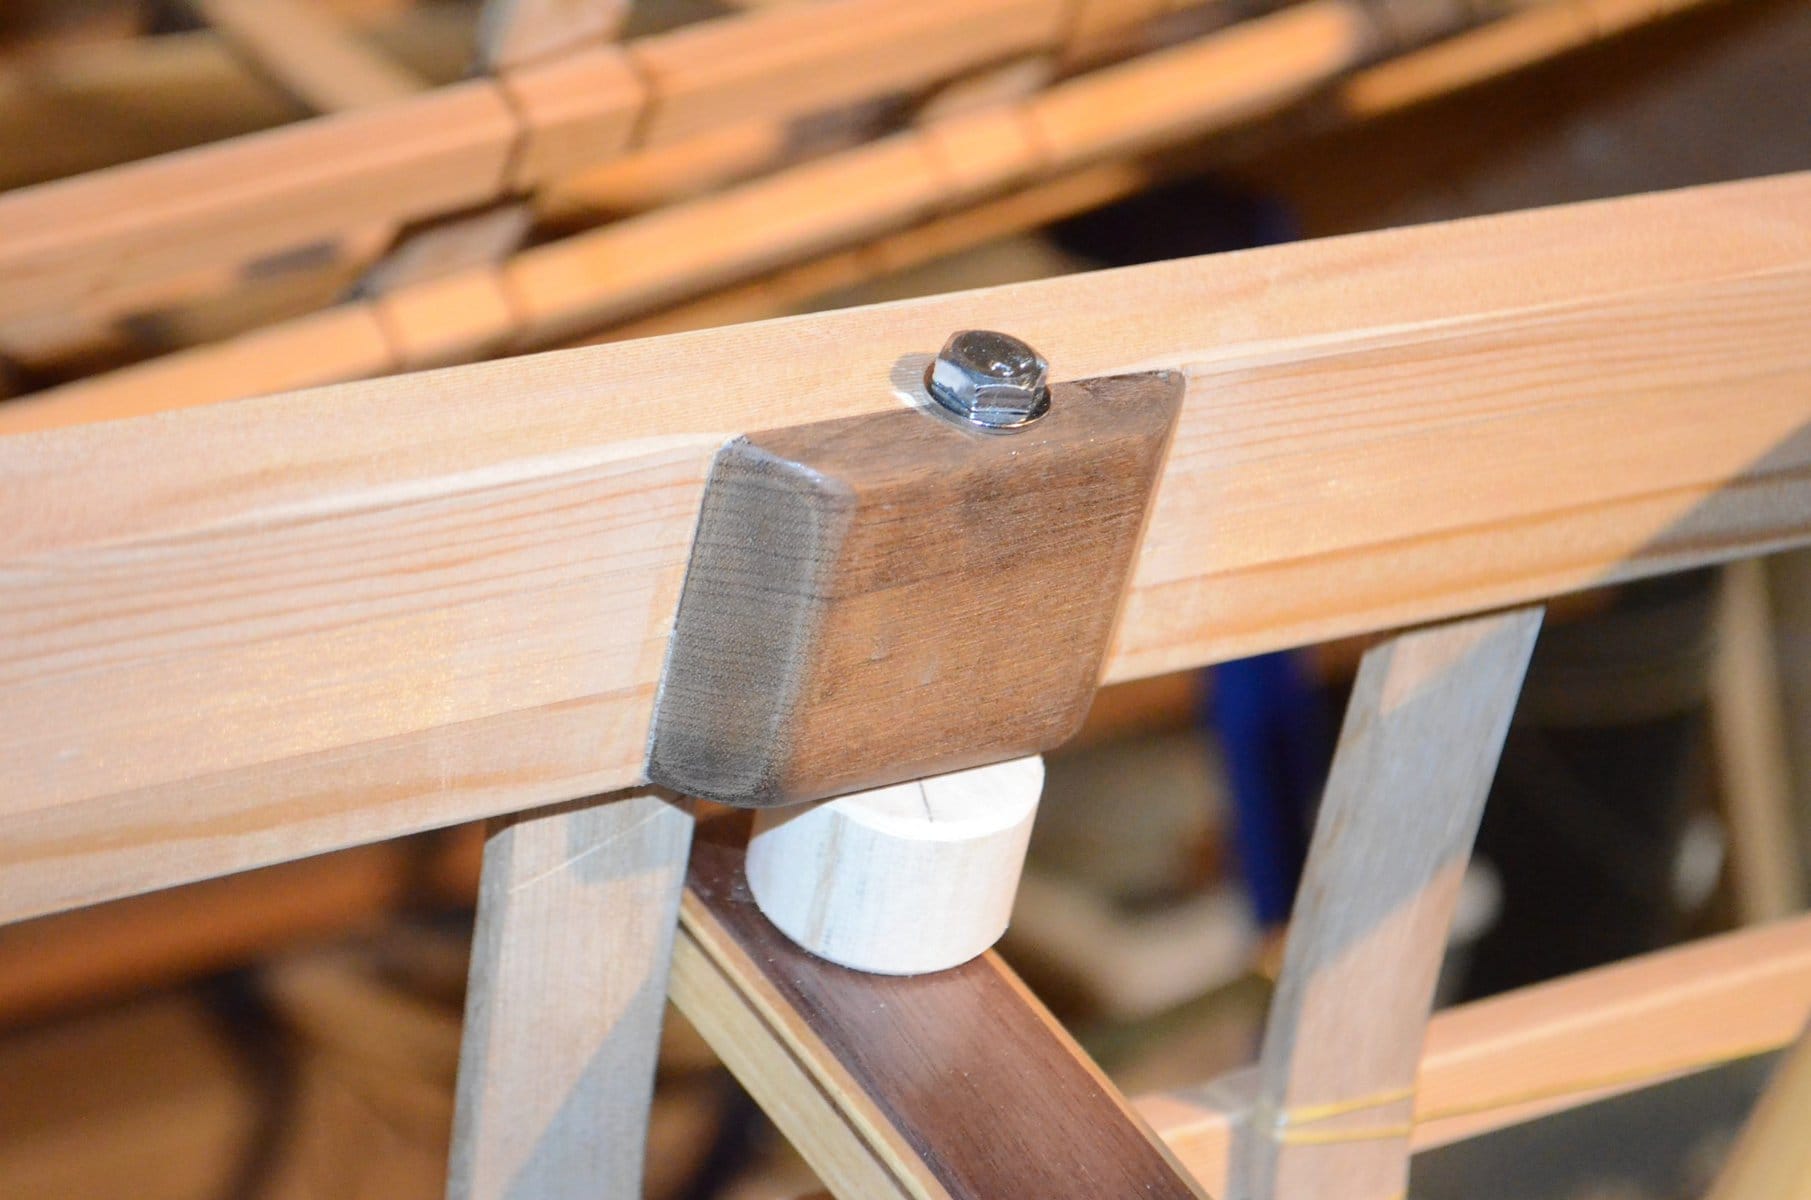
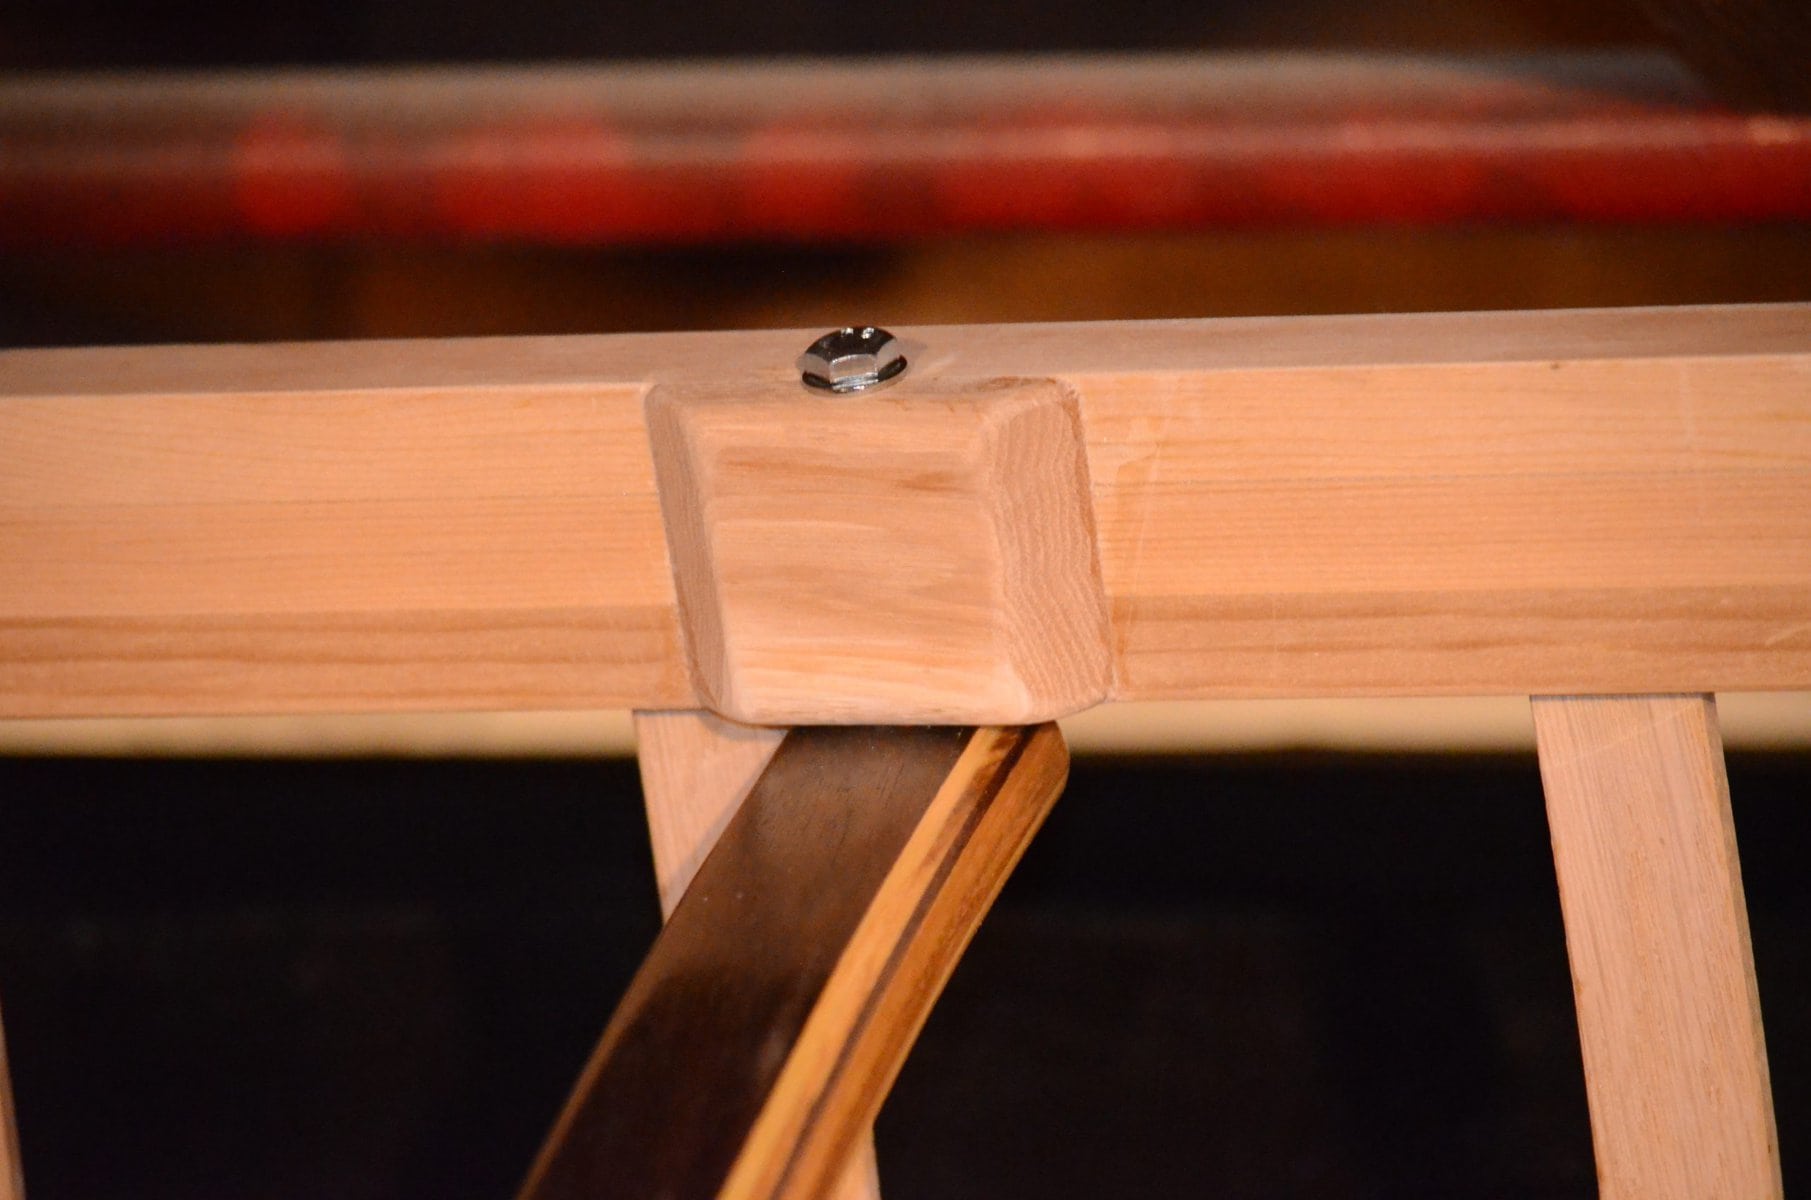
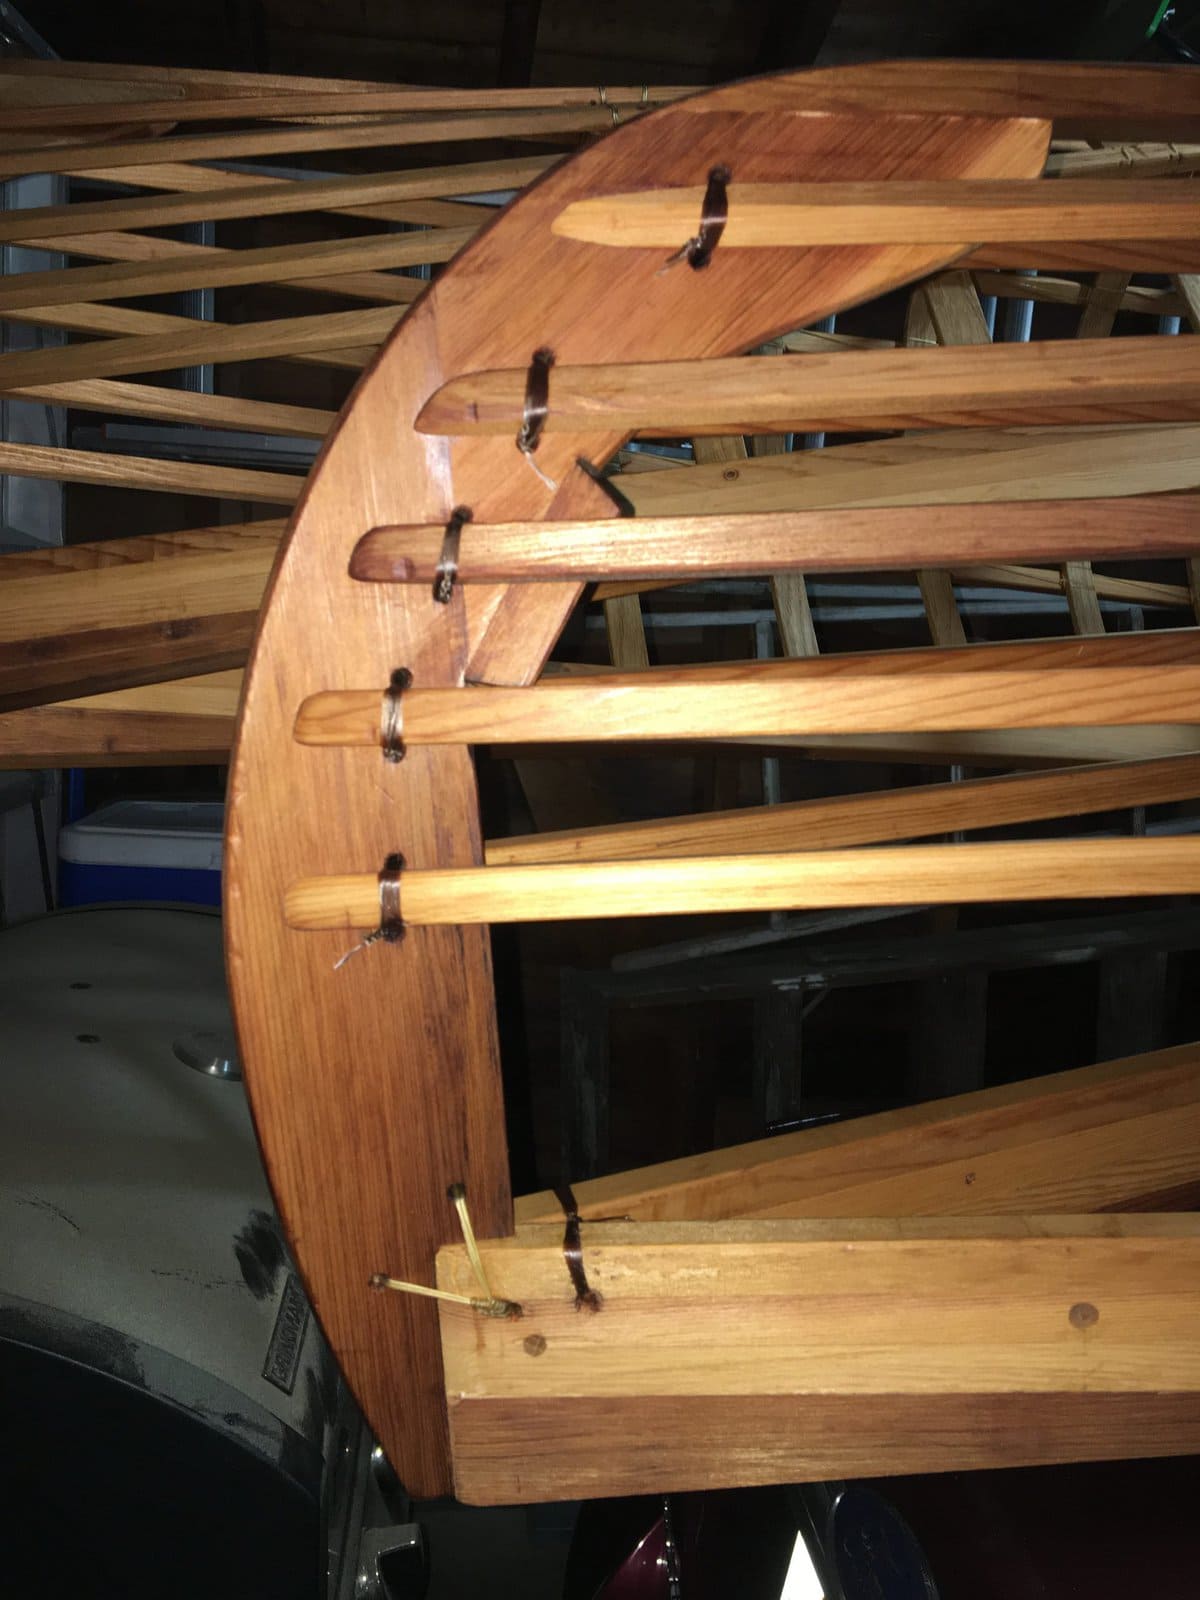
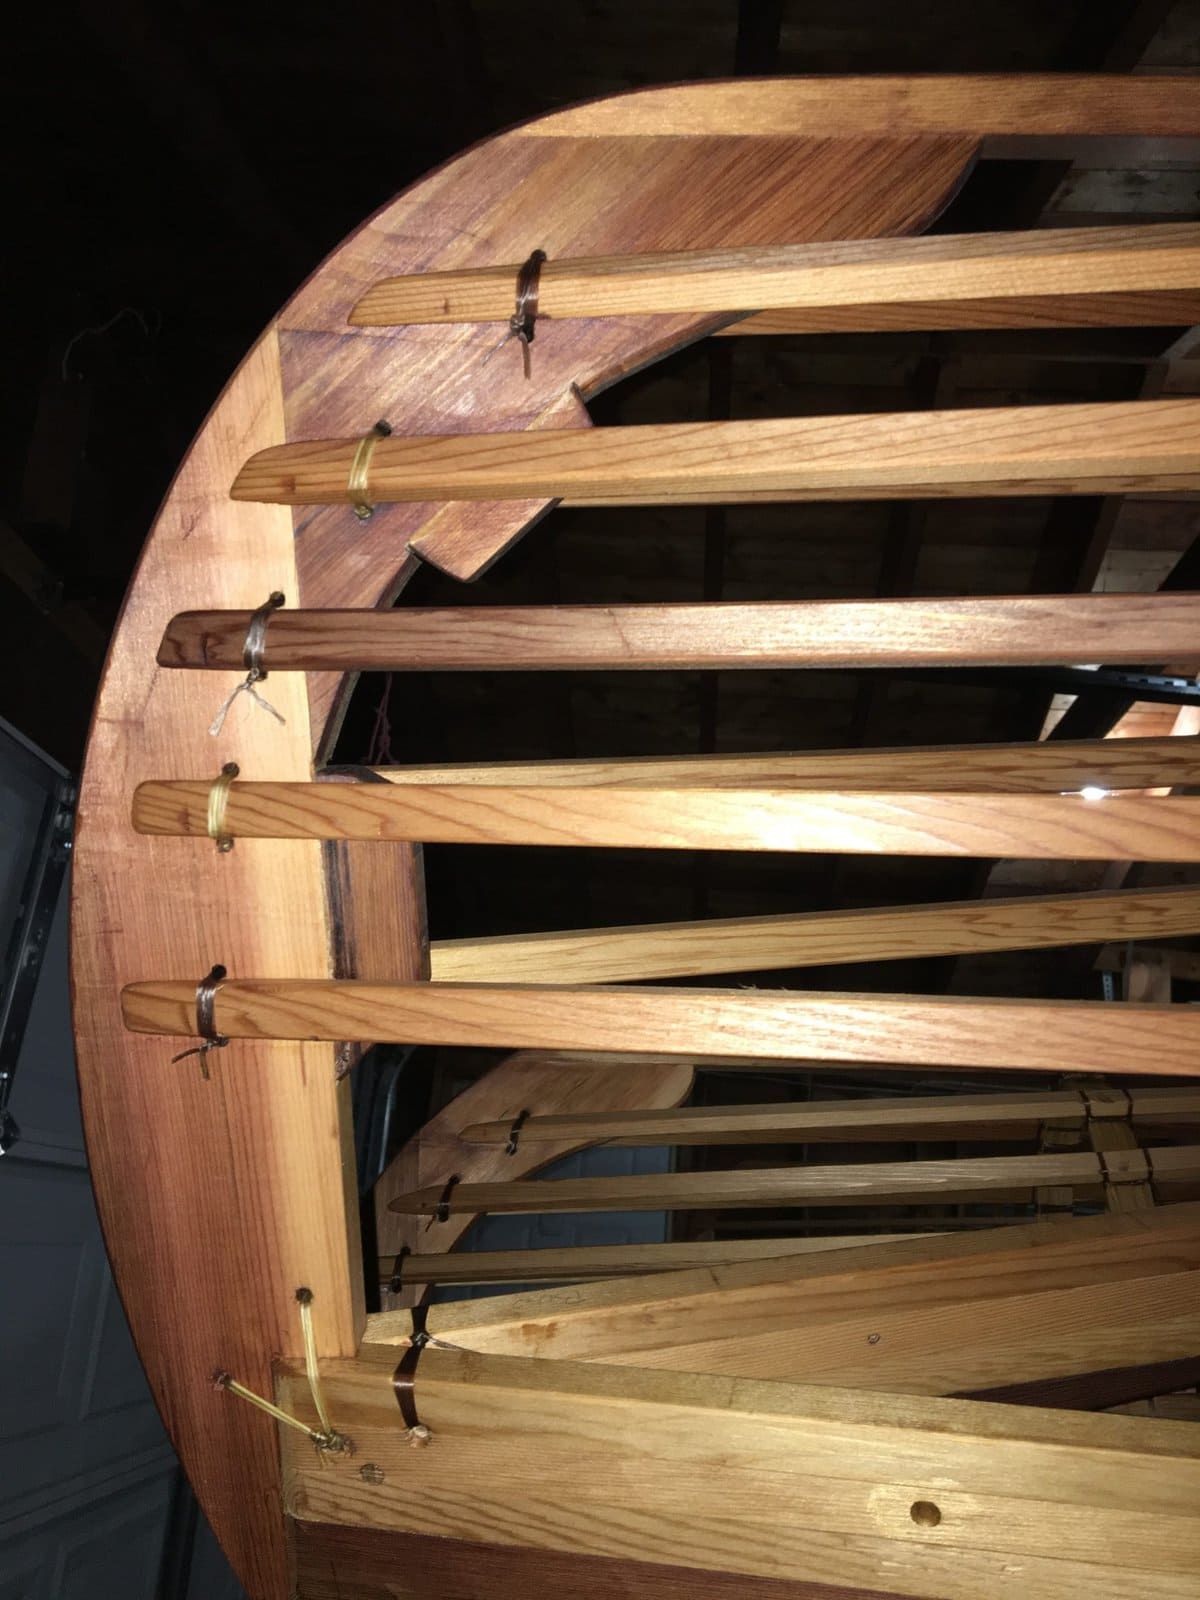
–Mast Mounts–
It wasn’t immediately obvious in the plans or videos where the mast mounts go with recurved stems. I found one video where a brief mention was made that on recurve stems the mounts go lower. I wish I would have caught this earlier, and not curved the inside of the stems. It would have made the mast mounts easier. Instead, in order to allow the masts to end up nicely vertical, I had to cut the lashing on a stringer, slightly modify the stem, and glue in a mounting block. It was fairly easy and quick work (compared to oiling and wiping!)
Here are some poor pictures of the mounts. I always work on the XL canoe first (mine), so I can learn from any mistakes and do better on my girls’ canoes. I first mounted it on the flat vertical part, but then revisited the videos and caught the brief mention of the mount being lower. I could have cut the first one off, but figured it might be useful for something later on (sorry, I’ll rotate these properly later):

–Bow shaping–
I had originally thought of shaping both bow and stern symmetrically, and using the approach Brian recommends for the stern of pack canoes at the bow as well. That is, have a more abrupt transition between keel and stem. But after consulting with Brian, he convinced me that the bow really needs a continuously curved shape. So I made that modification. Now that I think about it (after oiling)….I may really want to do that in the stern as well. It’s still not too late, I guess.
–Sanding & Oiling–
I sanded the top and inside surfaces of the gunwales, and made sure the inside corner was nice and round and smooth.
Oiling is a pain…I used Corey Freedman’s Pine Tar Boat Sauce, but it is tedious, messy and smelly, even with all the basement windows open. It was too cold to do it outside. Wiping the frames is equally tedious. It took between 3 – 4 hrs for each frame.
On Monday, the weather was warmer, and I let them sit outside in the sun to dry further. They’ve got a week to dry, while I prep the rub rails, and prepare for skinning next weekend.


May 27 – Apr 3
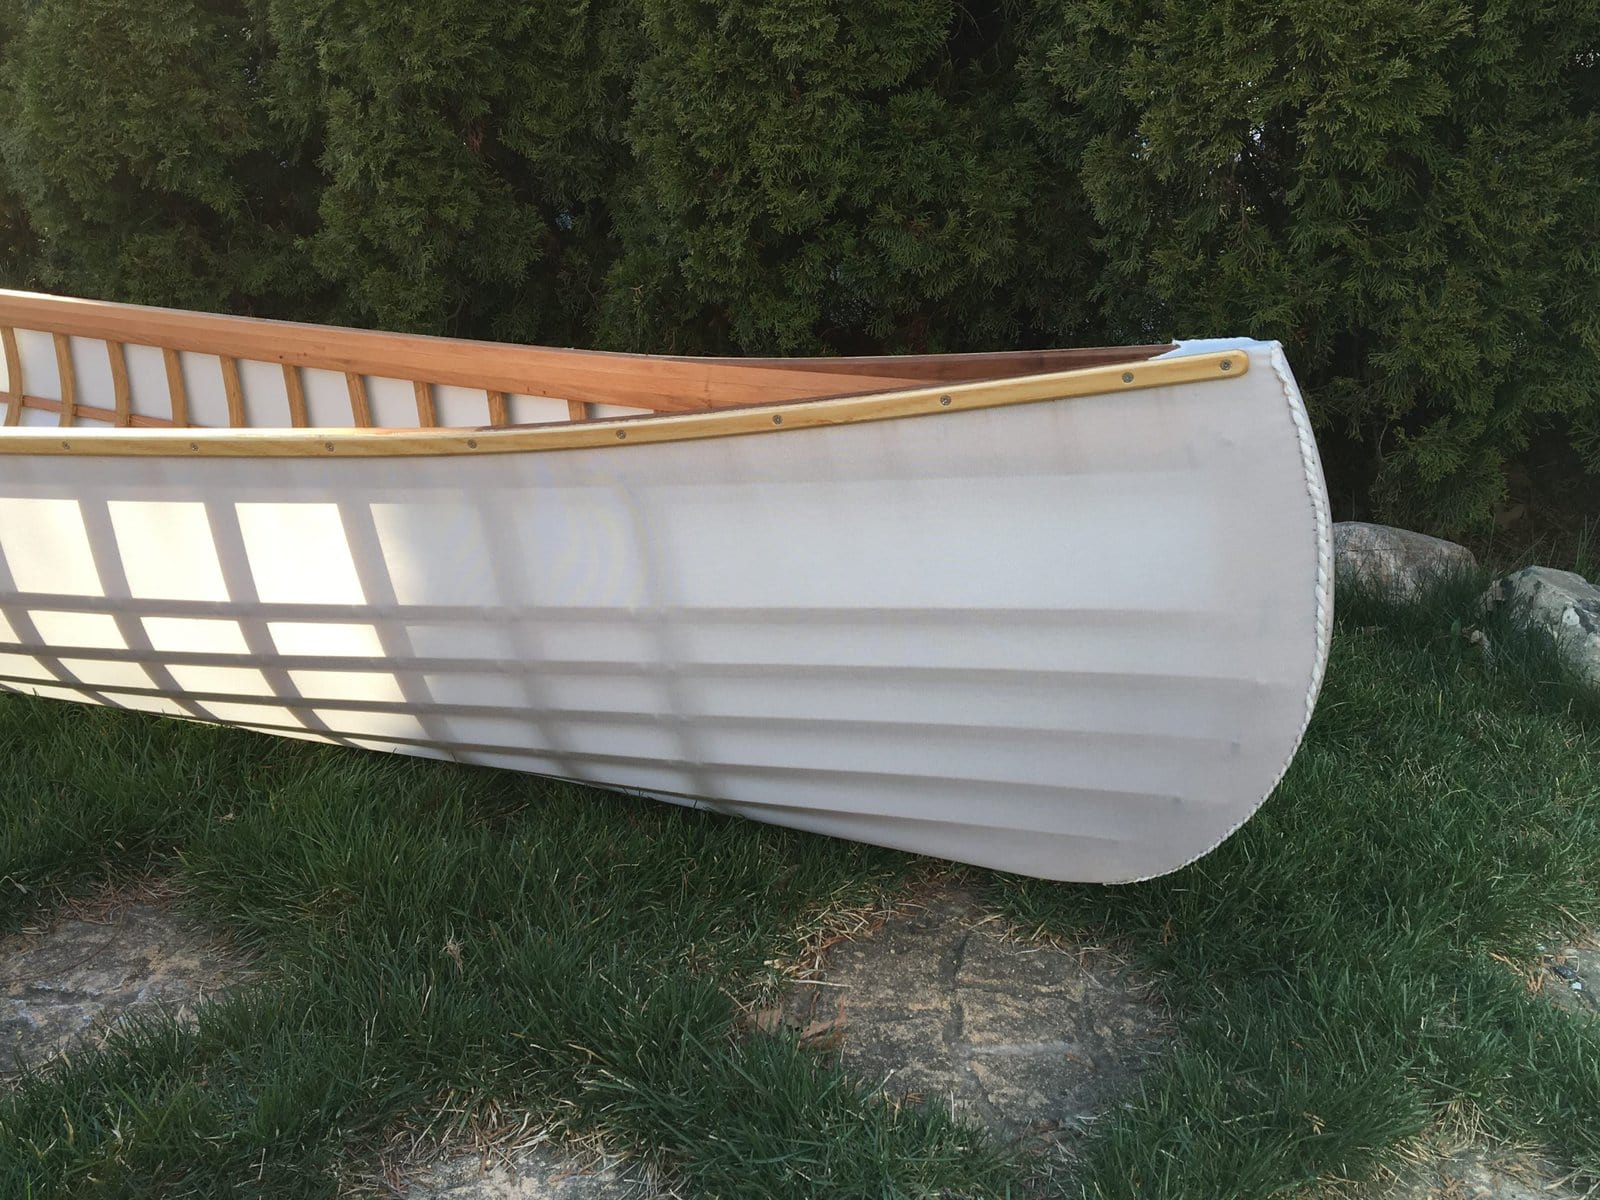
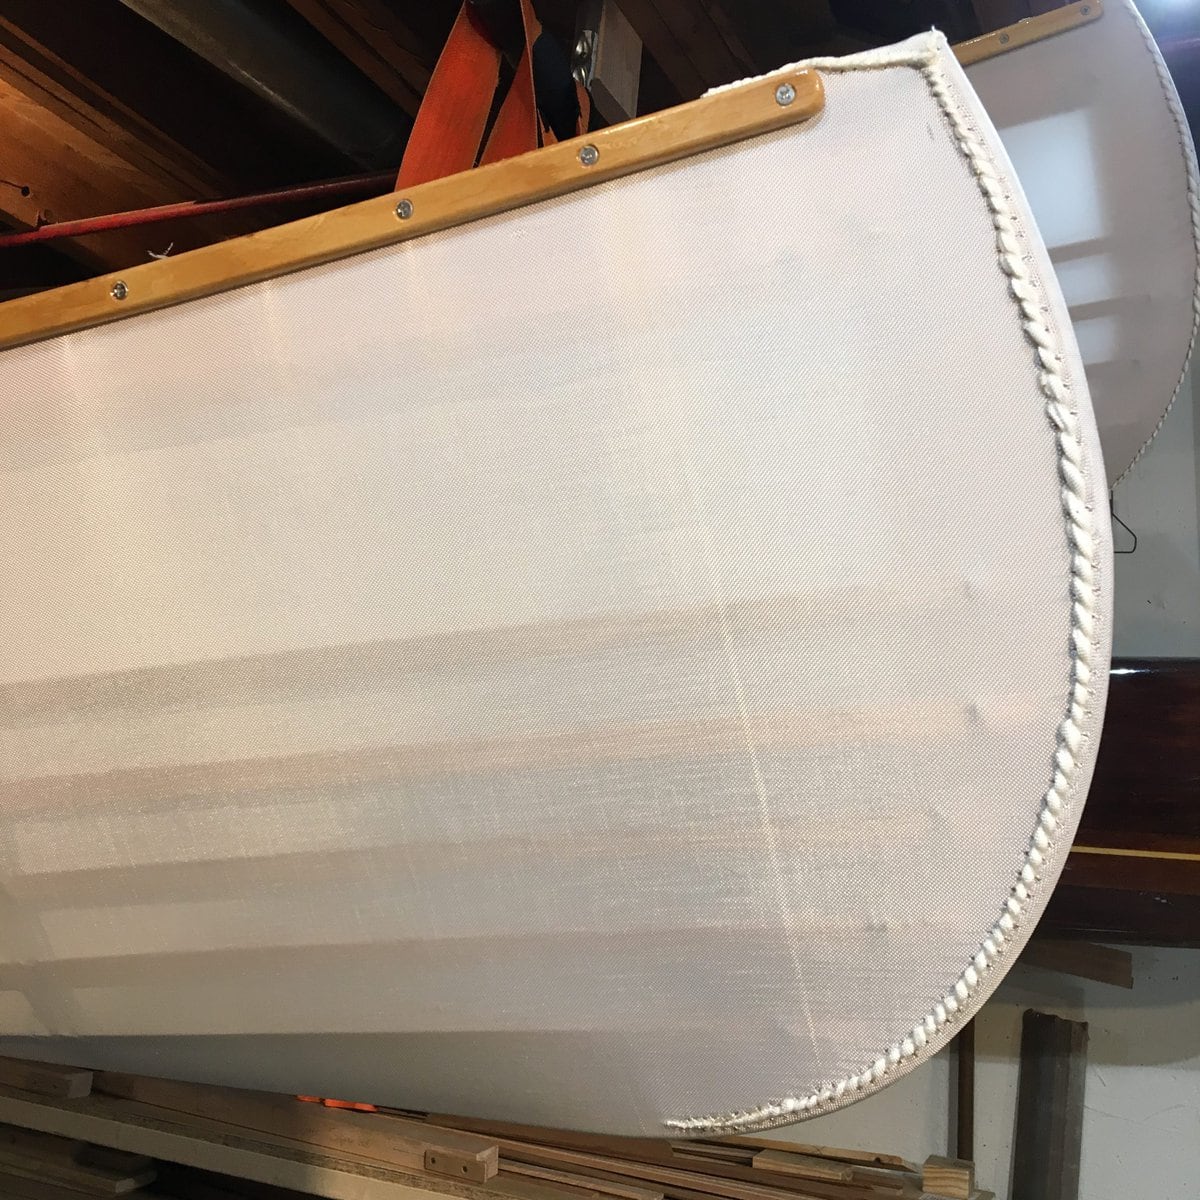
This week, I spent sanding and varnishing the rub rails multiple times in preparation for skinning. Because I’ve also built one skin-on-frame kayak in the past, I knew I could use some practice sewing to get a nice aesthetically pleasing seam. So I took some of the extra fabric I still had from my kayak build like 10 years ago, and mocked up a stem covering with it. I practiced cutting the fabric with the hot-cutter, and sewing to get the pleasing, pillowy, even seam….with Brian right next to me!


My first one was not so great, very small, tight seam in places, uneven width, etc……

So in the next one, I gave myself a little extra fabric. I actually cut the fabric with varying overhangs along the stem. First the 1/4″ Brian recommends, then 3/8″, then 1/2″. I ultimately went with about 3/8″ overhang.

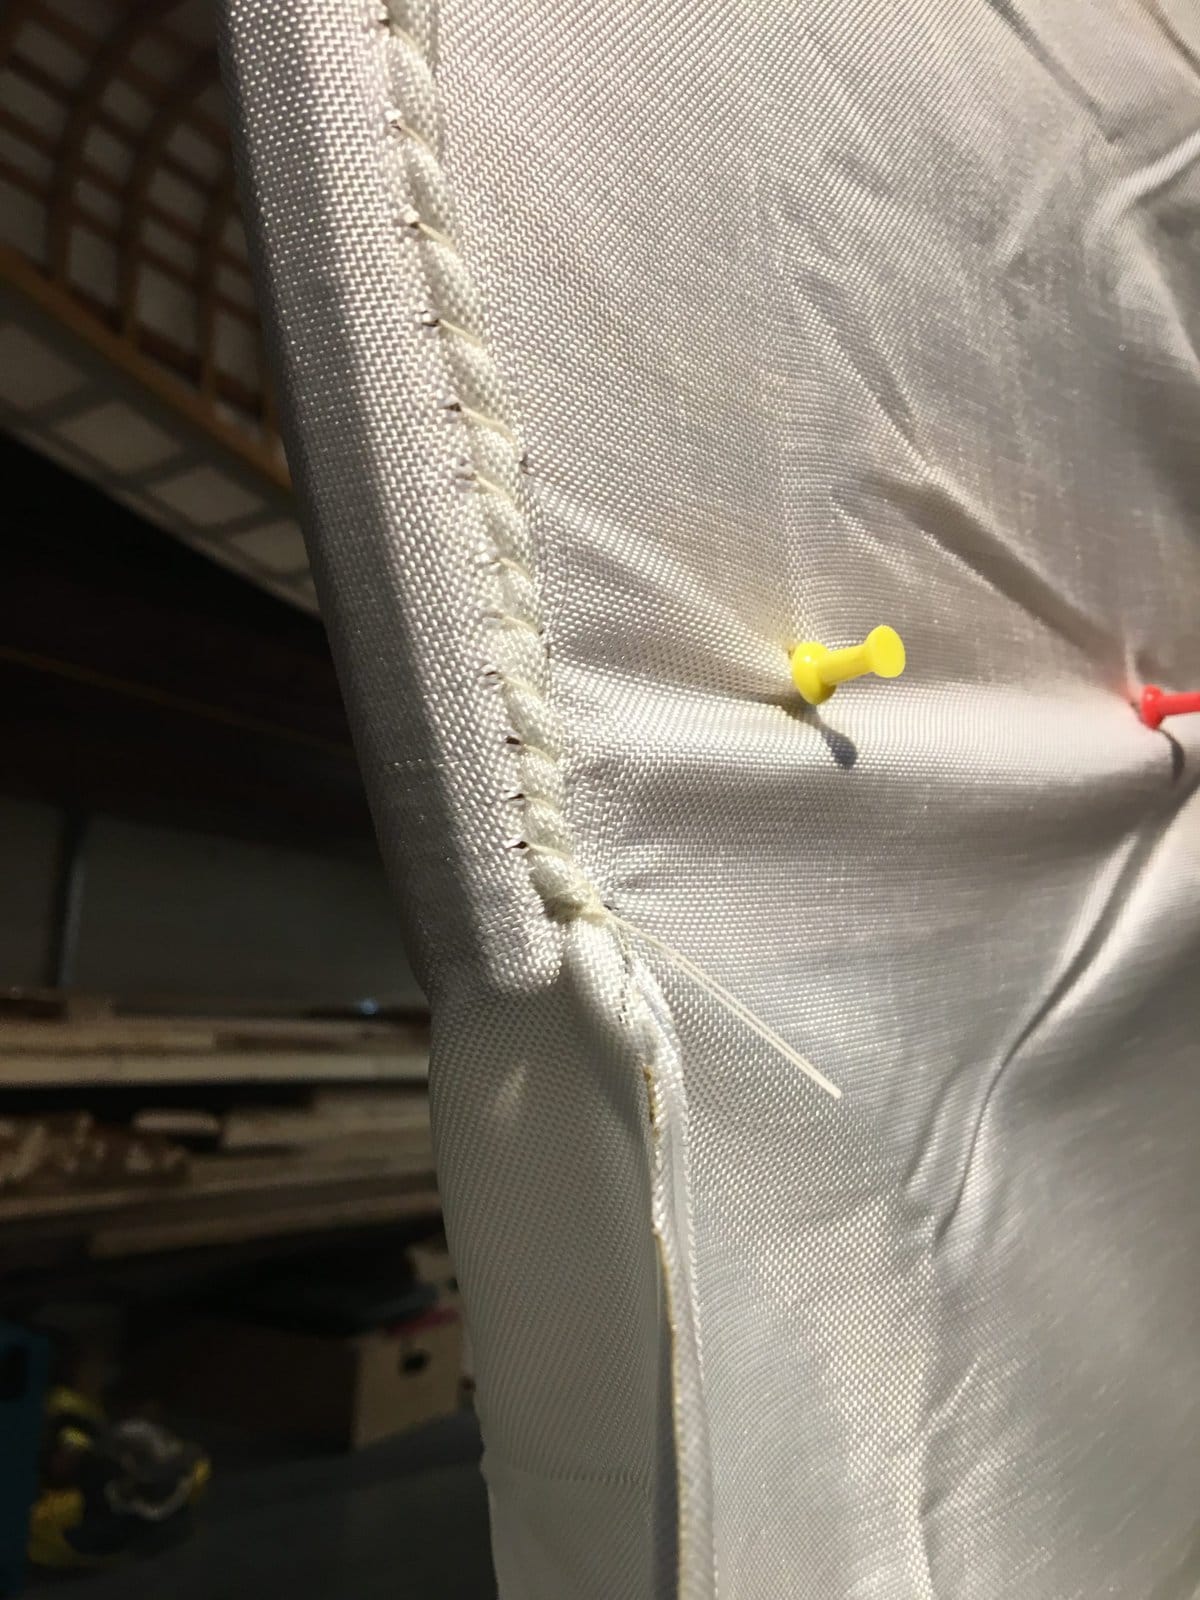
I also noticed, while sewing up the first practice end, that the fabric would tug against all of the pins along the edge of the stem, and make little ‘creases’ there. So, instead, I chose to pin the fabric along the keel, and along the gunwales, as shown below:

This allowed the seam to pull evenly all along the stem, and didn’t cause any creases or ‘bulges’ of fabric.
I stopped short of the tip of the stem by 1/2″, as Brian recommends, and did shift the skin 2.5″ forward when sewing up the other end. I don’t know if it was my pinning and sewing method, or the fact that I’m using recurved stems, but when I went to stretch the fabric, it was VERY tight. I could not get the second seam pulled all the way to the tip of the stem. I ended up pinning it where it was and finished sewing the seam. In the end, it turned out all right. Here are the two ends after finishing the rest of the skinning process (sorry about picture quality….it’s late, and I should take better pics with my SLR and better lighting):


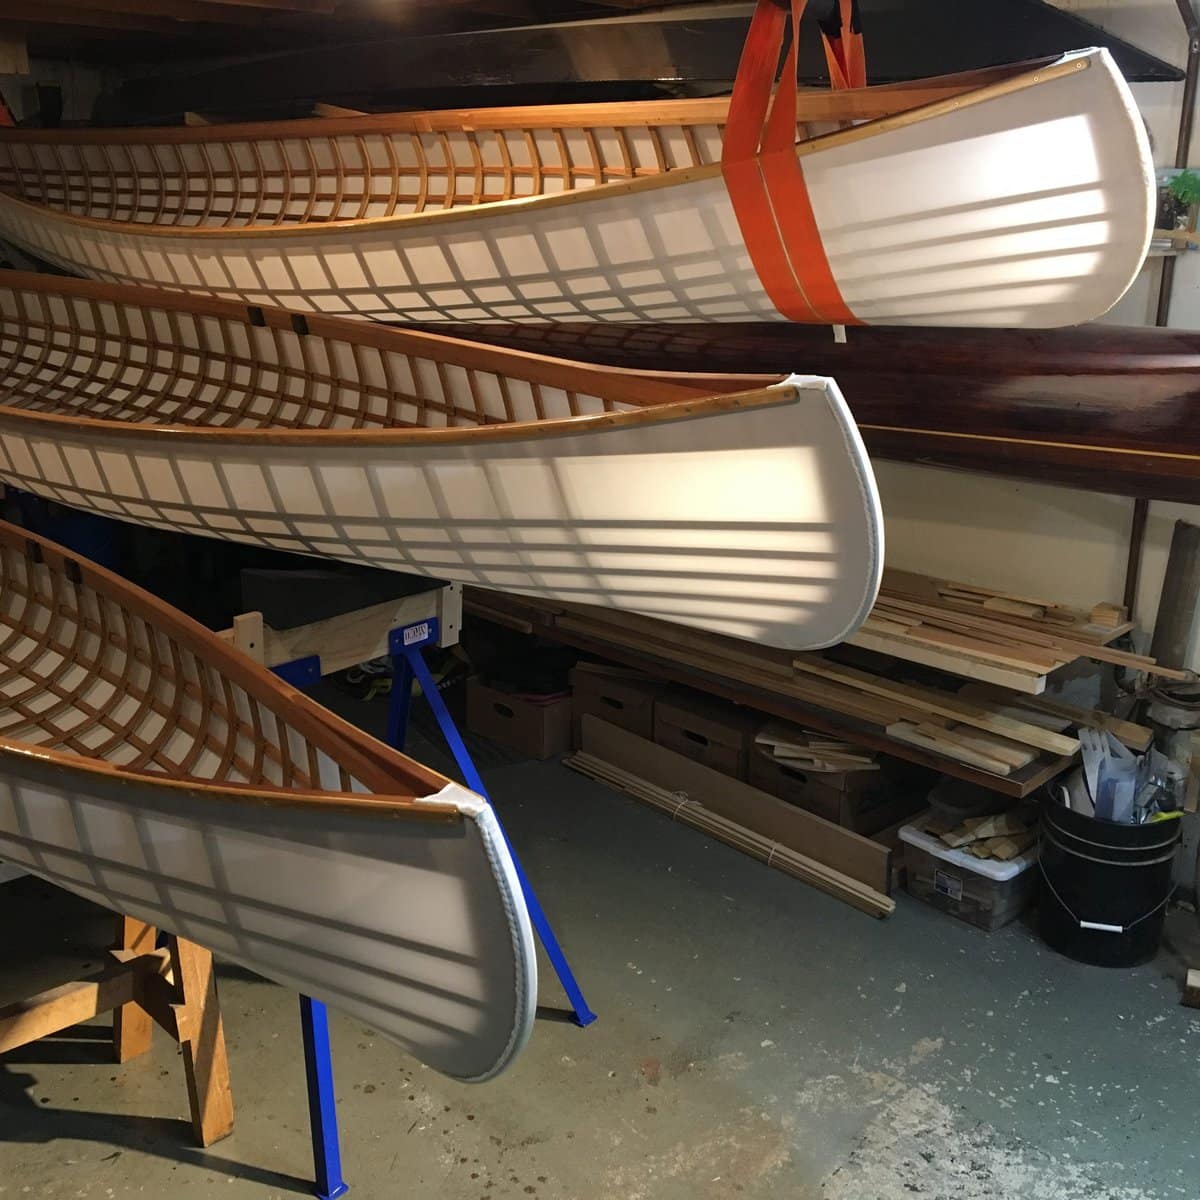
Here’s the end result of the first boat being skinned:


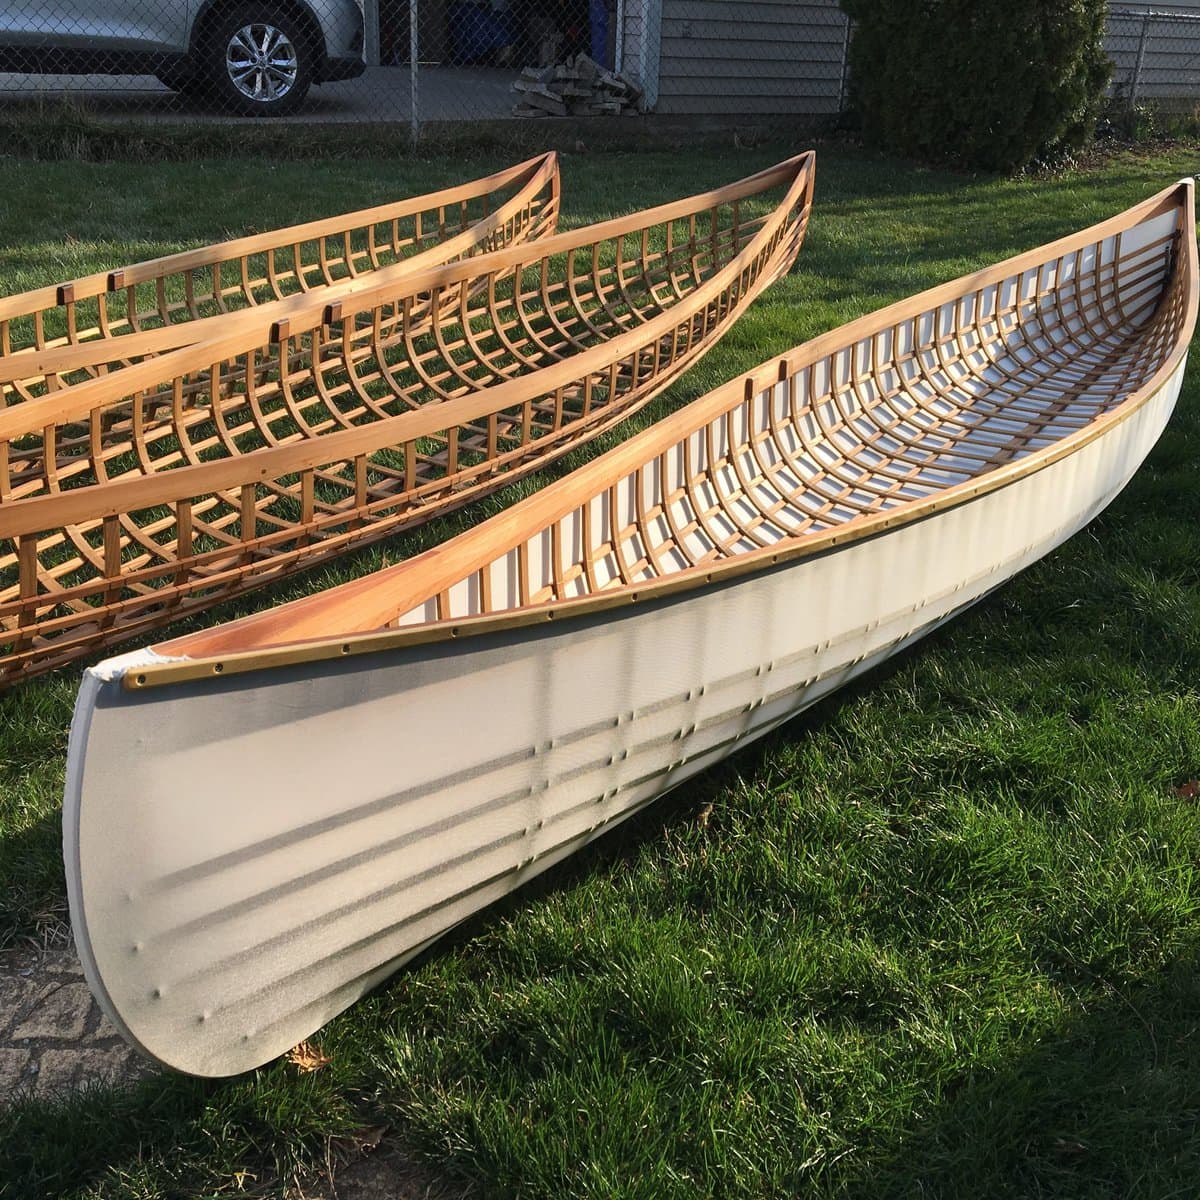


Apr 5th – Skin TWO canoes
I had off work today as a holiday, and set out to get the other two canoes skinned, which I did.
I also made a few really cool time lapse videos of the process.
–Layout of fabric, and sew-up of one end —
— Sewing the other end —
— Soaking the fabric, stretch and staple–
— Clamping and screwing rub rails —
Here are a few still shots I captured today:


Apr 6-7
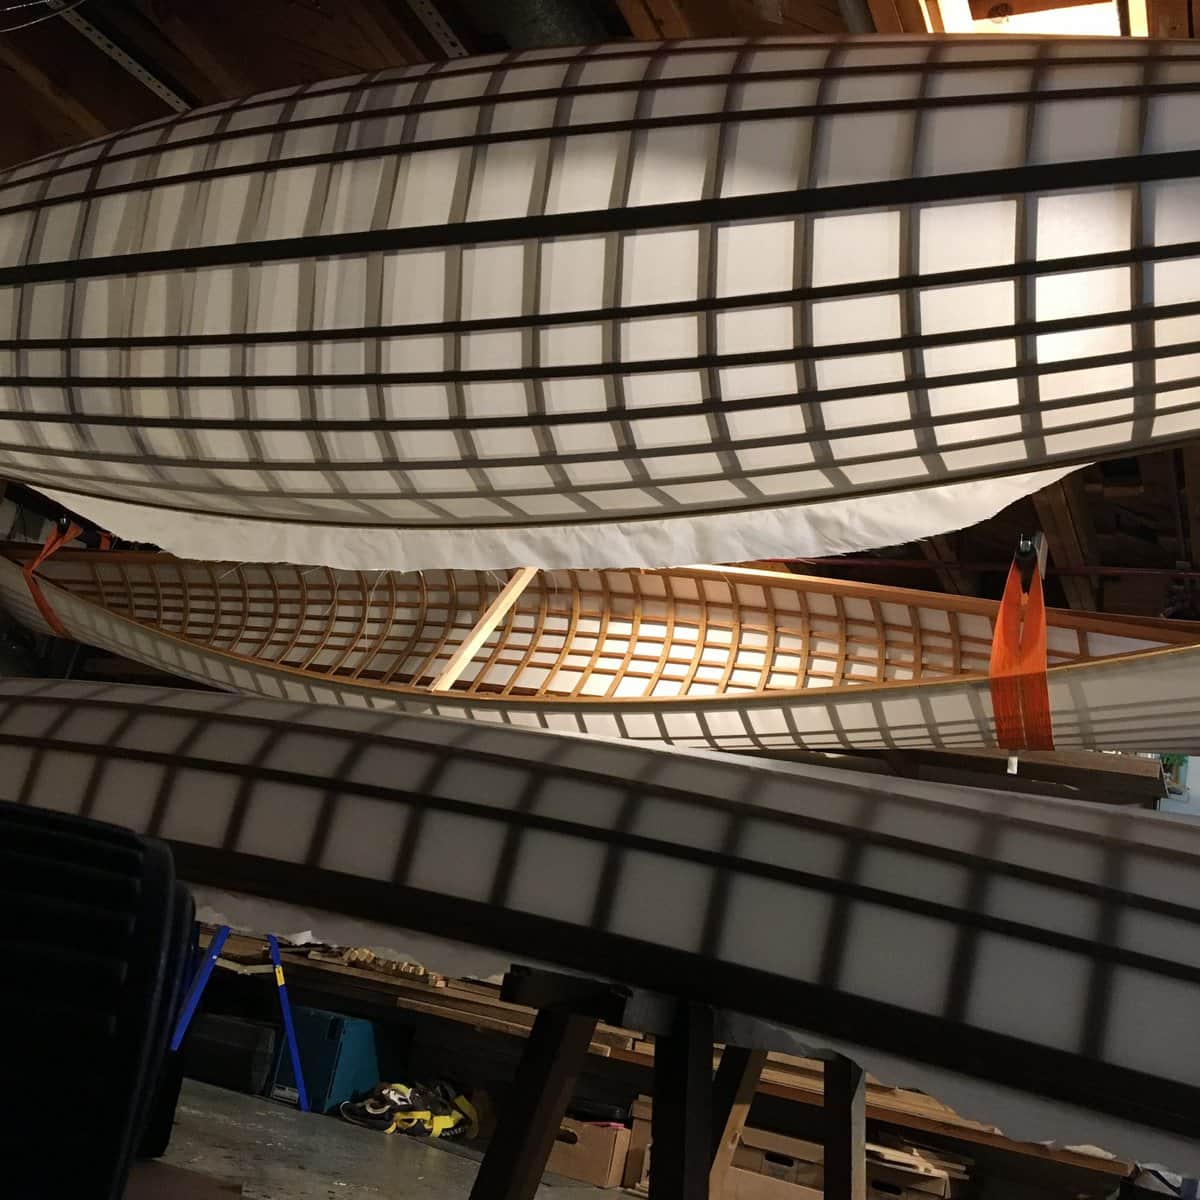
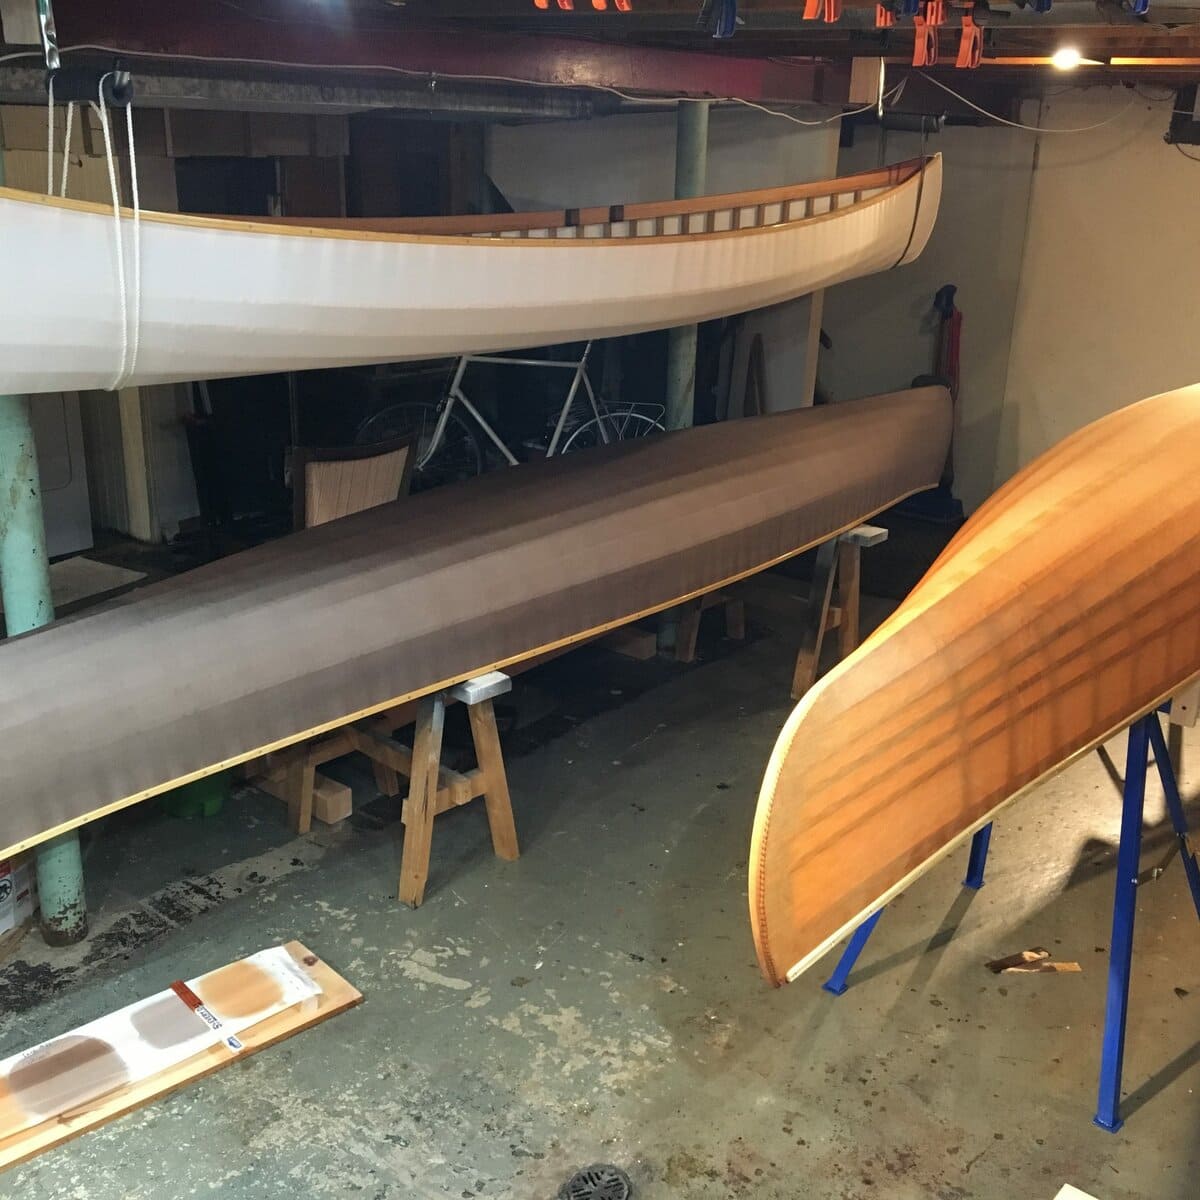
All I did this day was trim off the fabric above the rub rails and sew up the tips on the M & L canoes…take a bunch of pictures, and weigh the canoes.


Here are the weights of the three canoes empty (no seats), and with the skin, but without any coating yet:
Medium canoe (13′ 8″ x 27″): 22.7 lbs
Large canoe (14′ 8″ x 29″): 25.5 lbs
XLarge canoe (15′ 8″ x 31″): 27.9 lbs
Apr 12-15
This week, I dyed two of the canoes. I wanted a ‘brown’ one, my older daughter wanted Brian’s Chestnut+Russet, which she insisted was ‘pink’, and my youngest daughter wanted to keep hers white.
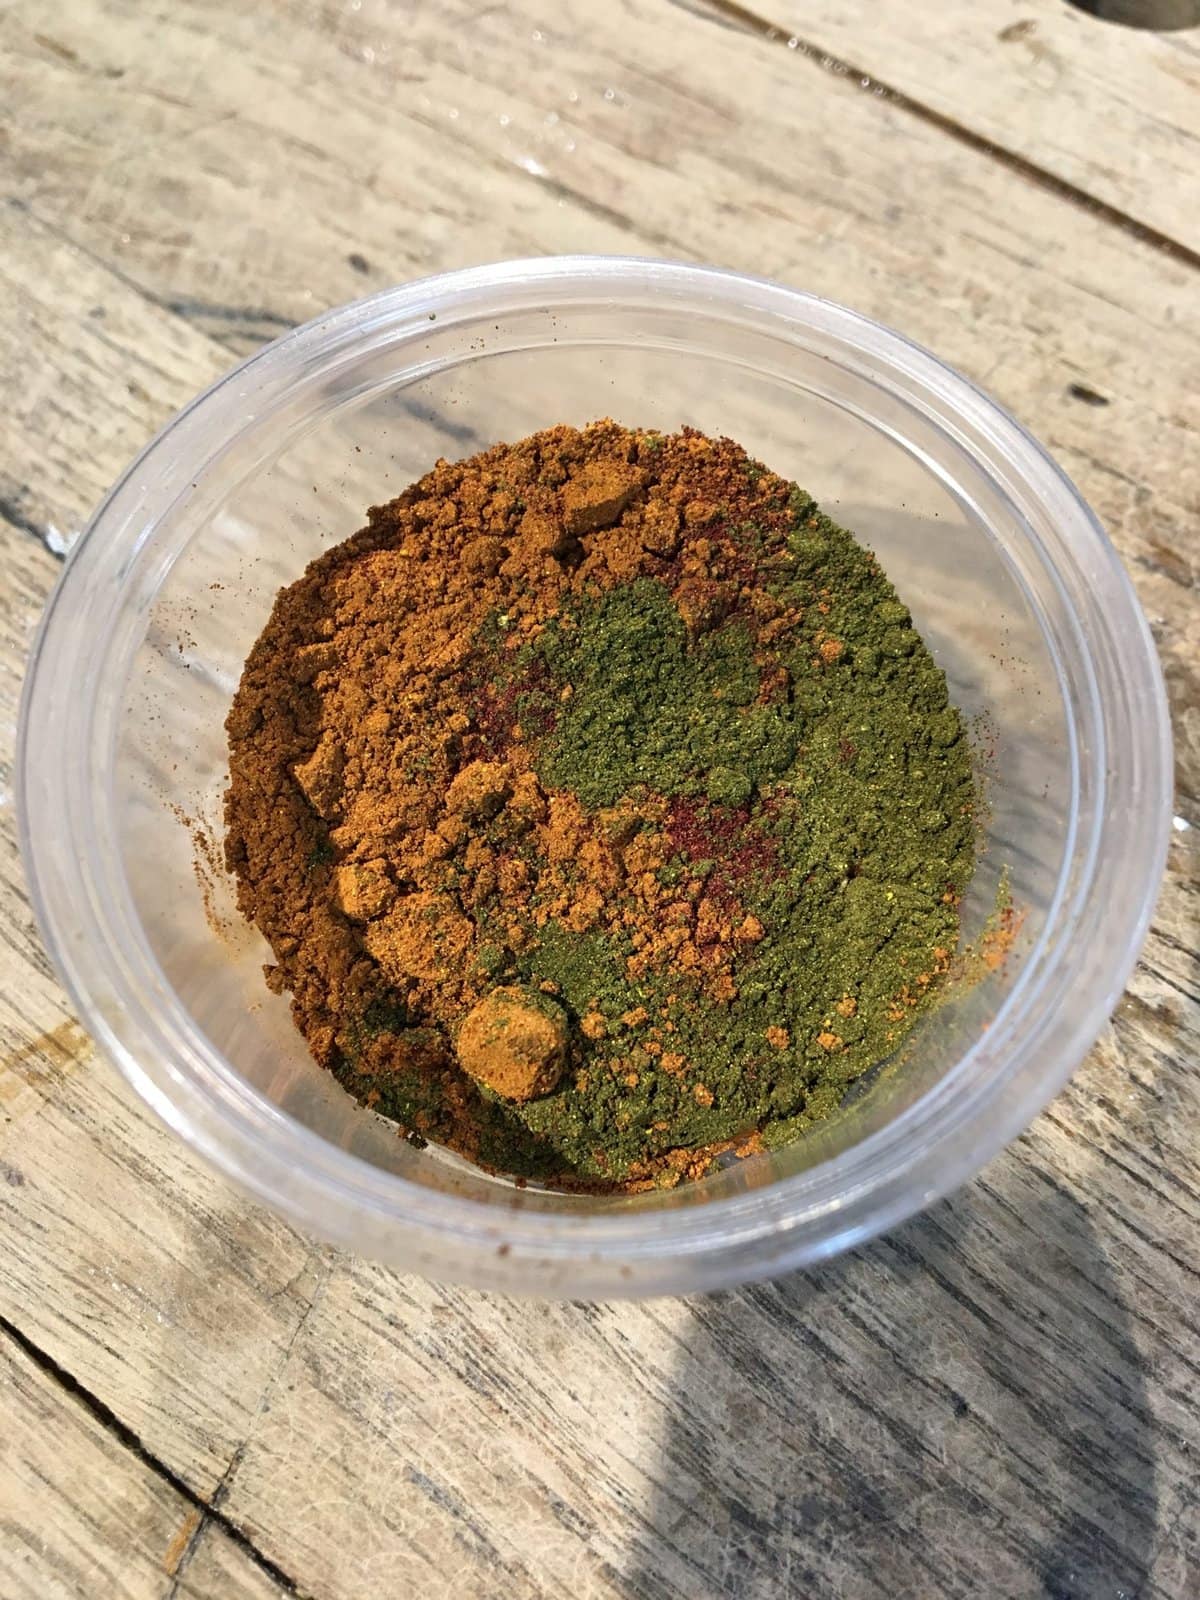
Not knowing exactly what colors we would end up choosing, I actually purchased 1/2 oz jars of Brian’s 4 recommended ‘primary’ colors: Aztec Gold, Brown, Chestnut & Russet.
On Tue and Wed, I made a series of test swatches, in exactly 1/8th proportions of Brian’s recommended recipe.

After making the test colors, I chose what Brian calls “Chocolate”, and my oldest daughter decided she wanted the color Brian calls “Sweet Potato”:
To keep the dye as hot as possible throughout the process, I made a “jug cozy” out of a towel and duct tape, and ‘preheated’ the jug with boiling water while I prepared the actual dye. I was really surprised that the jug was putting out steam for over 10 minutes while the vinegar solution was being prepared.


Apr 16-30
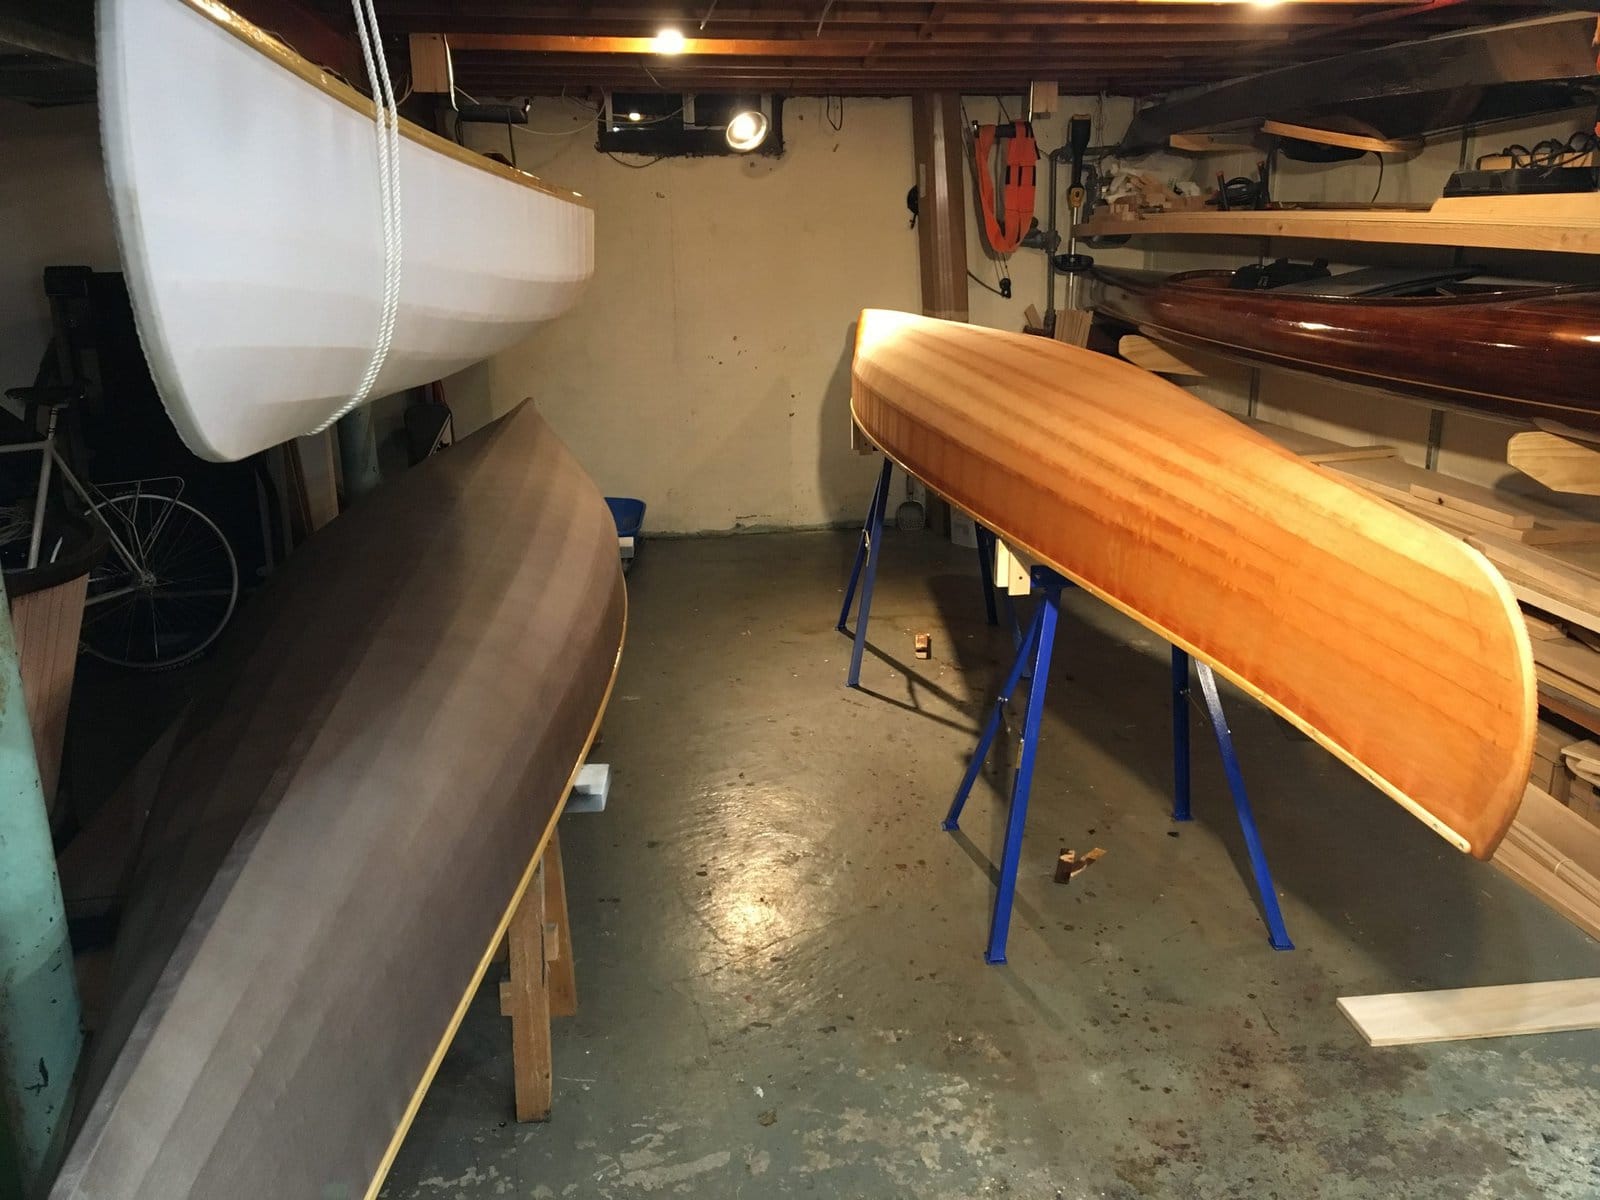
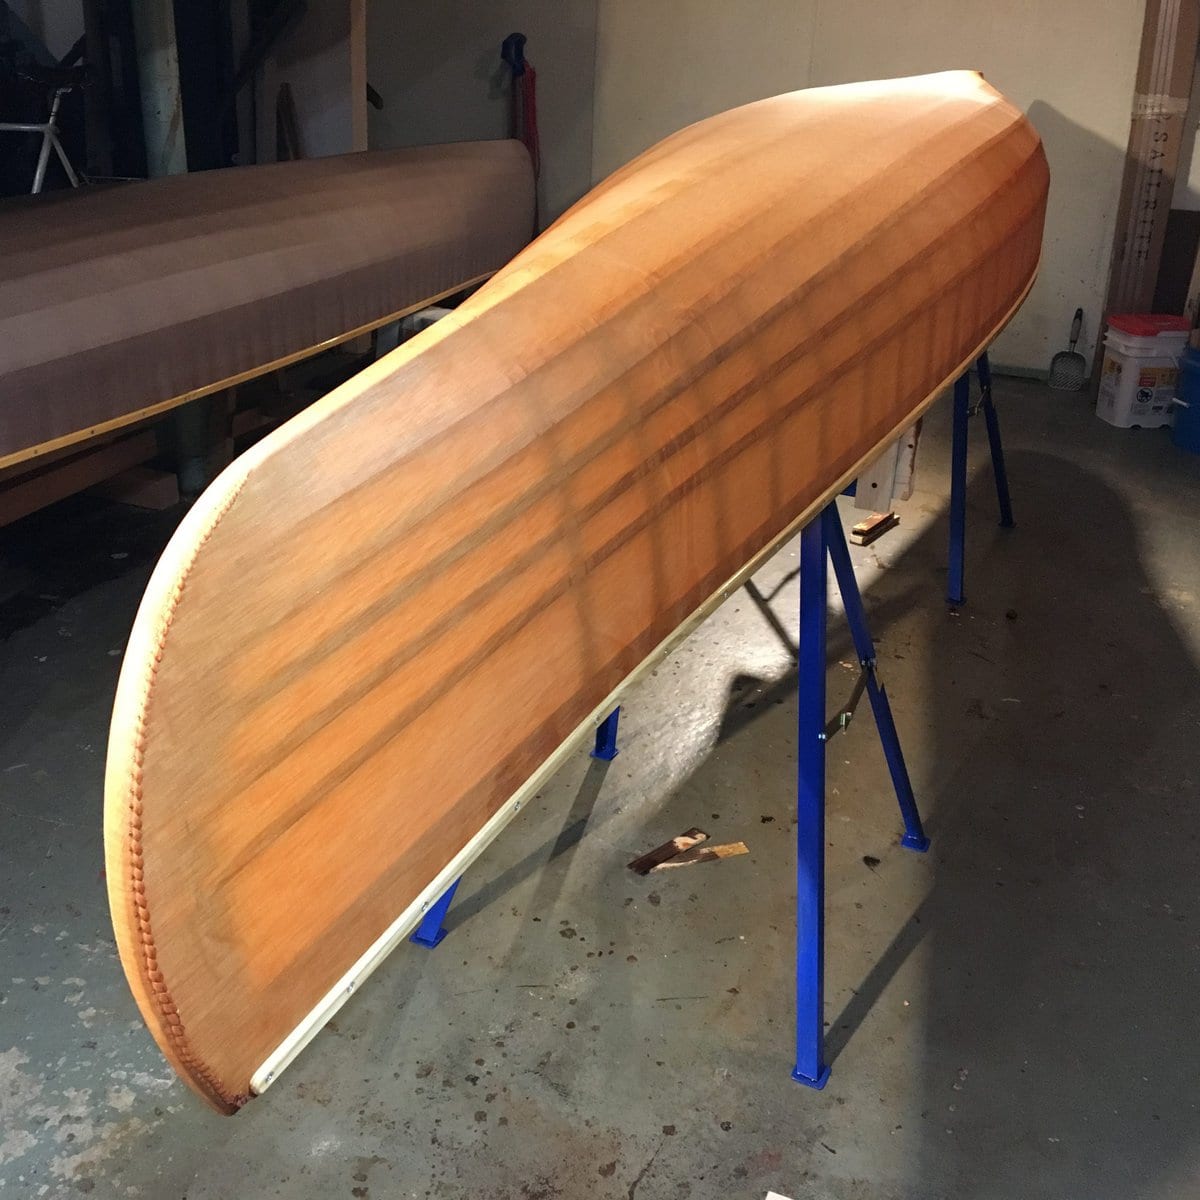
Last steps! I finally coated the canoes. I was able to coat the XL and L canoes the weekend of Apr 16-17, but did not have enough reserve urethane to start the M canoe.
I started on the Xl first with batches of 8/4 oz, as recommended for solo-single-blade boats, but couldn’t quite get the first half completed with that. I still used 8/4 the second batch, but fell short again, and panicked a bit trying to figure out what to do. I believe I hurried and made up a small batch of 4/2 oz to finish out the “first” coat. It was nerve wracking. I think I stuck with 8/4 for the full-boat second coat, and again wished I had more. By that time, I knew that the third coat would not soak in as much, having allowed the goop to setup slightly, so I think I went with 8/4 again. However, by this time, the sloppy goop on the roller mechanism was partially setup, preventing the roller from rolling effectively, so I hastily put a new roller on and….yeah, wished I had a little more goop by the end of that batch. I think on the 4th coat, I finally got some sense and made a batch of 10/5 oz.
On the second canoe, I used batches of 10/5 oz every time, which was WAY less stressful, as I could use a clean roller, and was not worried about running out of goop. I had mixed more, plus this boat was slightly smaller. This coating went really great.
I almost had a disaster on the third boat. Originally, I had a total of 4 full orders of goop. Brian recommended 1 1/2 batches per boat for a full-size single-blade solo. I had slightly less than that with 4 full batches. After coating the XL and L canoes, I THOUGHT I still had one full container of the hardener, even though I wrote on the top of the lid ~11 oz in sharpie marker…and so purchased one half-order. I should have more carefully calculated total material stock, and number of batches and batch size before beginning. It wasn’t until AFTER I had started applying the first batch that it hit me that I only had a total of about 1 1/4 batches of hardener remaining! I had plenty of the other part.
I figured out exactly how much hardener I actually had, and divided it up for the remaining batches. I had to decide whether go go with 3 full coats, and have the 3rd coat nice and thick….or go with 4 coats, and make the 3rd and 4th coats “thin”. I went with the latter, and had two batches of about 5.5/2.75 oz. I also didn’t add any “extra” hardener. This resulted in this boat having a few more bubbles in the finish due to more rolling to try to spread it out. It also took another day or two before the finish didn’t have any ‘tack’ feeling to it. But, it’s fully hardened, and still looks good and paddles great. I probably should have just gone with a “thick” 3rd coat.

May 1-7
After coating I added the stem bands. I originally had purchased HDPE, but after Brian cautioned about the expansion with heat and water, I switched to acetal copolymer. I did a little research and found this helpful article: https://www.lionep.com/uploads/files/Acetal-vs-Delrin.pdf
I thought I would like the contrast of white stem bands against the dark brown and orange boats, but I’m thinking black might have been better.

With the boats done…it was just a matter of waiting for the weather, which did NOT cooperate! Like the day after I finished the L boat, I think we got like 3″ of snow…that STAYED on the ground for two days…in April! This was crazy.
Anyway, before I was able to coat the M canoe, I did take the XL and L canoes out for a VERY brief test paddle in my local river. However, the temps were pretty cold (very low 50’s, I think, or high 40’s), it was moving water, I didn’t have any submersion gear, etc., etc….so I was really careful, and didn’t even get many pictures.
Because it’s been a while since I paddled a full-size canoe, I was pretty careful. I didn’t want to risk going for a swim, even though the water was shallow. (My cedar strip I always sit on a seat at about the waterline, so essentially almost on the bottom of the canoe). However, sitting on the raised seats was not too tippy. I also tried kneeling, with my butt still mostly on the seat, or towards the edge of the seat, which was great! With my large sandals on, it was a bit scary getting my feet back out from under the seat, while in the middle of the river, but later, with bare feet it was smooth and seamless.
During this time, I also constructed a couple sets of catamaran boards. I was REALLY excited to let the girls use these. I made two sets, so the M & L canoe could be catamaran’d, and so the L & XL canoes could be as well. I also plan to hook all three together.
May 8th
Finally, the weather and our schedules all synchronized to allow us a decent weather (mid to upper 50’s degrees F) Saturday, where we could all paddle. I wanted somewhere with sand or gravel beaches (rather than sticky mud) to launch and paddle for the first time.
I chose Kensington Metropark, just under an hour away from our house. It was fantastic.
The girls absolutely LOVED the catamaran configuration. I left the boards extra long, because I wasn’t sure how close/far apart I wanted the boats. I may add a second set of holes. It also surprised me how efficiently they paddled it, the speed and tracking. I expected there to be MORE of turning moment for one of them, but they really cruised along, were able to go where they wanted, etc. They also LOVED just laying down. “Thanks for building us a waterbed, dad!”, they said!


There’s lots more for me to do. This first paddle was more to just get out on the water for the first time and get familiar with them, rather than take good pictures or video.
I need to write up spec sheets on the final dimensions. I’ll give a QUICK summary of my paddling impressions below, but expand on it a bit further when we get more time in them. Especially when the weather warms a bit more.
I am SUPER HAPPY with all three, and can’t wait to finish the sails, a rowing rig, a stern camera mount, and get more time in them.
XL Initial Paddling Impressions
I’m not expert paddler, and don’t really have the experience or vocabulary to describe this really well, but here’s my first impressions.
Solo, this boat feels large, fairly stable (on the seat mounted immediately under the gunwales), and has a good balance between maneuverability and tracking. The reach over the edge is a bit more than I’m used to in my cedar-strip, but improves with kneeling, as does the stability. I can tell it’s a bit slower than the other two, but this is expected due to the size.
I like to paddle with my power hand down by the throat of the paddle and below the gunwale. I found that I often had to raise my hand while sitting in the highest position. If I recall, while kneeling, it was easier to paddle in my preferred style.
L Initial Paddling Impressions
Solo, this boat feels (of course) slightly smaller and a little ‘faster’, however the rocker on this ended up a bit more than I planned, and it could use a bit of help with tracking, I think. I will likely replace at least the stern stem band with the taller (1/4″ HDPE), which I just discovered after reviewing my McMaster Carr order history is “Moisture Resistant” HDPE bar. Don’t know if that will help with the expansion.
M Initial Paddling Impressions
This smallest boat impressed me. While building, I was really hoping I could paddle this one without feeling scary tippy. I found that while not only could I paddle it fully sitting on the seat (with 3/4″ drop spacer blocks), but in the “kneeling thwart” position, with the majority of my body weight still on half the seat, it was really comfortable, and felt REALLY fast! It was really fun to paddle this way.
Reach of course was really comfortable, and I could easily paddle in my preferred style with my power hand really close to the water.
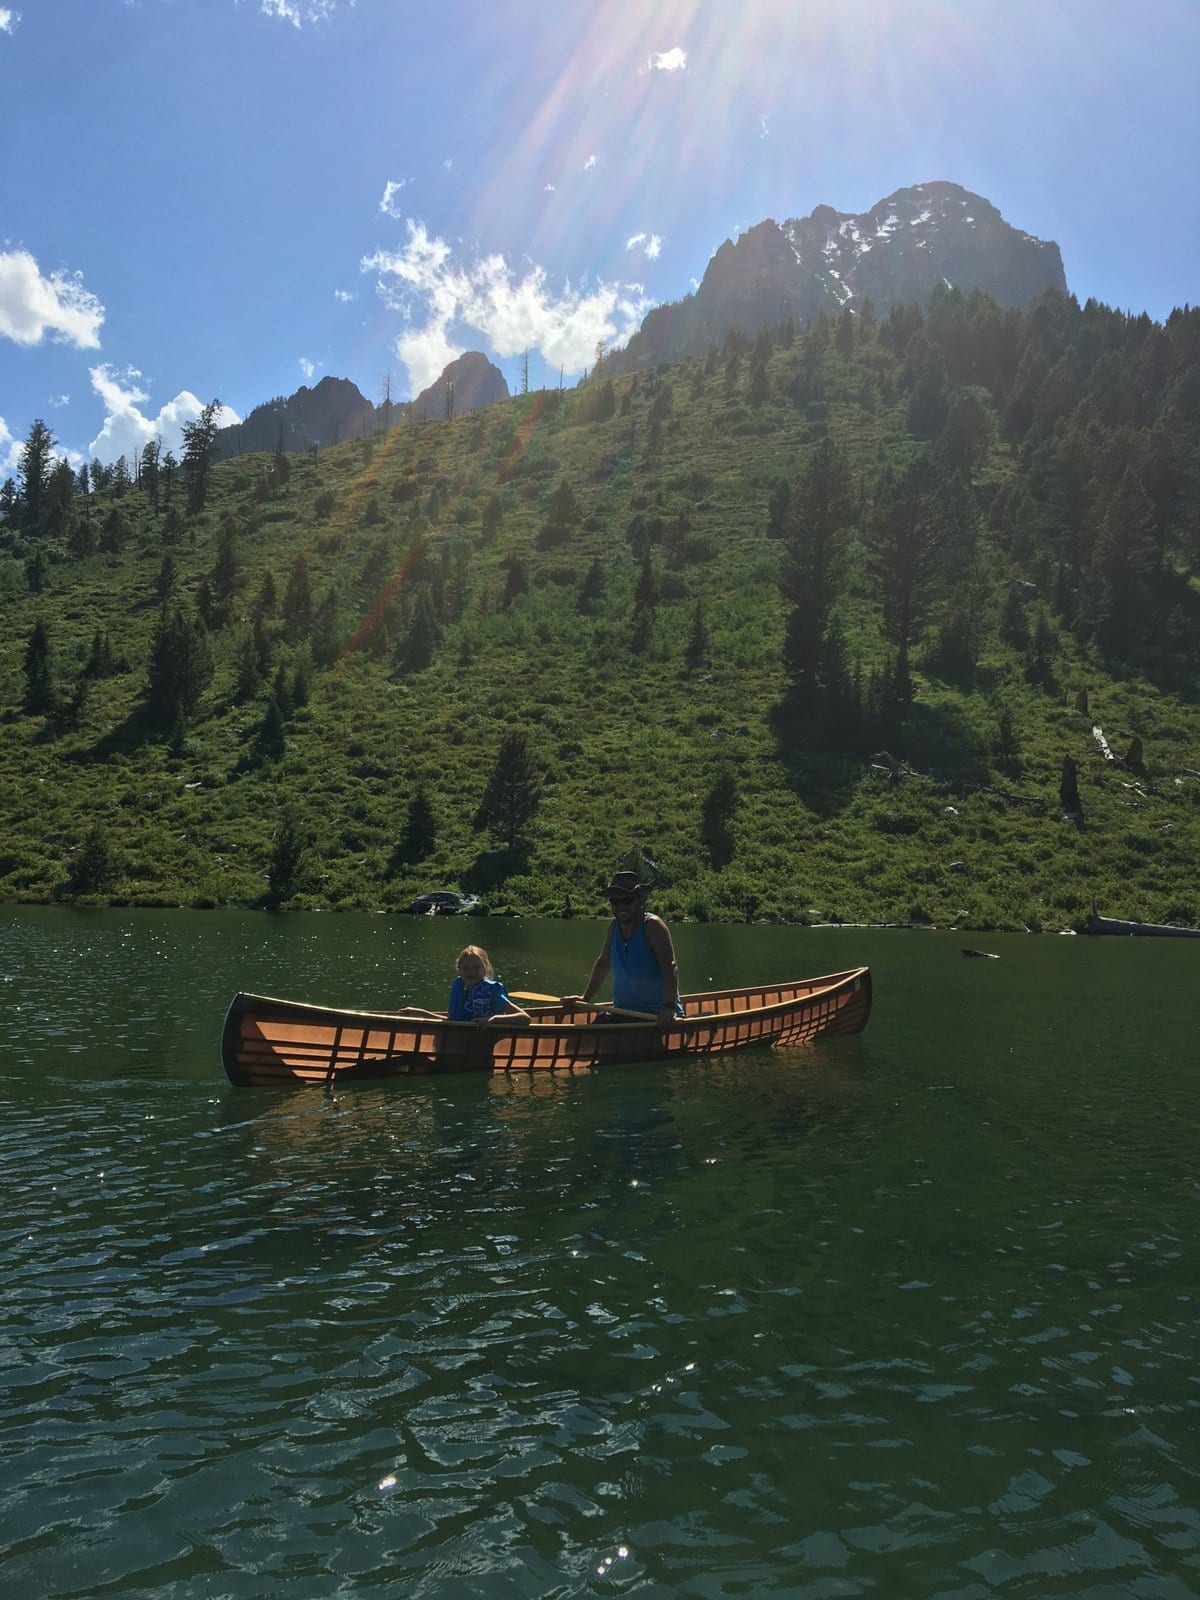
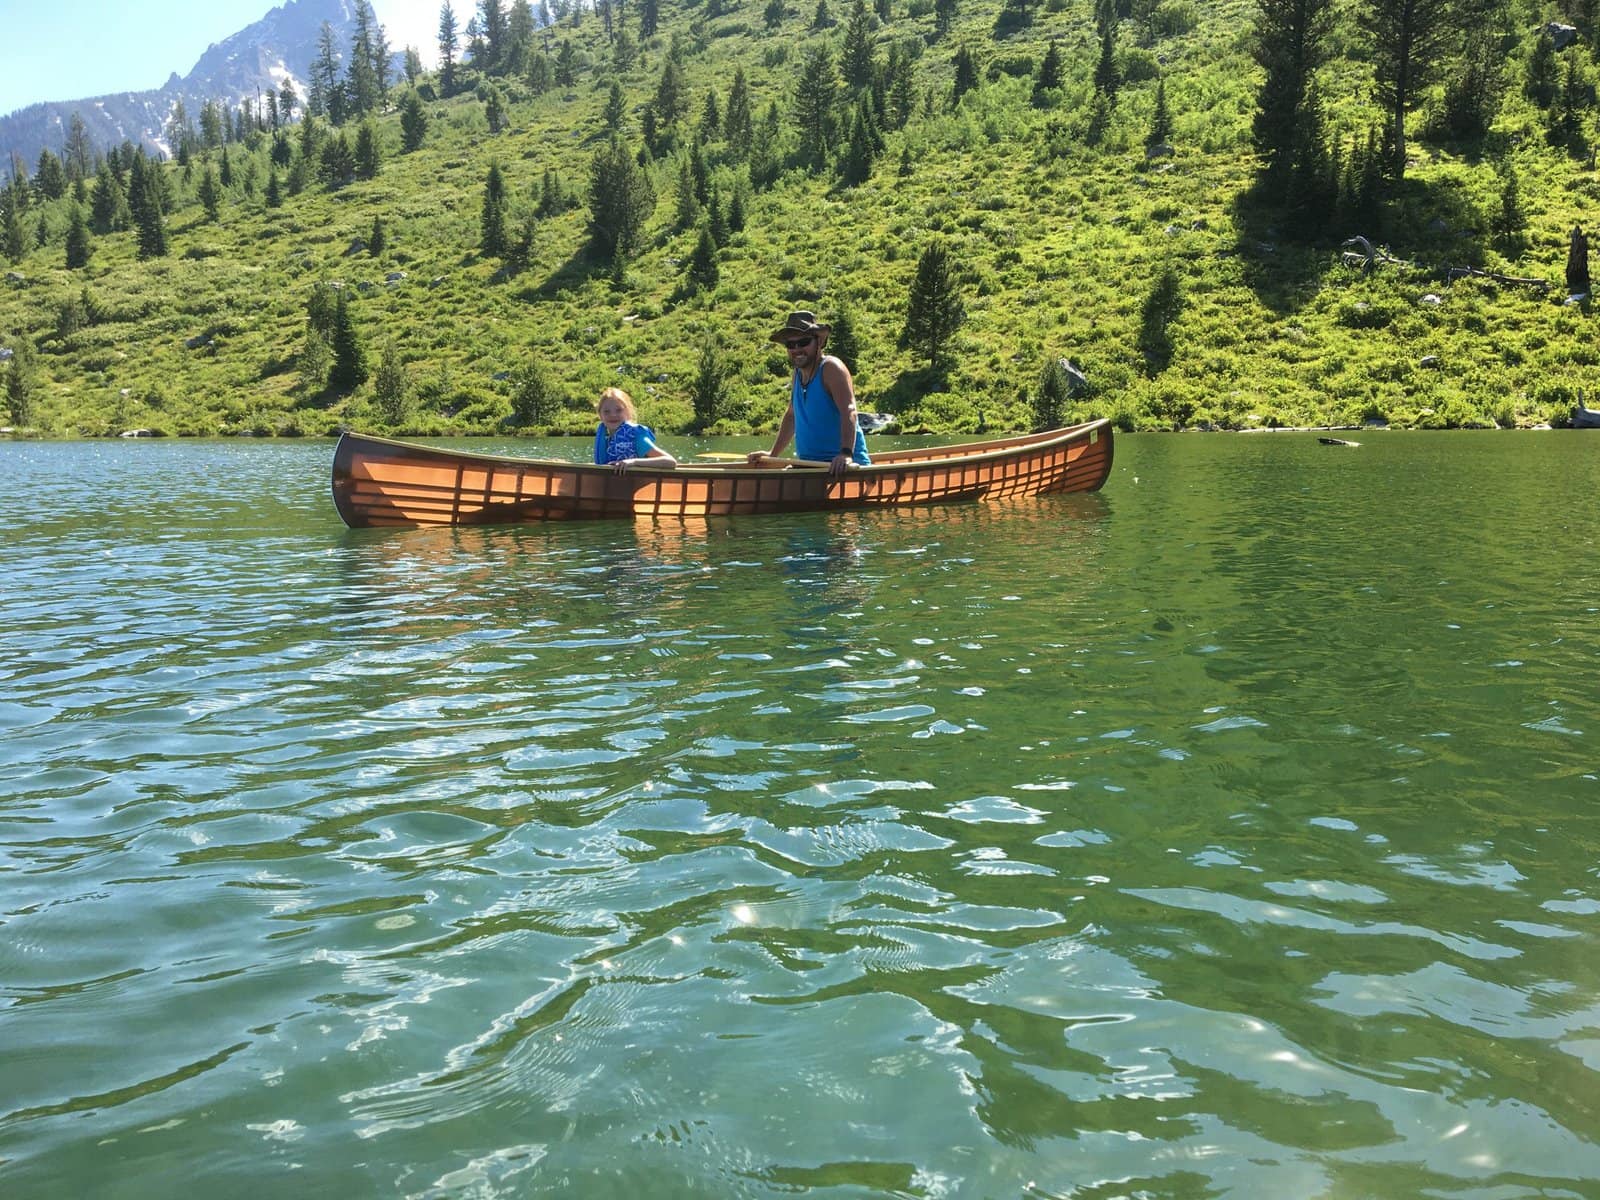
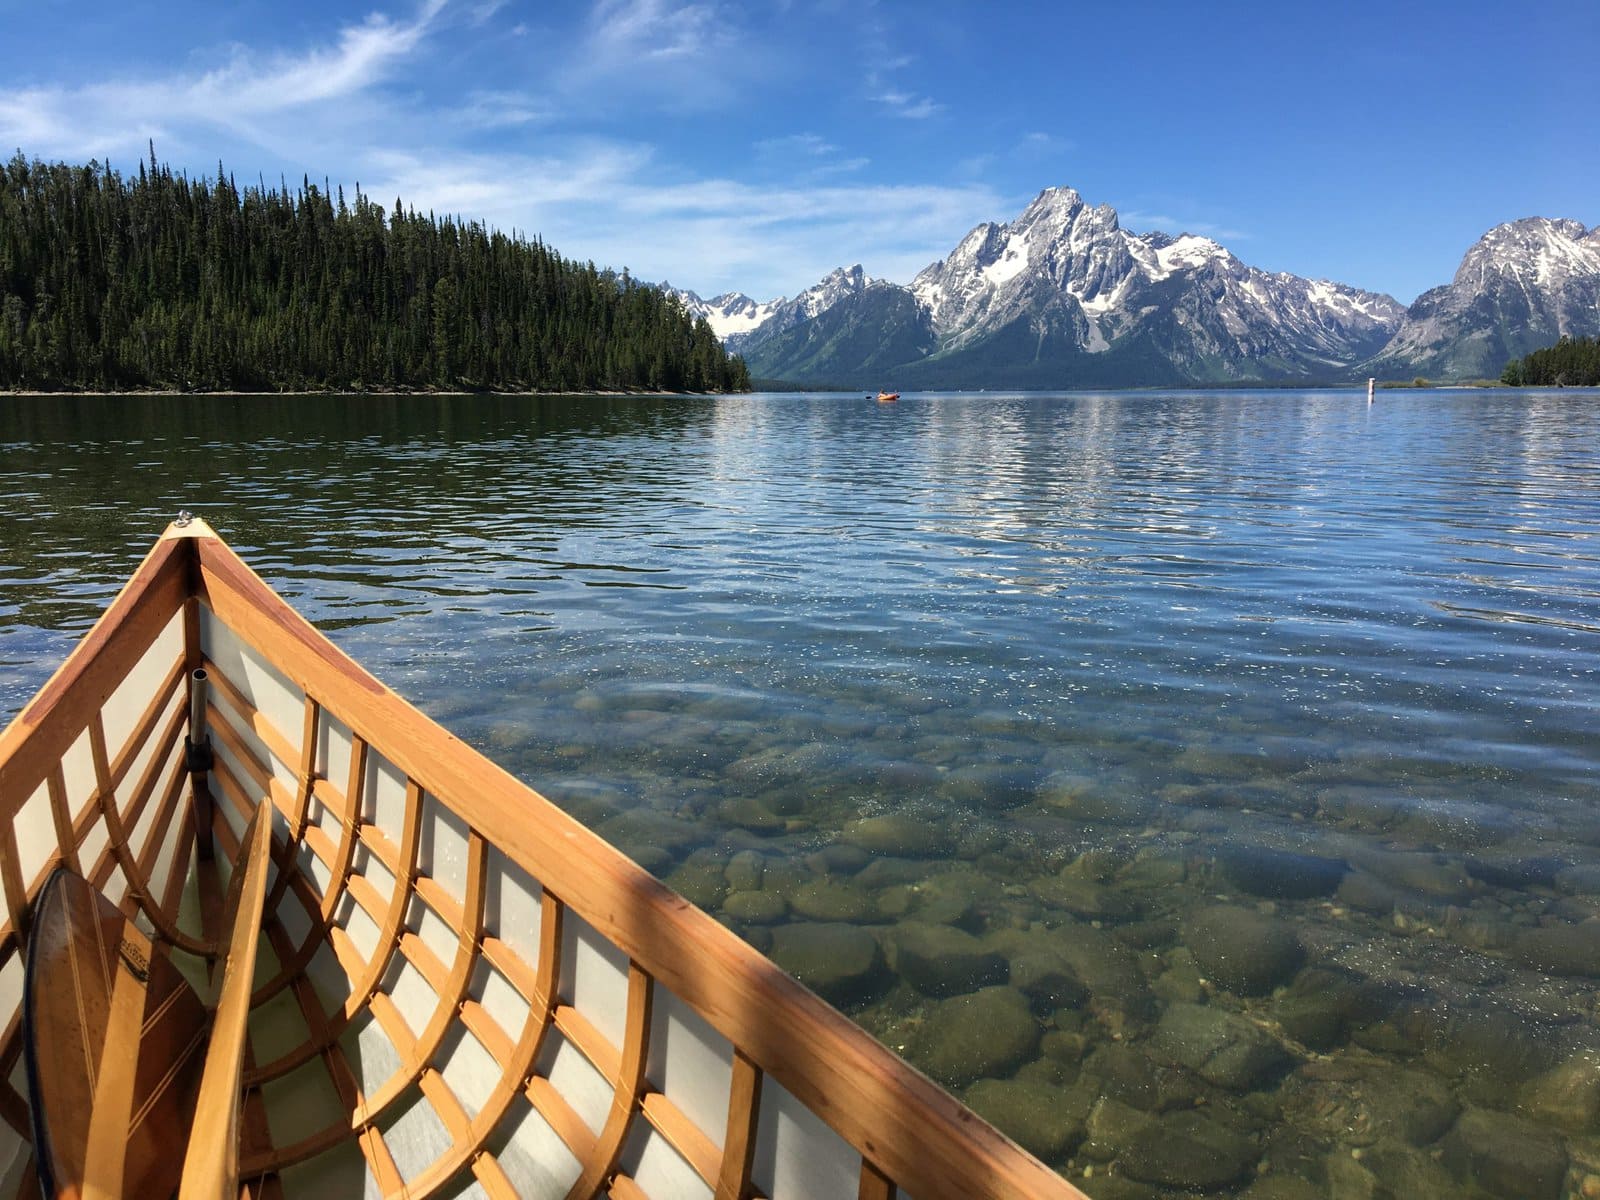
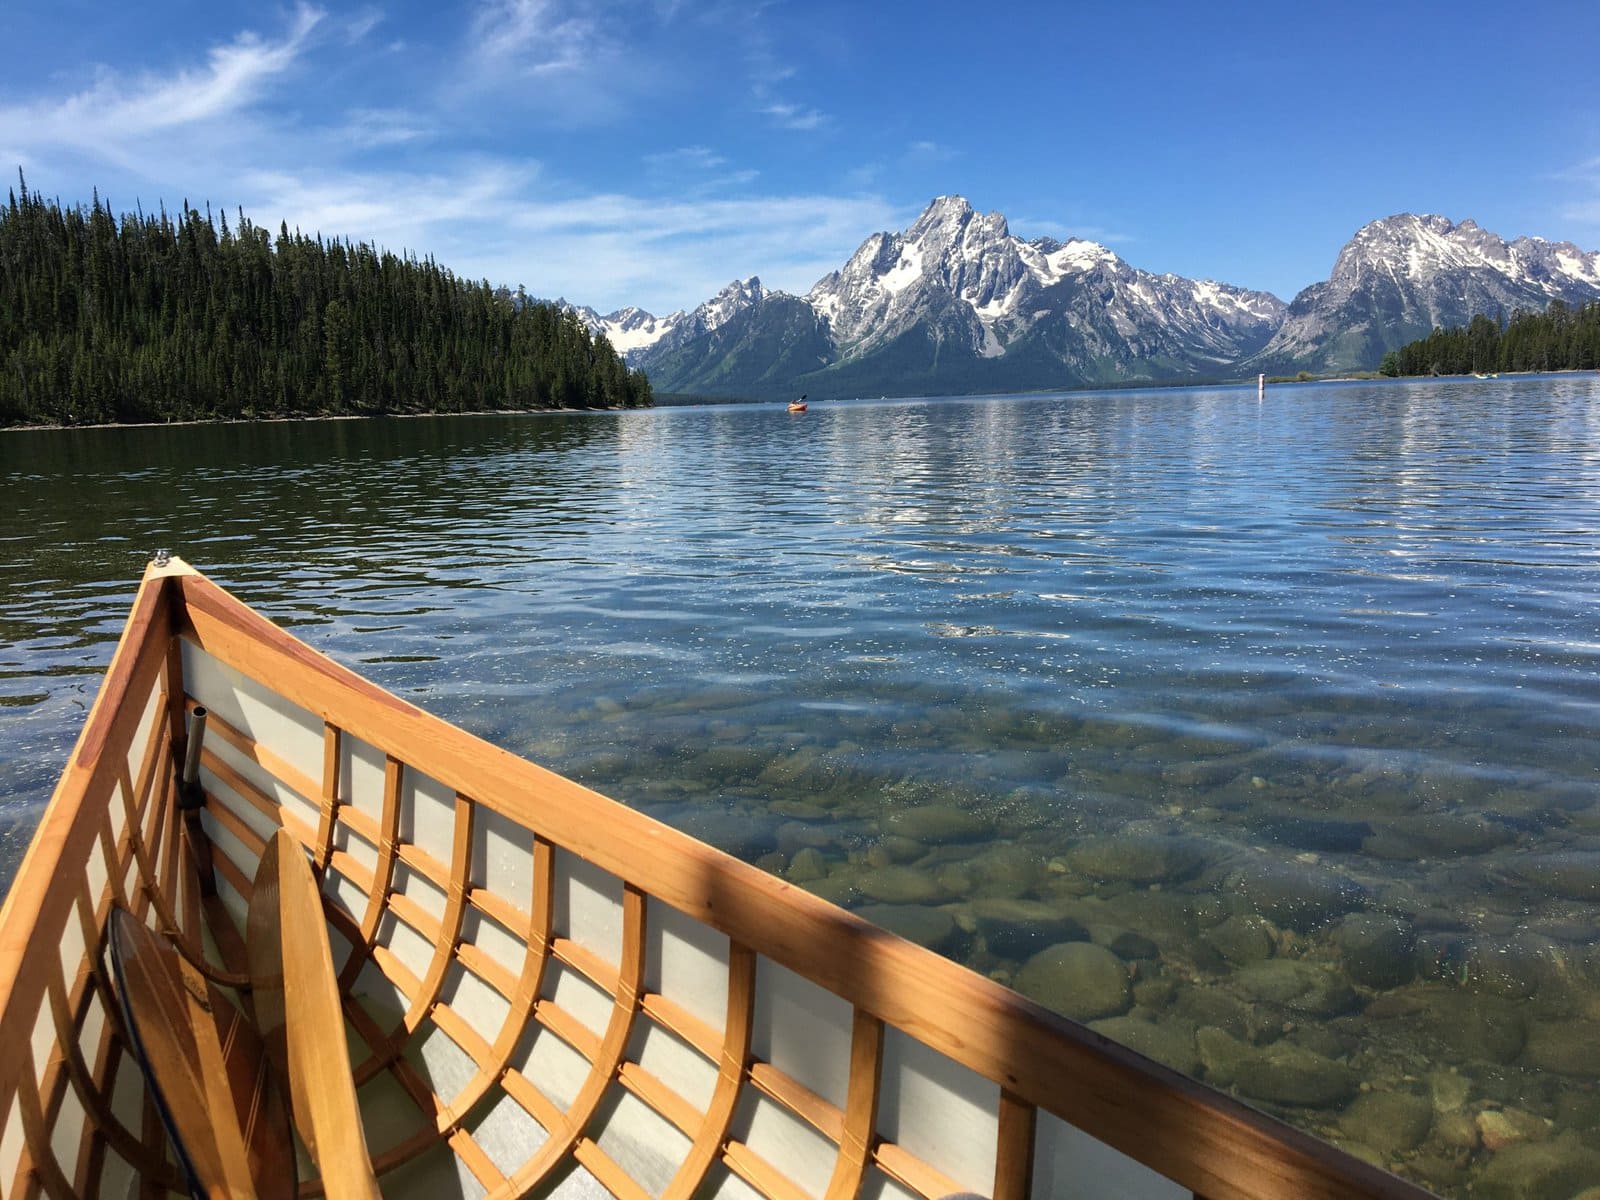
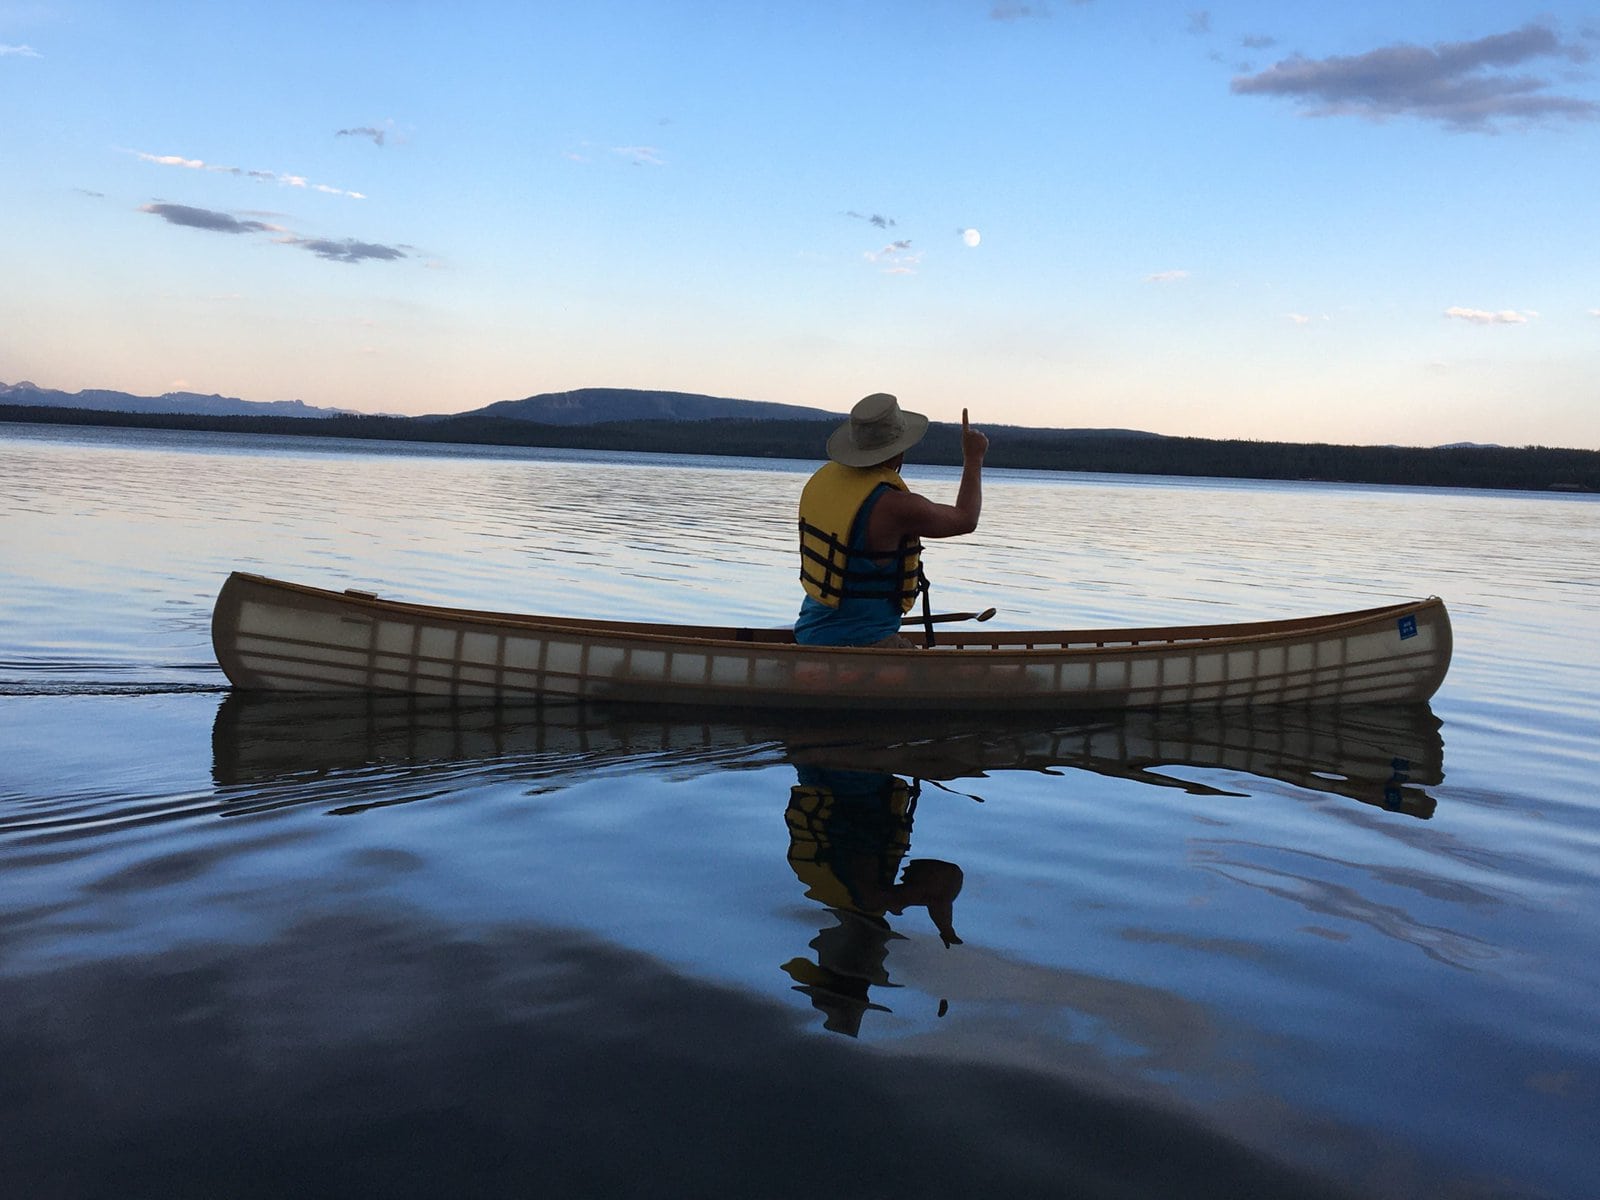
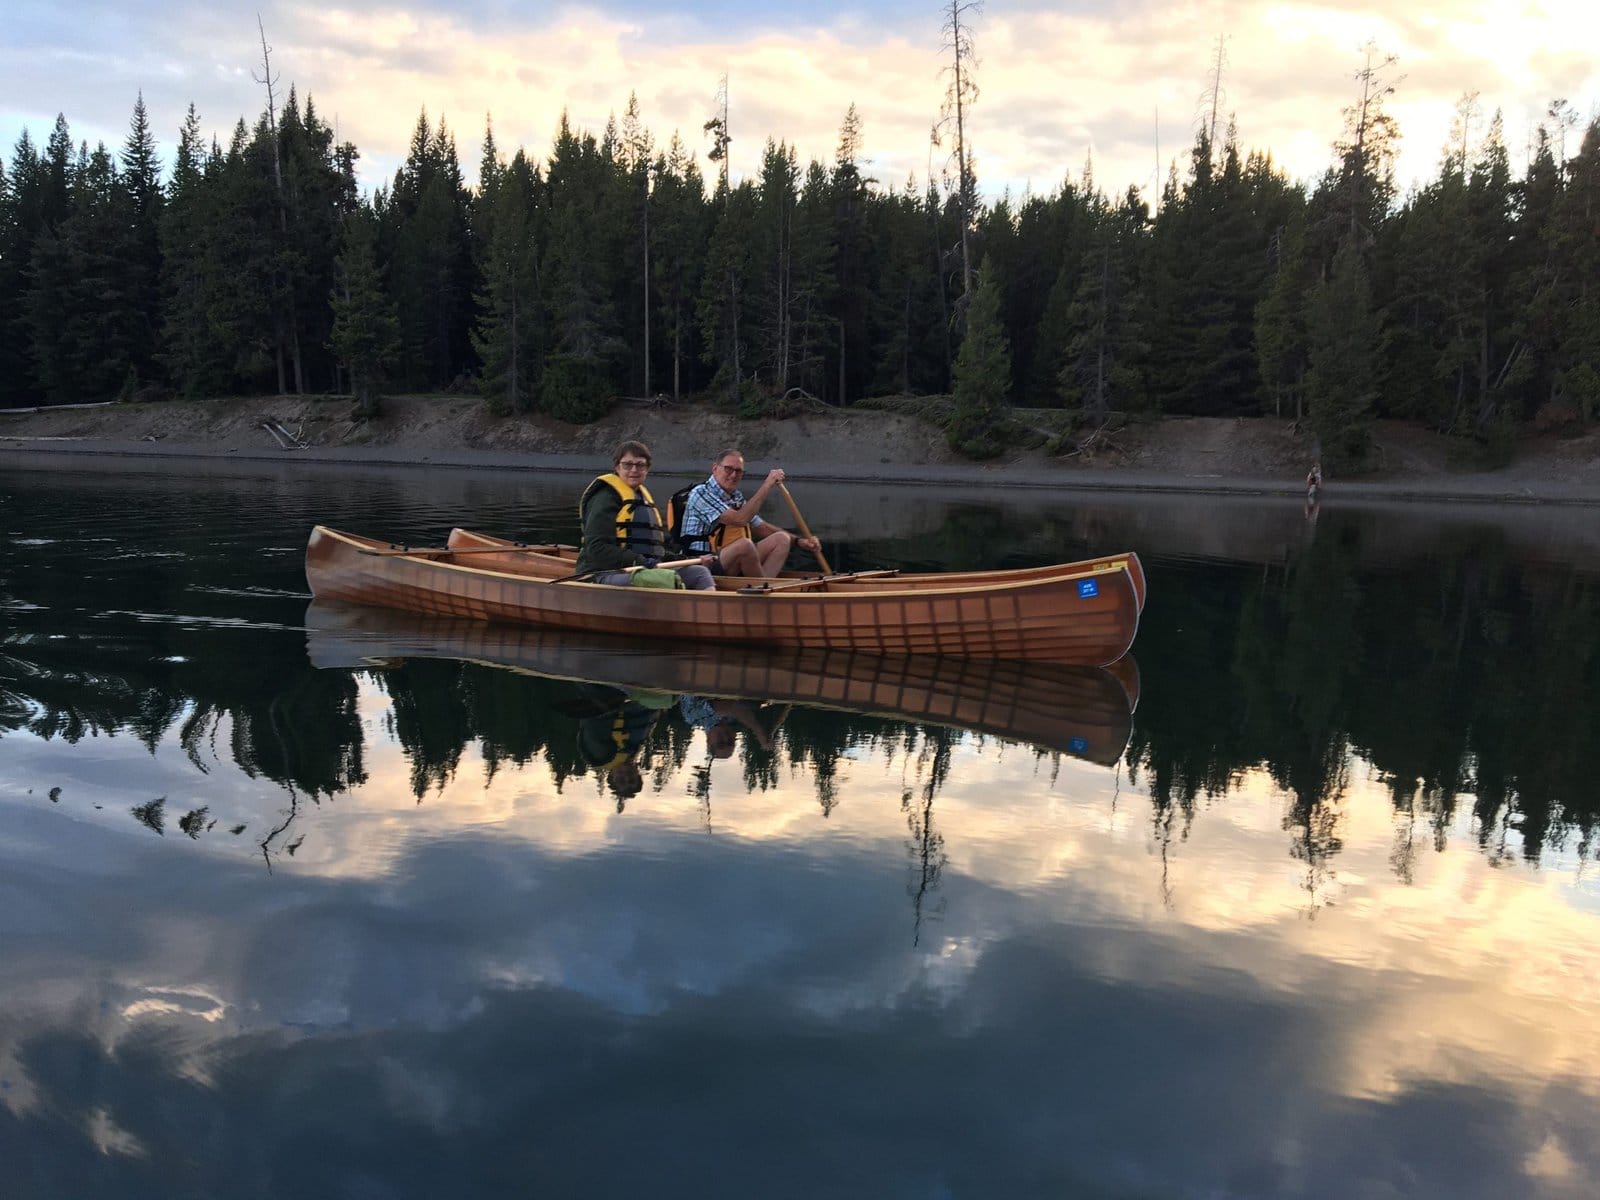
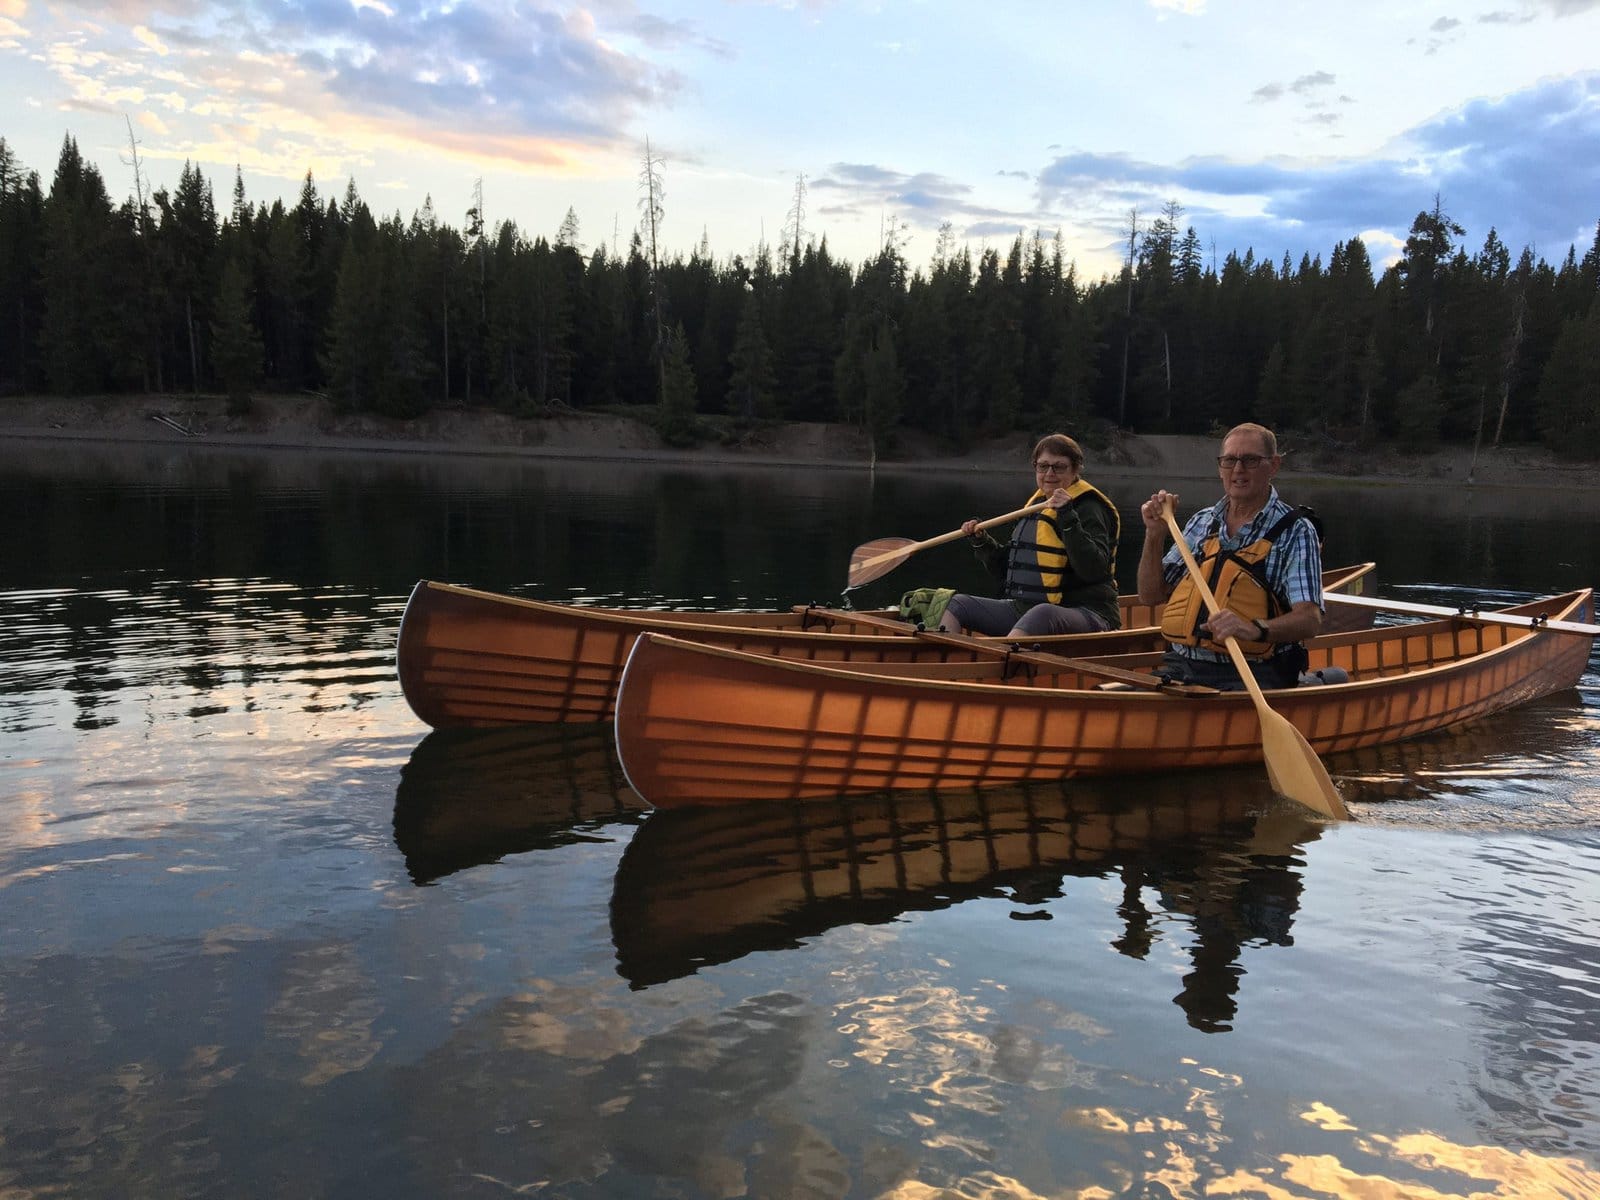
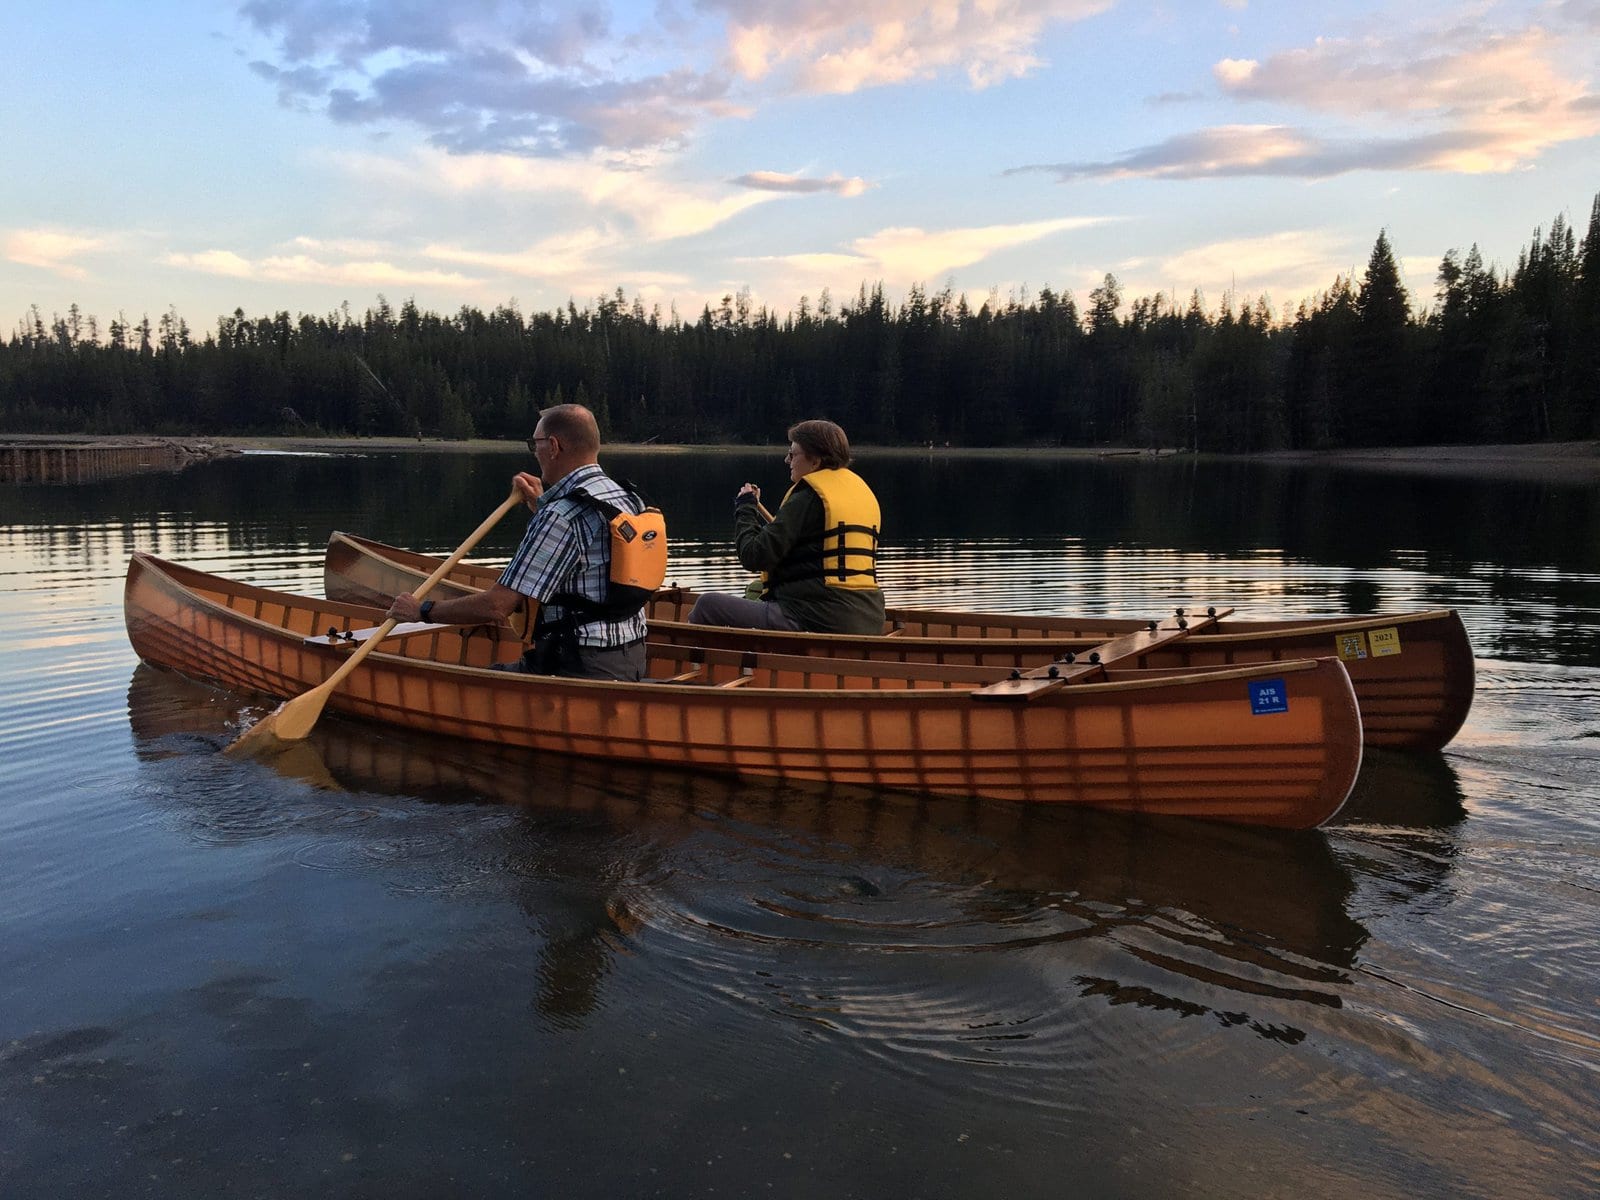
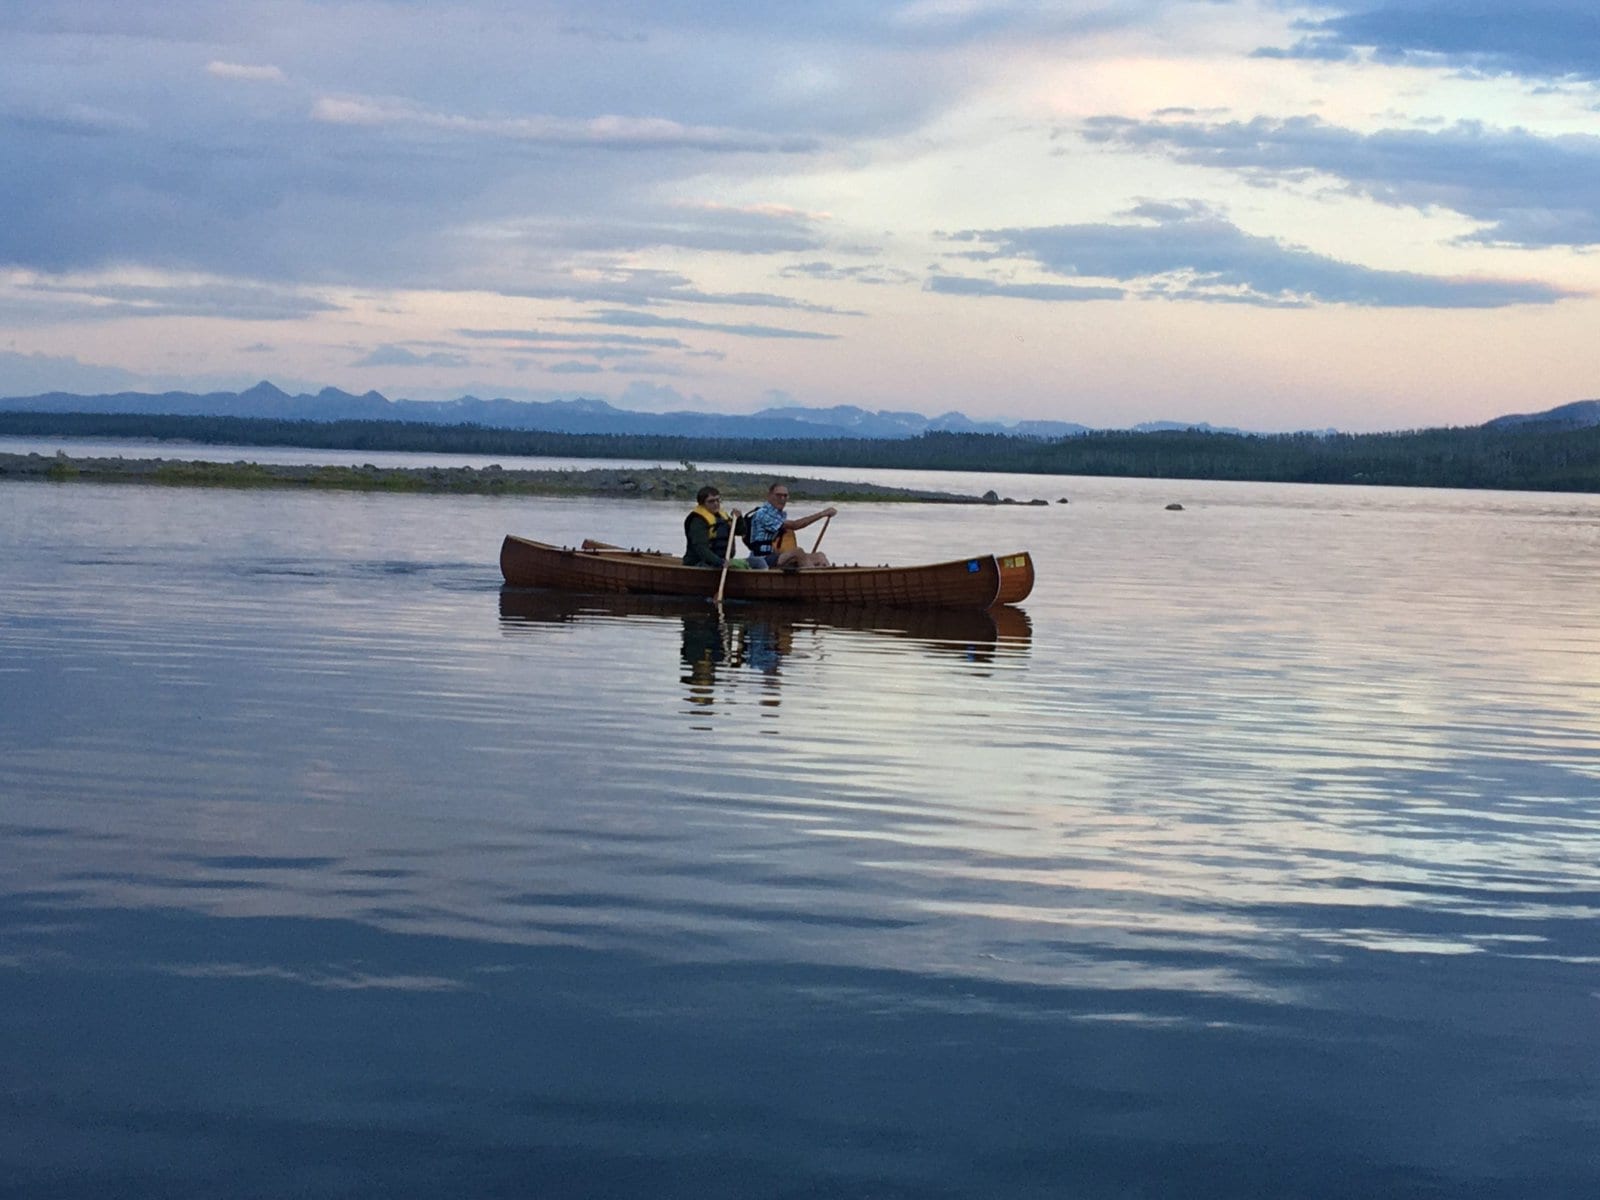
June 30: Specs & Grand Teton/Yellowstone trip
Triple-nesting set of single-blade solo canoes Built by Adam Eckhardt Jan-Apr 2021
These canoes are “close copies” of the M, L & XL canoes on the “Sample Canoe Sizing” page in Brian’s instructions.
| MEDIUM | LARGE | X-LARGE | |
| Length overall | 13’ 9 ½” | 14’ 9” | 15’ 9” |
| Width | 27” | 29” | 31” |
| Planned center depth | 10.8” | 11.6” | 12.4” |
| Actual center depth | 11 ¼” | 12 ⅛” | 12 ¾” |
| Planned sheer | 6 27/32” | 7 11/32” | 7 27/32” |
| Actual sheer | 6 15/16” | 6 5/16” | 7 ⅛” |
| Sheer blocks | Yes | Yes | Yes |
| Planned rocker | 1 ⅝” | 2” | 2 ⅜” |
| Final rocker | 2 ⅛” | 2 ¾” | 2 ⅜” |
| Depth-to-beam | 0.40 | 0.40 | 0.40 |
| Rib-length-to-beam | 0.42 | 0.42 | 0.42 |
| Gunwales | ⅝” x 1 ⅞” red cedar | ⅝” x 1 ⅞” red cedar | ⅝” x 1 ⅞” red cedar |
| Stringers | 7/16” x ⅝” red cedarQty: 4 each side | 7/16” x ⅝” red cedarQty: 5 each side | 7/16” x ⅝” red cedarQty: 5 each side *one stringer mod |
| Keel | 9/16” x 1 ¼” red cedar | 9/16” x 1 ¼” red cedar | 9/16” x 1 ¼” red cedar |
| Ribs | 1” x 17/64” white oak | 1” x 17/64” white oak | 1” x 17/64” white oak |
| Stems | Recurve, lap-jointed, red cedar | Recurve, lap-jointed, red cedar | Recurve, lap-jointed, red cedar |
| Outwales/rub rails | ¾” x ¼” ash + spar varnish | ¾” x ¼” ash + spar varnish | ¾” x ¼” ash + spar varnish |
| Stem bands | ⅜” x ⅛” x 4’ white acetal copolymer | ⅜” x ⅛” x 4’ white acetal copolymer | ⅜” x ⅛” x 4’ white acetal copolymer |
| Weight: Oiled frame | 18.9 lbs | 21.3 lbs | 23.7 lbs |
| Weight: skin+rub rails | 3.8 lbs | 4.2 lbs | 4.2 lbs |
| Weight: urethane | 3.7 lbs | 4.45 lbs | 4.2 lbs |
| Weight: seat + hw | 2.0 lbs | 2.1 lbs | 2.3 lbs |
| Weight: stem bands | 0.2 lbs | 0.2 lbs | 0.2 lbs |
| Finished Weight | 28.6 lbs | 32.0 lbs | 34.6 lbs |
Stringer spacing:
For some reason, I chose to use 5 stringers per side on both the XL and L canoes, but realized there was just no way I would be able to fit 5 on the M canoe. I got a little hung up on the instructions which said “smaller solo canoes can get away with 4 stringers per side; larger canoes will need 5”. I didn’t really know what constituted a “larger” or “smaller” canoe…and started with “5 must be ‘better’”. In hindsight, I could have probably gone with 4 per side in the L canoe, and maybe even in the XL canoe.
X-LARGE:
Stringer 1: @center, 4” from bottom of gunwale
Stringer 5: @center, 4 ½” from keel
Stringers 2-4: @center, 2 ¼” spacing from other stringers; @ends 1 ⅜” spacing
LARGE:
Stringer 1: @center, 4” from bottom of gunwale
Stringer 5: @center, 4 ½” from keel
Stringers 2-4: @center, 1 ⅞” spacing from other stringers; @ends 1” spacing
MEDIUM:
Stringer 1: @center, 3 ½” from bottom of gunwale
Stringer 5: @center, 4 ½” from keel
Stringers 2-4: @center, 2 ⅜” spacing from other stringers; @ends 1 ½” spacing
Rib length adjustments:
I ribbed the XL canoe first, exactly according to the 0.42 r/b ratio. Then later, upon suggestion from Brian, removed and widened the second stringer down, to possibly provide more stability.
For the L canoe, I lengthened the middle 5 ribs by using a r/b of 0.43, and the next two ribs on either side of those using a r/b of 0.425. This only lengthened these ribs a max of 0.3”, which probably didn’t make much difference at all.
I ribbed the M canoe last, and I believe used a 0.42 r/b throughout, but just tried to focus more on making them flatter in the center.
Initial thoughts:
MEDIUM: In two months of paddling this has become my favorite of the three to paddle solo. For me, I mount the seat right against the gunwales, and use the “kneeling thwart” position. I find it stable enough to be comfortable (I’m 6’2”, 190 lbs). My less experienced brother-in-law (slightly shorter and probably ~170 lbs) found it initially quite tippy, but adjusted to it comfortably over a 1.5 mile paddle. My daughter (5’ 5” tall, 110 lbs), uses the seat dropped 1” from the gunwales, and found it stable to paddle in the normal seated position this way.
LARGE: I haven’t really paddled this one very much, because I found the M canoe stable enough. Because of the extra rocker that I managed to build into this one (I think to just getting too aggressive with ‘progressive’ rocker) it needs a little help on the tracking front, which should be easy to address.
X-LARGE: As I mentioned previously, this is noticeably the most stable and slowest of the three, understandably. I should paddle this more solo, but so far I’ve been using it primarily for the catamaran configuration. On this trip out to Grand Teton/Yellowstone, my brother-in-law (minimal experience) paddled it solo with one of his daughters (9yrs old) and found it stable enough, but difficult to manage in moderate winds.
CATAMARAN CONFIGURATION:
I cannot rave enough about the catamaran configuration! It is super fun, and opens up new possibilities. Namely, on my trip to Grand Teton/Yellowstone, I was able to have my parents paddle the catamaran, and thoroughly enjoy some time on the water, despite them being in their early 70s. My mom especially would certainly never have been able to enter/exit a solo canoe, but they both absolutely had a blast using the catamaran. It enabled them to enjoy another experience that would simply not have been possible otherwise, and to do it together. They were able to paddle, maneuver wherever they wanted, and enjoy doing so.
OTHER CONSIDERATIONS:
I have yet to make the sails (although I have all the materials). So will provide another update when those are done.
I also am eager to build some oars and a rowing rig, and try that out. I suspect those might be most appropriate on the XL canoe.


October 9, 2021
I live on Grosse Ile and am interested in building my own F1 kayak. I would like to meet and speak with you about your build if possible. please contact me .
October 11, 2021
Sure, Thomas. I’ll contact you via direct e-mail.
January 2, 2023
Beautiful work Adam!
I’ve completed a few SOF kayaks using pine and baltic birch plywd, but I’m planning to start on a canoe this winter based on Brian’s system/ design. I’m having a heck of a time locally sourcing bending oak and clear cedar. May I ask where you found yours? I’m just across the river from you, in Canada, and would gladly cross the border to gets my hands on the proper materials.
January 3, 2023
Karl,
Thanks so much! The canoes have been fantastic.
I spent a bit of time finding sources as well, but am glad to share.
For Clear Vertical Grain (CVG) cedar, I had two choices:
1. Purchase from my local lumber shop (Mans Lumber, in Trenton, MI), who gets it from C.J. Link Lumber Company in Detroit…however, I could ONLY get random lengths. But the price was really good.
2. I searched C.J. Link’s dealer list (http://www.cjlinklumber.com/cedar-board-dealers/), and called all the places within 4 hrs of me to find one (Dillman & Upton in Rochester, MI) that stocked the cedar, and would let me pick out just the boards of the length I needed. The problem was that they charged a relative fortune compared to my local shop. ($5.89 per linear foot for 1×6 boards! I figured that at $12.85 per board foot)
I took the hit, and purchased from Dillman & Upton.
For bending oak, I finally found this local mill, Maple Rapids Lumber Mill, in St. Johns, MI. You have to plan a bit ahead, and let them know that you’re interested in rift or quarter sawn white oak (depending on your preference), then they will let you know when they’ve sawn up a batch of logs. However, its fantastic material, you can pick the specific boards you want, and quite inexpensive…relatively ($5.35 per board foot)
Note the prices I received were late 2020, early 2021, your mileage may vary.
Best wishes on your build!
January 3, 2023
FYI, I tried to purchase cedar directly from C.J. Link, but they wouldn’t let me. 🙁
January 3, 2023
Adam,
We’re practically neighbors, I live on Grosse Ile. I’ve been kicking around the idea of building a SOF kayak for a couple of years but between Covid and some personal health issues it just never happened. I’d like to see your canoes and have some conversation with you. Maybe that will help me get started. The cost of materials and locating the has been somewhat of a challenge. I’m actually considering having Cape Falcon build one for me. If you’re interested please email me.
Thanks
January 4, 2023
@Tom, no problem. Sorry to hear of your health issues, but glad you’ve recovered!
See my direct e-mail for further plans to get together.
January 3, 2023
Thank You for taking the time to share this info. I’ll explore this further.
I generally head North in Ontario for most of my backcountry adventures, but I hope to explore Michigan in the near future. Beautiful State.
Happy Paddling.
January 4, 2023
You’re certainly welcome.
And I have the reciprocal hope, in that I mostly travel in MI (and the US), but hope to explore more of wild Canada in the near future (beyond Pinery Provincial Park). 🙂
Happy building and paddling to you as well.