My all-around kayak is the Boreal Baffin P1. It behaves well in rough water, there is lots of storage space, robust, and it rolls like a dream. But perfect, it is not. Long, wide, and a beast to carry. I cringe by the thought of lifting it onto the roof rack solo. I am 169 cm / 64kg, practically a midget by Norwegian standards, and my car is a X-trail. Therefore, one year ago I started searching for a more lightweight boat. Due to covid, good deals on the second-hand market were- and are far in between, and also being smaller than the standard male, there is just a tiny number of boats available to begin with.
So why shouldn’t I build one? I saw three alternatives: The coolest would be a strip built Black Pearl from Thomasson design, alternatively a shrinked stitch-and-glue Shrike Too would also fit, but I balked at the thought of working with epoxy and fiber, particularly unappealing is the part of grinding excess epoxy. Third alternative would be skin-on-frame. So I built a Cunningham/Peterson Greenland.


At first, I loved it, even though directional stability at speeds lower than 5 km/hour are non-existent, it drifts to starboard on flat water and it is a struggle to keep on course even with a slight breeze from sides. Speed is highest with wind in my face. With a skeg, directional stability was manageable, at the cost of maneuverability. The deal-breaker was that intermediate level rolls are hard. Hand rolls with the Baffin is no problem even with bad technique, but with the Cormorant even balance braces feel impossible. My love was broken, so my search for the perfect kayak continued. Since I used the videos from Cape Falcon extensively during my build, it was naturally to cash out for a full course.
I am trying hard to avoid falling into the trap common to a lot of men my age, which is to disregard any instructions and insisting on doing it in some special way. I am paying good money for this course after all. Therefore I wanted to do everything according to the instructions, down to the 16th fraction of an inch, probably to the despair of Brian.
The only deviation from the instructions was adding a mortised foot brace. When making the Cunningham, I made a story stick documenting the position of deck beams and ribs. This is one of the really good suggestions by Cunningham in his “Making the Greenland kayak”. When making one for the current build, it was obvious that the foot brace would be 10 cm forwards of my feet, and a rib exactly under my heels. To give some space for adjustment, the foot brace was set approx 3 cm in front of the expected position. The rib was moved 5 cm’ forwards. Rib length wasn’t adjusted, I intended to this after bending.
Talking about inches… How many satellites needs to fall down before you Americans do the sensible thing and adopt the SI system like everyone else? Even the English have done so. After all, you have everything else in common, except, of course, the language.
During the last kayak build, the basement workshop was dominated by the kayak skeleton for months, making other work challenging. This time I followed Brians advice of getting all supplies before hand giving more flow in the building. Some times I was itching to begin, but when the building started I was glad supplies were at hand. That was especially helpful when milling the wood. Since I don’t have the space for storing and using stationary wood machinery, the work needed to be done outside. Setting up everything in the garden takes time, so doing everything in two sessions was satisfying.
The Cunningham was built with Norwegian pine. It wasn’t easy to get knot free, straight grained wood, but I managed. During the last year, due to the bark beetles in Canada and Europe, lumber prices has sky rocketed, and availability is difficult. The easiest was actually to buy imported cedar from the US, white ash from the same source. One would think that importing wood to Norway is like selling sand in Sahara, but not. So almost no Norwegian wood in this kayak. The upside is that the weight will be lower.


Ripping was done with the circular saw attached to a aluminum plate with guides. Thickness sanding was done pretty well with a small jig. Not perfect, but OK. All in all, the ripping was done in a day. The ash went straight into the kids outdoor tub.
Building
Then to the fun part, the building. Last time I did the deck beam mortises by drilling. Time consuming, tedious and low precision. With a router jig, it was done in no time. Note the stop jig, making all mortises exactly same length. Then the rib mortises. Again, I made a stop jig. A bit time consuming to make the guide plates exactly the same length, but very satisfying to have rib mortises exactly equal down to sub mm precision.


Ribbing
In the spring, I cut down some a straight, knot free ash. Regrettably, when I split it, it became clear that the growth has been very slow, especially the last five years. From earlier experience, it was clear that it would be a waste of time trying it. Recently I learnt that the summer wood is far stronger than winter, opposite compared with pine and spruce, which explained the trouble from last time. The ribs will be kiln dried, imported white ash then. They have been soaking now for four weeks, and have sunk to the bottom of the tub, so I guess they are good to go.


Bending went remarkably smooth. No breakage. The first three ribs came out unsatisfactory though. Difficult to center the bend. I redid the three, putting a big fat mark on the center of the rib to have a good reference. I was perhaps a bit overzealous and broke no 1and 2 halfway through. The V-shape came out nice and symmetrically so decided to keep them, just filled up with PU-glue and tied the splinters down tight with artificial sinew.


The obligatory pics from inside the frame. Bow and stern, respectively.


Before skinning, I made a paper template for cockpit cover and toe end for the sea sock. Far easier to do this before assembly.


Skinning
Now for the skinning. Previous kayak was skinned with nylon from Extremtextil. Stay away! The skin unraveled while stitching and the holes were too large to be bridged with paint. I had to fill the holes with some gooey stuff similar to Tech-7. Worst was that holes opened after half a year, requiring even more gooey. This time I used skin from Anders Thygeson at Kajakkspesialisten.
He has put out some great stitching videos on YouTube. Also check out the older ones at Vimeo.
I forgot to make foot brace spacer until after skin was added. Luckily I remembered before sewing.
The stitching method might be a bit more time consuming than ordinary sailmakers stitch, but makes smaller holes. It looks pretty good too. In the next build I will probably aim for less perfection and use the sail makers stitch. Part of the fun of building several boats is the learning from trying out different techniques.


The colour was added by mixing a tiny amount of powder with water. I was really disappointed after the colouring. The colour came out uneven and weak. After applying varnish, however, the result wasn’t too bad. I would have liked a bit less translucency, but that’s just details. Varnish BTW was just inexpensive urethane alkyd-based from the Scandinavian favorite, Biltema. Previous experience is good. With extreme mistreatment like running over rocks, it rubs off over the keel, stringers and hard seat, but on the unsupported areas, it is remarkably resilient. This is another good reason not to add seat and foot slats.
I would however love to try some of the coating products available in the US. Due to the toll barriers recently put in place, I am afraid of getting a huge bill.
Before and after varnishing. This is starting to look like something:


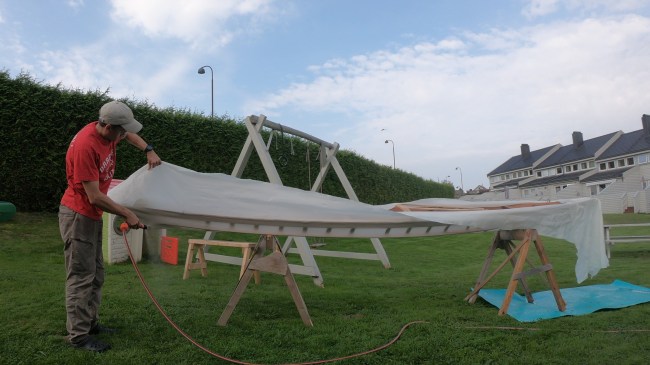
I threaded the handle straps before skinning. Wanting to reduce the time to launch, both deck and hull was varnished in one go. Three layers total.
Launch
Now for the trial. In beer from Ægir brewery it was named Njord. Those versed in Nordic mythology will find the names apt.


I have had a handful trips paddling it. Impression is great! Remarkably directional stable. Some difficulties with wind from stern, but much less than my other boat. I guess that is inherent with West Greenland kayaks in general. Increasing speed helps. Also it rolls like I dreamed it would. Blog-quality pictures are difficult to shoot, but they will come.

Rigging
Even though unnecessary, I like to put some work into the sliders & c. I really like antler, and have used it to good effect in knife handles and side panels for folding knives. As kayak fittings, antler is less suitable. The marrow turns brown with exposure to the elements. Also it is difficult to find good pieces long enough.
This time I decided to simplify and go for machined POM (also marketed as acetal). The shapes are inspired from the deck fitting of Fritjof Nansens kayak, documented as Fram 276 in Harwey Goldens tome. Turning balls and cutting of longitudinal notches on a toolmakers lathe requires somewhat esoteric machining operations.


I couldn’t resist making at least one fitting from antler. This one I found hiding inside one my father found in the Jotunheimen mountains. Is it Miðgarðsormr? Fáfnir? Or perhaps an eldritch horror out of the Chtlulhu mythos?

Comparison to Cunningham/Peterson


Inside view of the ribs on the Cunningham, stern and bow. Sorry for the background mess, these pictures were not intended for publishing.
First of all I must say that I really like the “Building the Greenland kayak” by Chris Cunningham. To my understanding, the kayak he describes is almost the same as H. C. Petterson in “Instructions in kayak building”, down to using some of the same illustrations. I’d say that Cunninghams book is a must. It contains a wealth of techniques and methods. It might read a bit like the old Haynes car maintenance manuals, in that the text is short and concise, and the pictures small. That might be off-putting for some. I like it.
There are some obvious differences to the Cape Falcon West Greenland. Listing only the differences that affects paddling and rolling, on the Cunningham, the:
- kayaker is sitting at the center of gravity
- sheer angle is 17 deg
- kayak is quite a bit deeper
- first ribs in the bow are rounder
The felt differences are a kayak that is more affected by wind, does not track as well and have higher primary stability. Rolling is generally harder. Some of that might be because of an inexperienced builder and kayaker, some of the general design. The hydro-dynamically reasons why it is so would be better explained by someone with more knowledge, although I have opinions.
The conclusion is that for the first-time builder of a west greenland, there is no better resource than the Cape Falcon course, but get your hands on a copy of “Building the Greenland kayak” nonetheless.
That being said, if I had unlimited time, motivation and buy-in from my family, it would be cool to make a Cunningham with 46 cm beam width, 15 cm depth and 25 deg sheer angle. It would make an awesome roller.
Hatches
Apparently there aren’t many good solutions for hatches in a SOF. Anders Thygeson at kajakkspesialisten has developed a bombproof design that doesn’t look out of place on a skin on frame. I bought a kit from him, quicker than making it myself, and also it wouldn’t feel right copying it. Basically it is a miniature coaming coupled with a dry-bag like seal and a neoprene cover from Brooks.


Rolling
Days are getting short, and paddling has priority, but I have done some rolling. As expected she rolls great. Managed to get a decent pic of forward sculling. The double seal hatch design does it’s job. No water ingress.


January 30, 2022
Great post Olav, thanks for sharing all the info!