
Hi all –
At the Yonkers Paddling and Rowing club we have had a boat-building program for several years. At our first shop we had heat, so we made stitch-and-glue and hybrid kayaks with epoxy and fiberglass.
After we left that shop, we didn’t have enough heating to work with epoxy so we moved to building skin-on-frame kayaks. We had worked from Tom Yost’s designs for frame and stringer kayaks. This worked for us since there were several models we could build, with the procedures being consistent model to model.
A few years ago a friend built one of Brian’s F1s at the Delmarva Paddlers Retreat. When I got to try this out, thought it was a great kayak.
About 3 years ago I was fortunate enough to be able to buy a Mariner Coaster, the kayak that was the inspiration for Brian’s F1.
I was later able to buy an F1 that Brian had built for a friend. Definitely hooked.
We decided this year to build F1s as our project for the winter. We are not doing it as an intensive 5 day build, but are meeting several times a week. This was we don’t have to do all the prep Brian does for his classes, so it lets our builders experience more of the process.
It was great that one of our instructors, Jon, had built 2 F1s with Brian so he has a lot of experience with the build.
You can see Jon in the background n many of the videos on the website.
We have 7 F1s being built this season, 3 instructors and 4 students.
Builders:
Margie, Kevin K., Kevin H., Chuck
Instructors:
Jon, Todd, Jack
Photos by Jack and Chuck
First off we needed to watch the videos, read over the plans, and get a handle on the process.
We got busy fabricating the jigs and laminating forms and picked up the wood for the build.
We are lucky to have a lumberyard, ML Condon’s in White Plains, that could supply us with the western red cedar we would need.
All beautiful, clear grained.

We then set up our table saw and ripped it into gunnels, stringers and keels. Also made pieces for the laminated curved deck beams. I had a piece of clear Sitka spruce left over from a previous build that we are using for the rear straight deck beams.


We then each selected our gunnels, screwed them together and marked out all the beam locations and rib mortices.
Jon made the jigs for the plunge router and we got all of the mortices made.


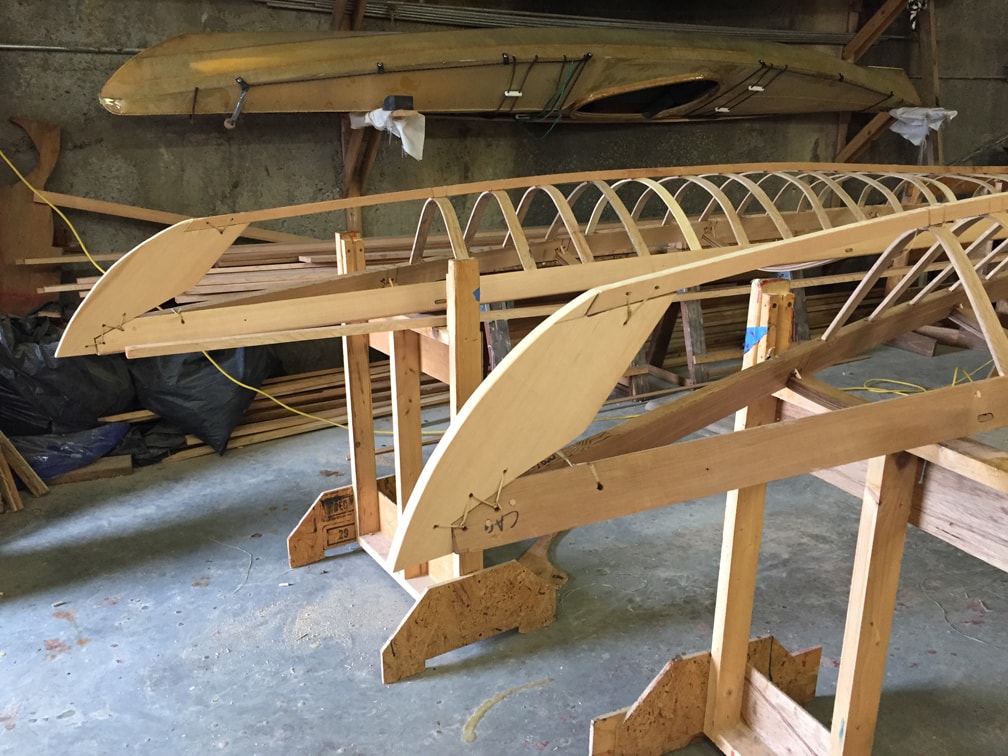
With all this done, each builder took his gunnels and set up their deck on sawhorses, with the capture forms and spreaders so we could start with the kerf cuts, lashings and pegs. Then it was time to cut and install the deck beams.


We are almost finished with the deck set up. Our task now is to source some good bending oak. We bought some when we got the cedar, but it is sort of old and a bit dried out. I am going to try soaking it with fabric softener to see if that helps. If not, we have some ash we can mill the ribs out of. One lumberyard I contacted can set us up with some newly sawn white oak boards, but they can’t deliver them for several weeks. We will use that for the coamings.


This batch worked decently, but we did run out of clear pieces so we sourced more from Dain’s, a sawmill upriver in Peekskill. With that oak, and some from a board we had laying around the shop, we were able to get all 4 boats ribbed.
We developed a system where the boat builder measured and marked his ribs for length. handed them off to another to trim to length and another to sand the ends if needed. At the steam box we had a minder who regulated putting the ribs in at 1 minute intervals and replaced the ribs with the next in sequence. And someone on the timer. Worked really well, and got everyone involved. Chuck’s parents were here too, got his dad involved.


Now was the time to get the bow and stern stems set up. Chuck and I drew out and cut blanks for the stems. Each builder then followed the process in the video and we measured, marked and cut out the bows and sterns for each boat. Installation gave us a chance to do some more lashings.


Keel time! Got them cut to length, placed in position and we did the running lashes.

Chines were next. Cut to length and placed with running lashings after making sure all the heights were correct. Final trimming and lashing to the stems finished this part. We made sure all the stern stringers were close to the gunnels. In some boats we had to crank, a few chines ended up there naturally. Go figure.
We ripped up some more cedar to 1/2 x 1/2 and made up some secondary stringers. A bit of pegging and they were on. We did use glue on the first and past, but it’s pretty cold in the shop. I keep the glue at home and bring it with me so it stays warm.


Since it’s early December, we still have warm enough temperatures to work.
Time to finish the frames…

Winter 2019! It got cold out, and since the next steps in our build is to skin and coat the kayaks, we decided to hold off for a while. The shop only has a few small heaters so is not comfortable when temps drop under 20º.
We picked back up in April.


As we got closer to having the sewing done, it was time to make up our coamings. We had 7 boats, but since they were all pretty much similar we decided it would be easiest to make all the coamings the same size. That way we only needed one jig.
We had all the oak ripped up, end scarf tapers planed and soaked for a week. When we got the stream box all heated, we did one at a time and bent and glued each one. Didn’t take more than 5 minutes per coaming. Another time we worked as a team to get it done. Most of us glued the rim pieces on, but Jon was in a hurry and just nailed his on. We had some nice bronze ring nails that looked good on the rim.


We did a few of the boats with the sewing method Brian suggests. It works well. A few of us had used another method that we used in the past, again good results. All in all each boat ended up looking great.
This year we got a 150-foot roll of George Dyson’s 9 oz polyester. This was a new product (he bought 4,000 feet of it!) and we all liked it very much. It has a tighter weave so holds the thread without making big holes. It had no trouble in the bow and stern, and when we ironed the skin before coating all the ripples came out nicely.


Each of us made a choice of color for the 2-part urethane. Most did an earth tone, ochres, but we ended up with a strong cobalt and an elegant off-white with light green tones too.


We did our first launch as a group on June 4th.


Everybody was very happy with their boats! A few needed to finesse the outfitting. We made hip pads from some mini cell foam, as well as a bulkhead footrest for one boat.


This was a very fun build for all of us.
Thanks go out to Brian for all the work and inspiration to create such a well thought out design.
With his plans and videos it’s easy to get a quality kayak.

Here is a picture of my Mariner Coaster on the left, an F1 that Brian had made years ago for a friend, and this year’s new boat.
We are looking forward to paddling these boats, and to another class next building season.
Jack


December 28, 2020
Hi Jack,
Really nice kayaks you guys made.
Wondering how the 2-part urethane worked on George’s 9 oz. polyester? I’ve only used enamel paint on his polyester.
Thanks.
Kevin
December 28, 2020
Hi
Definitely recommend the 2 part urethane from Corey. Seals the 9oz really well, no leakage.
We add powdered dyes for color.