
Introduction
This is my first paddle build. I’ll be using cheap western redcedar 2-by-4 boards as practice before I try with nicer wood. I live in a small town on the east coast and there are very few options for me to find good wood. There will probably be plenty of knots and some warping in the wood I buy but I’m still challenging myself to get a usable paddle out of the process. The lessons I learn about how to work with wood with defects can only help me in the future.
My other challenge here is that I usually paddle a very wide open cockpit tandem kayak, which doesn’t really fit into the standard rules for deciding on paddle measurements. Therefore, I’m planning to build a paddle to dimensions that can be altered if I decide later that I want a shorter paddle or longer loom.
Deciding on dimensions
I found a few websites that suggested measurements based on various body measurements. These all provided about the same measurements that Brian suggested, from his plans and personal communication. The suggested length is 90″. However, my current Euro-style paddles are a whopping 102″ long, so I’ve decided to use an entire 8-foot 2-by-4 to make a 96″ paddle. I plan to leave a flat 3″ at each end of the blades that I can optionally cut off later, if I decide a shorter paddle is necessary, once I’ve tried it in the water a few times. Similarly, I’m going with a loom length of 20″ but altering the plans somewhat to allow me to increase the loom up to 22″ if I decide a longer loom is necessary.
Selecting wood
I went to the “local” (40 minutes drive from my house) orange big box store and started looking through a pallet of western redcedar 2-by-4’s. They were still wet from transport. That concerned be a bit because the boards on the outside of the pallet were drier on one side, meaning even if those looked straight in the store, they may be warped when dry. Something else I noticed was wide growth rings, meaning these boards were cut from fast growing trees, meaning low density wood, and therefore less strength but also less weight for my final product.
I know knots can be a problem because they can weaken the wood and can make shaping more difficult, especially when using a block plane. I really didn’t want any knots in the loom or along the edges of the paddle blades, because I didn’t want to make those already weak parts even weaker. I also looked for splits in the wood, which often occurred near the ends of the boards.
The other thing I looked out for was warping. There are many types of warping. Boards that twist along their length are the most problematic in my mind. A twisted paddle is not going to be very nice for paddling, and fixing a twisted board could remove so much wood that I’d be left with a paddle that is too thin or too narrow. I avoided twisted boards at all costs. I considered a little cupping (a warp across the width of the board) acceptable because I could always run it through a planer or jointer to flatten it. Finding a board with spring (warping along the length of the board like a river going around a bend) was pretty rare. However, bowed boards (warping along the length like a road going over a hill) were much more common, but so were knots, and I couldn’t find anything without bow and knots in the wrong place. I selected two boards, one straight board but with a couple of knots in problematic places, and another board with nicer knot locations but a bit of bow. Here they are in all their ugly glory.

Marking and cutting out the paddle shape
I let my wood dry for a few days and then re-checked the boards for warping. Luckily, they didn’t get any worse.
I carefully removed all the staples so I didn’t have any flying metal when I start cutting (or dulled tools).
I marked the pattern with a sharpie on one side of the board. As I already mentioned, I have done something a bit different from Brian’s instructions here: I’m leaving a flat 3″ at each end of the blades that I can optionally cut off later, if I decide a shorter paddle is necessary, once I’ve tried it in the water a few times. See the photo below.

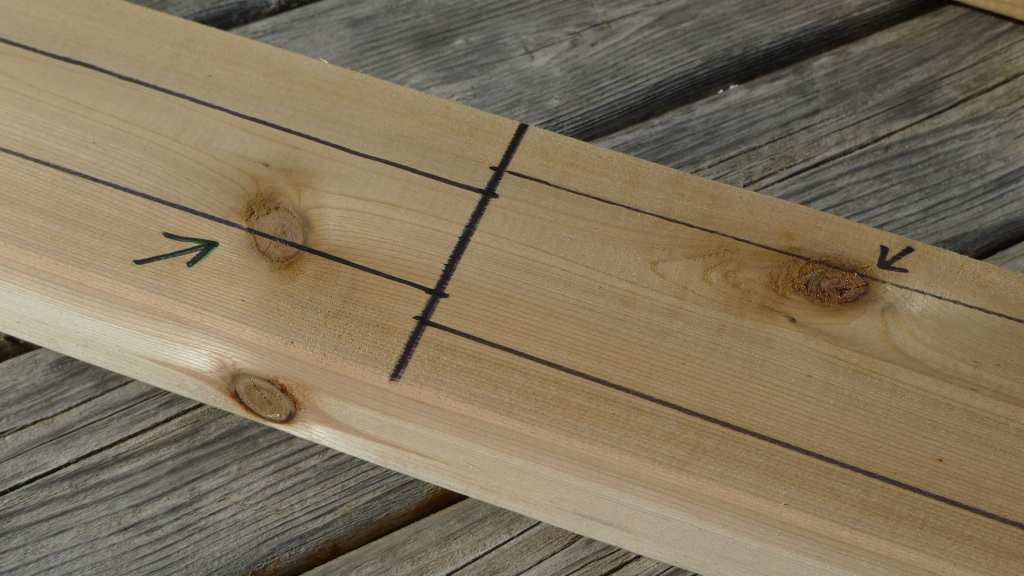
I marked the pattern on the other side of the board with a pencil, to help assess the knots on both sides. I marked any potentially problematic knots so you’ll be able to see what happens to them during the paddle cutting and shaping. Below is a photo of a couple knots I’m worried about. The knot on the left is in the loom. I’m hoping that the two you see on the left are connected so that the knot will be removed once the loom is shaped. The knot on the right may be a problem, depending on which way it moves into the wood. It’s difficult to tell for now. I’ll show before-and-after photos of the knots later.
I cut out the paddle pattern slightly differently from Brian’s instructions. I used a table saw to cut along the edges of the blades, which I find gives a much straighter cut than a bandsaw or jigsaw (although the bandsaw I used was pretty flimsy). For the loom I used the bandsaw and went very slowly.
Marking and cutting out the taper
I had a bit of a bow in one of my boards. I followed Brian’s initial instructions for marking the taper by making small marks with a sharpie at each end of each blade, which for a straight board (no bowing) should all line up when sighted along the length of the paddle. This was not the case for my bowed board so I shifted the marks at the ends of the blades somewhat to get a straight line connecting them, which I drew with a sharpie and then continued to mark the tapers following Brian’s instructions. That’s a bit difficult to explain. Below is an exaggerated sketch of what I mean. The top diagram is what you would get if you follow Brian’s instructions with a bowed board. The bottom diagram is what you want.

My plan to allow me to extend the loom beyond 20″ later, if I decide to, meant that I had to start the tapers from 1″ away from the ends of the loom (see photo below).

Also, my alteration of adding a straight 3″ at the ends of the blades made this step a bit more challenging because a straight-edge rested along the side of the blades of the paddle no longer sat flush along the entire blade (it lifted off the wood when it got to that 3″ end, see photo below). I just had to be a bit more careful when drawing the tapers because of that.

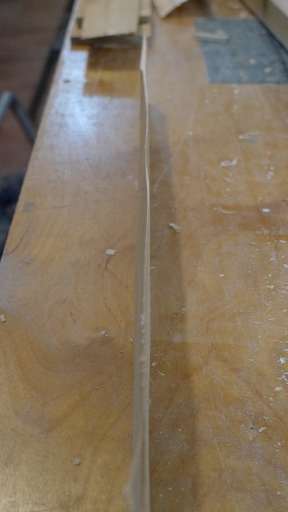
I then cut following Brian’s instructions, although using a flimsier bandsaw than he suggests. No matter how careful I was, this resulted in very wavy cuts. Also, the saw wanted to jump out of the wood as soon as it got close to the edge of the board. Part of this resulted from the flimsy bandsaw, but it’s also because you don’t have a flat edge on your board at this point to lay on the bandsaw table. Here’s a photo sighting along one of the cut-off pieces, for one of my worse cuts.
Like Brian says, don’t worry about this. I easily cleaned up those waves on a jointer, which I highly suggest using if you have one, or as in my case, if you have a friend with more tools in his workshop than you have. While I do agree that chisels are dangerous, I might argue that jointers are the most dangerous tool you can use. You could also use a power planer.
Shaping the blades
Knots can stop a block plane dead in its tracks. Basically when you hit a knot you are hitting a change in grain that is harder to cut through. You can use a block plane if it is very sharp and with the blade set for a very shallow cut, and at a high angle, but I really think a power planer is a necessity when you have knots. I shaped using a power planer for the entire process, following Brian’s instructions in the “Advanced techniques for carving Greenland paddles” video. You just have to be a lot more careful.
There are definitely some disadvantages of using a power planer for the entire process. First, it leaves lots of little dents that mean I’ll have to sand a lot more (see all the photos below). Second, you gan get some amazing gouge marks if you aren’t careful. In the photo below I ran the power planer from right to left with the front of the planer angled upwards too much. It ate a nice chunk out of the end of my board but I think this should be easy enough to fix in the final shaping.

In the photo below, I lost grip on the planer as I was moving across the loom and it skewed, moving along the loom but held at an angle. Well apparently this makes for a nice gouge. Again, I can fix this in the final shaping.

In the photo below, I again wasn’t being particularly careful and ran a pointy corner of the planer into the wood. Western redcedar is soft, really soft, so there’s another big gouge. Once again, easy to fix in the final shaping.

Finally, the power planer knocked out a couple of the knots. Here is a photo of one:

Knots can be “tight”, meaning continuous wood, or “loose”, meaning with signs of scar tissue, cracks and gaps. If the knots are loose then they represent a significant weak spot in your wood, and they pop out pretty easily when planing over them. I’ll have to glue this back in before I go any further with the finishing.
Here is a photo of another knot that got knocked out by the planer, this one in the loom. It’s the same one I drew an arrow to in a previous photo. Turns out I got lucky and it did indeed travel in the direction I needed it to. I should be able to clean this up when I shape the loom.


