
As part of a work anniversary I received a 8 foot kayak, I used that for a while, but soon realized that I wanted something faster with better handling. After looking at plastic kayaks for a while and researching kayaks on the internet I decided to buy a used 13 foot fiberglass Epic kayak, and had a blast with it, was hooked. At the end of the season I happened upon a Greenland paddle discussion, liked some of the benefits I read regarding being easier on the shoulders(especially for older paddlers), so I built two Greenland paddles out of a 2×4 of Western Cedar(I found a great video on Brian Shultz’s Cape Falcon kayak website). After that I continued to look into kayaks, especially skin on frame, and after more research, bought the online video course for building a F1 modern kayak thru Cape Falcon kayak website. Most of my days are a few hours in the afternoon, work part of the days on weekends. After April 1, 2021(I retired on March 31, 2021), I was able to work on it more full time.

March 19, 2021, gathering supplies
Went to the local lumberyard (Hilltop Lumber) and was able to find a number of 1×6 x14′ Western Cedar boards with straight grain and reasonably clear. I had picked up a hitch mounted pickup bed extension which helped to haul the board home. I was not able to find any ash from the lumber yards or cabinet makers, but was able to find hickory for the aft deck beam and aft deck stringers thru a local cabinet shop. I initially planned to purchase the rib bending boards thru Brian, but ended up getting the rib stock from J. W. Swan Boat Builders, (Brian was not able to get good bending stock). I did purchase the F1 parts kit (including coaming) thru Cape Falcon kayaks.
March 20, 2021 cutting up lumber

March 21, 2021 Start prep work
First thing I started on was the curved deck beams, glued up one at a time, only have 10 clamps. One thing I learned that you do not to wait too long to clean up the glue with your chisel, around 3 1/2 hours is best. Next I started to work on the gunwales, I setup my fixed base router (versus a plunger router in the videos) with a 1/4 ” spiral up-cut bit. I was a bit nervous about cutting the rib mortises, but once I got started, it went well. I then used the drill jig for the deck beam mortises, I used a 3/8 Forstner drill bit, and drilled the left side, right side, then middle, then drilled 2 more in between these three holes, then cleaned up the mortise with a chisel that I got clean mortises.


March 22, 2021 finish prep work
When getting ready to work on the stringers, I noticed that these did not look as good as they should. I then went to the lumber yard and picked up another 1x4x14′ Western Cedar. I then proceeded to cut and plane the stringers. I used the old stringers to do some practice work on rolling bevels, after I got the hang of it, I proceeded to plane the good stringers. The prep work took me about 11 hours.

March 25, 2021 first day of assembly
Today I started to assemble the pieces that I have been working on through the prep phase. First thing is to get the gunwales assembled with the forms and jigs. I had to use an additional set of straps to get the gunwales to align to the forms.

At this point the forms are in place and the gunwales are secured with artificial sinew.

March 26, 2021 attach deck beams with mortises
Today was spent cutting all the tenons for the deck beams, then installed the deck beams and pegged them to the gunwales with with 1/8 inch dowels.


March 27, 2021 pegging deck beams

I placed an order for the rib bending stock from J. W. Swan Boat Building(got the lead from Brian’s Instagram feed), should be later this week.
April 3, 3021 The rib stock arrived today

Today was a busy day measuring, and measuring again (like the saying measure twice(or 3 times) cut once), to get the ribs cut to the proper length based on the chart in the plans. Next removing the the edges, and trimming the thickness of the ends of the ribs, I used my joiner/planer, worked good.


April 5, 2021 Rib bending day
I was a little nervous about bending the ribs, had a rocky start, and mixed up a couple of ribs, was one off (rib number versus rib mortise number), did not find that until I had all the ribs in place. I ending up breaking several ribs(glad I got 10 extra, used a few for testing, and broke a few). After a little work re-working ribs(they can be put back in the steamer to modify the shape), I was pleased with the result.


April 6, 2021 lashing stringers


April 7, 2021 Bow and Aft Stringers
Today I lashed down the bow stringer, and cleaned up the frame


Started cleaning up the dowels(using the chisel to trim them flush with the gunwales), and using the Slick plane to take the edge off gunwales and other members.
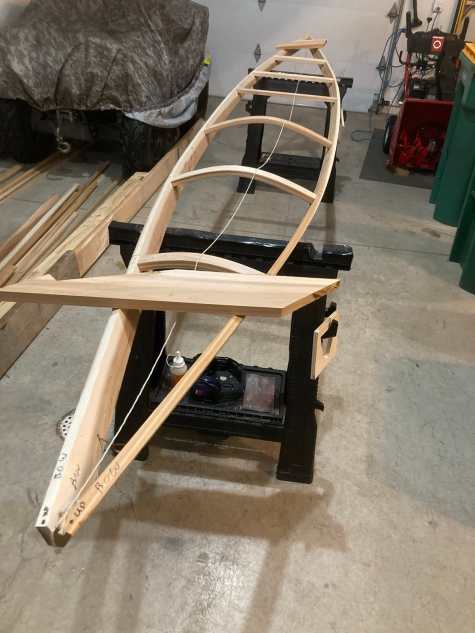
April 9, 2021 Finish frame
One of the last things to do before I oil the frame with Watco Danish Oil is to check for symmetry. I noticed that the keel was a little crooked, to did some shifting and got that aligned, also check the main stringers and noticed that they had crept up a little in the stern, added another lashing to them, now they are where they belong, about a finger width between the stringer and the gunwale at the stern stem.
April 10, 2021 oil frame
The rain finally stopped, with allowed me to work outside oiling the frame with Watco Danish Oil today. Fortunately I was was outside as the fumes are strong, set up the saw horses in out pontoon parking pad, (is gravel). I applied the oil over the whole kayak, took almost a quart. I let it sit for 15 minutes(per the instructions), then proceeded to wipe it down(top and bottom). After an hour or so, I wiped it down again making sure all the lashing were dry, and there was not oil dripping from any mortise joint . Plan on putting it back outside again tomorrow to make sure it is dry. When I was wiping it down I noticed that one of the foot braces was mounted incorrectly, the little stop was at the cockpit end of the bracket, I then proceeded to swap it around so it was mounted correctly.


April 12, 2021 skinning the kayak


I had a neighbor come over help me pin the stern as I stretched the nylon, this needed as skin gets sewed up 2 1/2 inch short.
I used a soldering iron with cutting tip ( $7), it worked real good for cutting the nylon.

I am glad I followed Brian’s suggestion to sew up the stern before doing the bow sewing, the stern is not near as nice as the bow sew job.
April 11, 2021 Coaming and dyeing skin


For the color I chose Sweet Potato Pie (a custom color Brian came up with (3 teaspoons of gold Ochre, 1/2 tsp Brown, and 1/2 tsp Russet) of Jacquard Acid dye mixed with 5 cups of water and 2 cups of vinegar. Applying the dye is messy(I used a 4 inch foam brush), as you want to get the dye on before the dye mix cools down.

April 16, 2021 applying coating

I used the 2 part Urethane from Corey at SkinBoats.com, applying 3 coats on the hull and 2 coats on the deck.


April 19, 2021 finishing up
Today was deck finishing day, worked on installing the leather deck straps used to secure a paddle, and the end straps used to carry the kayak. While threading thru the leather strap I forgot to include the second toggle, fortunately I caught the mistake before I got too far. Pulling the leather straps is definitely a workout, definitely one of the harder tasks in building the kayak. I also installed the Wilderness Systems foot braces, Snap Dragon back band, keel protector strip and inside seat pad (Thermarest Ridgerest)


I believe it took me about 60 hours to assemble the kayak plus the 12 hours of prep work. The weight for the completed kayak is about 32 pounds.

I added a 0.060 inch Kydex keel protector(you buy it in 12″ x 12″ sheets and form it with a heat gun or propane torch) in the bow section(to protect from sand / rock wearing the keel). I added one to my fiberglass kayak, and it worked well. I sprayed it with Cinnamon spray paint(as close as I could find in spray paint at Fleet Farm) then glued on using Marine Goop.


Hope to get some “on the water” pictures and reviews when the weather warms a bit(hopefully in May).
May 1, 2021 mainden voyage


Th initial stability seemed less than my other kayak (Epic GP 13′ touring kayak), but I got more comfortable as time went on. One thing I did notice that it was quicker and faster than my other kayak. I started out with my euro paddle, did not want to introduce two new things at one. After awhile I switched to my 84 inch Greenland paddle, need to work on that. I am wondering if I need to increase the loom(this one has a 19 inch loom) as I was hitting the gunwales, will have to try my other Greenland paddle, has a 19.5 inch loom and is 87 inches long. After more time on the water, I realized that the loom was correct, I needed more work on my form, just needed more length, so I am using my 87 inch long paddle now.


May 10, 2021
Very nice build. I am currently working on an almost identical boat! I have a soldering iron with a knife attachment and would like to know if you had any trouble with using it on the fabric?
May 13, 2021
When purchasing the coating did you buy the full order and one half order? How much coating did you use?
May 13, 2021
When ordering the urethane from Corey did you purchase a one and a half orders? How much of the goop did you actually end up using?