
Having grown out of a skin-on-frame kayak we made several years ago, and suffering from prolonged Covid lockdown boredom, my 14 year old son decided to go for it again. This time the key objectives were to go for a kayak with good handling and durability. We spend a lot of time researching all the available resources and were really impressed with the F1 specification and the quality of the resources available on the Cape Falcon website. So we tried to make room in the overcrowded shed, lined up our materials and got going…..
We had a nice length of western red cedar form a previous (unsuccessful) strip built kayak project, to which we added some American white oak from a local supplier. We took Brian’s advice and prepared just about everything we could beforehand. The downside was that this was not very exciting, so the younger members of the team lost at bit of interest for a while….

The coaming was the only challenge during the preparation process. Having never steamed anything we were not aware of the importance of the stock. While the main 3/8″ coaming steamed and bent nicely, we eventually gave up on the 1/2″ after three unsuccessful attempts; the wood was just too brittle and split despite trying several different steaming durations. I’m guessing it was too well seasoned. We solved it by bending two 1/4″ laminates. Laminating the deck beams was a big hit though, particularly cleaning them up and planing them down; very satisfying.

After routing the mortices we finally got down to making the boat proper. Again, the only real difficulty was steaming the oak ribs. We learned that our stock was unforgiving and that we should have been more particular about getting the grain parallel to the rib faces. Luckily, we had about 10 spare ribs; we needed them! Live and learn.
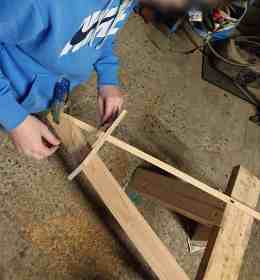


Adding the secondary stringers, deck stringers and tidying up the bow and stern stems all went pretty smoothly. After checking for symmetry and doing the final dimensional checks, we oiled the frame, which brought out the character of the wood nicely.


We used Ballistic-Nylon (850den, 310g/m2) from extremtextil.de to cover the frame and spent a few hours stitching her up and inserting the coaming. We dyed the fabric with 2 parts Brown and 1 part Aztec Gold Jacquard dyes. This dried to fainter, more insipid colour than Ruadhán was hoping for, but all ended well (see more below).


It proved difficult to find any of the coatings recommended either by Brian (no response from skinboats.org) or by other builders in Europe (UK suppliers were unwilling to post to Ireland). After some searching I acquired a 2-part clear coat polyurethane acrylic with a flexibility additive (15%) which is normally used for car bumpers. After dyeing the fabric we first applied an adhesion promoter; the following day we applied the two part coating without any major problems, except some small bubbles, some of which were not possible to remove, but which are not really noticeable. (I think the problem was that I applied the coatings too quickly on top of one another – about 15 minutes apart – and this trapped evaporating solvent.) The brown dye coating, which was a bit insipid before the coating, took on a nice deep tone – we were very pleased with the final look.


After this, we installed deck lines and elasticated cord and made a back band. And then it was all over! Nothing more to do than to launch her and bring her on her maiden voyage.


We launched the boat on a cold April morning at Bull Island, near Dublin city centre. Ruadhán had no difficulty and confidently paddled the boat in light winds and a small chop. He was really happy with her – she looked beautiful and the admiring comments from passersby added to his general satisfaction! I tried her out and first impressions were that she tracks well and is quite manoeuvrable (compared to my plastic sea kayak in any event). The centre of gravity is much lower than I am used to, the primary stability is a little tippy (just a matter of getting used to), but secondary stability is absolutely solid. Some water got in through the cockpit when entering/exiting which we had to empty through the aft bung (very handy); when tipping the boat during draining, we noticed that the stitched seam and lashing stiches were very permeable! So we’ll need to do a bit of aquasealing to finally finish the job.


March 23, 2021
Aidan, I also had some cracked ribs but pressed in polyurethane glue (which bubble expands, like Gorilla glue) and taped hard over them. Remove the tape after curing and they look perfect! 🙂
March 23, 2021
Thanks Tibor. We did that but didn’t tape hard – had a bit of cleaning/sanding to do! Will know the next time…
March 27, 2021
bail ó Dhia ar an obair, a Aodháin 7 a Ruadháin, naomhóg nua-aimseartha do na laethanta saoire i gCiarraí!
ó Dhubhthaigh Port Láirge
March 29, 2021
Go raibh maith agaibh. B’fhéidir go mbeidh naomhóg traidisiúnta an chéad tionscadal eile!
May 17, 2022
Super job guys and thanks for logging your build process. I am about to start the F1 kayak build myself and feel more confident now with your detailing the build.
Hope you really enjoy your kayak.
Well done.
ps. if you ever need anything from the UK, I’m on the Isle of Wight and would be more than happy to see what I could do to help.
ps 2 . come to the island and kayak around here a bit
May 17, 2022
Super job and thanks for detailing your build; it makes me so much more confident to start my F1 build.
Hope it brings you lots of fun and joy on the water.
Well done.
ps. If you ever need anything from the UK, I would be more than happy to try help. I’m on the Isle of Wight.
ps 2. come to island and kayak around here a bit.
July 14, 2022
Hi Aidan, Any updates on how the kayak has fared since the initial try-out? I’m also from Dublin and curious as to how it handles on waters around here.
November 12, 2022
Hi Ruadhán,
Have you been out around Bull Island much? Or was it’s maidan voyage the only time you were there. I’ve never seen an F1 in the bay.
Do you know what was resulting in the leaking issues you mentioned? Was this due to the type of paint you used not sealing the sticthing properly, or what do you think it might have been.
How has the boat been handling since?
Thanks,
Alan