
Vancouver, B.C., Canada

It’s Early August…I’m standing in my garage taking stock of the offcuts and leftovers from my yellow cedar tandem canoe build. I find myself doing some mental math and realising I have enough yellow cedar left over to make a steam bent cockpit coaming and about 45 F1 ribs..!
I was first drawn to Brian’s designs with the F1 before I found his canoe designs and course. I’ve been contemplating an F1 build for a while and having throughly enjoyed the canoe course and the canoe build it was an obvious choice to pick up the plans and the kayak video course. I have to say that the kayak course is exceptionally polished. Having learned a great deal with the canoe building course plus the detailed instruction in this one I’m finding the material is sinking in quickly.
By mid-August in just a few hours of work I’ve completed the jigs and forms and I’ve steam bent and laminated up a coaming. Because yellow cedar is not as strong as white oak, I’ve laminated two layers for the coaming body and two more for the lip. All mating surfaces are gorilla glued (it helps to have 50 spring clamps left over from the canoe course!), and finished with the usual bronze ring nails but with a 1/32” pilot. Inspired by Brian’s laminated deck beams it is light, incredibly stiff and seemingly pretty tough. We shall see if using softwood for the coaming is a good idea when the skin is stitched onto it – it might split out. Note this boat will likely not see very rough water or e.g. risk of cockpit implosions.
Tip on the capture forms I had not seen detailed anywhere – If you can safely clamp the blanks on a table saw at the correct angles a plunge cut with a 7-3/4” blade makes light work of accurate edges for all the internal faces – saves fussing with a jig saw and poorly aligned cuts that inevitably result.


August 24th: Deck beams
I was able to get six deck beams with a couple of extra laminations all of clear wood out of a knotty 8’ red cedar 2×4, including a 2” wide deck beam #3 for a sail rig as suggested. Bending the laminates to fit the jig took a surprising amount of force that I wasn’t expecting at first!
A single stick of red cedar I’ve picked up will do enough aft deck beams for two boats for a couple of dollars. I already have some Douglas fir for deck beam #4. The ash I had used for the canoe was really nice but when thinned to a narrow tip it seemed to chip occasionally. Looking at the joinery of those parts I decided to go with a piece of kiln dried white oak which I’ve added to the wood pile.


Late August: Ripping!
A quick Saturday trip to the lumber yard and I’m home with two clear 1x6s of red cedar 16’ long. The ends will serve for the stems, the rest for all the longitudinals. I spent about an hour ripping and trimming the pieces, which are all still 3/4” thick – learning from the canoe build I’ve decided to keep everything at the stock thickness and then I’ll plane them all down in one go on a borrowed thickness planer before assembly.
Unfortunately, one of the 1x6s had a check hidden 1/3 of the way down the board in the centre. My first attempt at a keel fell apart as I ripped it as a result but I turned it into a secondary stringer and I had enough wood to spare for another keel. I really wasn’t expecting that to crop up but the grain on the board I was using for the narrow pieces was a little off. Just a risk to consider if only buying just enough wood!


September 5th–7th: finishing prep work
I spent more time than necessary deciding which way to pair up my gunwales. In the end I spun or “helicoptered” one 180˚ to match the other in bow and flex exactly – probably unnecessary. Morticing for the ribs worked very well with the plunge router just like the canoe build. If anyone has missed it, I believe Lee Valley has the best deal on 1/4” spiral upcuts around. They are HSS rather than carbide but in red cedar that’s not an issue. I used the drill block method for the deck beam mortices. Again that was pretty simple but I was finding the drill guide block was getting pretty worn out after just one boat…that might have been the brand new drill bit I had in the drill but worth watching out for. I used painters tape on the back sides of the drilled mortices to prevent grain tear out.
I’ve ripped 45 ribs (I have another boat planned). Six of them are 1/4” thick for the front three per boat, and the rest are 5/16”. I had put together the calculations to match any wood species to white oak stiffness for my canoe build and that is the number I arrived at to match Brian’s suggested thickness for Oregon white oak. I’d be happy to share the method if anyone is interested in other bending species and getting to the correct strength or rib resistance to bending.
I found the rolling bevels on the stringers particularly confusing to think about for some reason, but after just turning my brain off and following the videos and Brian’s hand/arm motion with the power plane I was able to get good results.
I made the mistake with the canoe build of not doing all the prep work on the wood components before starting the build, then getting tripped up and needing to stop, e.g. rip stringers or plane ribs, etc. and it really slowed down the progress but also made the build feel longer than it needed to. On this one I’m determined to have everything prepped.


Sept 19th-21st: Building the deck
I had the same feeling when building the canoe but I’ll say it again. There is something special about watching the shape of one of these boats suddenly come into existence when you spread apart and curve the gunwales to shape. By the end of the deck building process I balanced the coaming on the deck beams and stood back to enjoy seeing an F1’s outline in the flesh for the first time.
Having had some practice with the canoe I felt like I was flying through the beginning of this process with familiar tasks of kerfing the ends, lashing and pegging. I started on the deck beams trying to visualise the tenon shapes in my head which I found a little challenging. Instead, following on from the rolling bevels I just stopped thinking about the angles and got down to it following Brian’s instruction and really they were quite straight forward. The “special sticks” are genius! The hardest part for me of this whole deck building process was consistently drilling for the larger dowels (that pin the tenons in place) to aim at the right place in the gunwales. After a couple off the mark I was able to get the hang of it. I found it helpful to try to ignore the deck beam (that you start by drilling into) and just visualing and aiming directly at the centre of the gunwale with the drill. The size C drill bit came in very handy here.


October 3rd: prepping ribs and other minor things
I borrowed and used a real thickness planer to machine the ribs down to final thickness. It took a little getting used to, as with softwood the intake roller tended to mar the face of the ribs unless it was taking more than about 1/32” off per pass – I was able to avoid anything in the finished product. I wish I’d done the same with the canoe, it was really fast! For those who don’t know, with yellow cedar it is almost impossible to properly see the incredibly narrow, closely coloured grain until its planed smooth. Once I’d got them all processed, I was pleasantly surprised to find I had no ribs with any diving grain.
Just to go with how I’d done the canoe ribs previously, I used a 3-letter system and graded ~90% of them “A” for totally clear straight grained, a few “Short A” where there might have been an imperfection at one end, and a handful remaining “B” where there might be minor questionable grain shape or behavior with the planer. None landed in my “C” category, which still bent well into semi-circular shapes in the canoe.
I also used a band saw to cut out the stem angles and the same band saw with a tilting deck set to the gunwale angle to cut the rear block to mount a drain plug. I found this to be a safe and effective way to cut the shape and it fits perfectly – the very tip just needs to be flush cut. I have also started on a Greenland paddle out of a $15 stick of red cedar, cutting the major band saw cuts only.
Ahead of a week or so of rain we have in the forecast I rushed to lay out the ribs and get them finished. I didn’t want to get the rest of the frame wet even though the ribs were about to get soaked anyway. Using the A, B, C grading system they were laid onto the gunwales somewhat at random within their categories. “B” grade ended up ahead of the cockpit. All the ribs were marked to length using a modification on the rib length stick I thought up (some of it is blurred out in the photo to protect Brian’s designs), cut to length on a table saw, and then I thinned the ends with a power planer in a custom jig I’ve built to narrow the ends to exactly 1/4″.
I built another stegosaurus to test the fit of each end of the ribs in the gunwales and adjusted a couple of the mortices with a chisel and the rib ends with a block plane to get a good fit. The ribs have now been placed under a couple of large granite stones to soak for at least a week out in the west coast rain to somewhat ceremonially introduce them to things to come – the canoe ribs were lucky enough to get snowed on too!


Oct 18th-20th: Ribs, stringers and stems
We finally got a break in the rain here and I was able to get a solid amount of work done this week on the frame which I feel really good about. I started off with bending in ribs 2 to 11 which went really well, some minor tear outs but straightforward. I have been using some yellow cedar that I had left over from last year’s canoe build. I got more problematic grain situations cropping up with some of the aft ribs, a couple of ribs just peeled open like a banana skin, while others worked perfectly on the same bend shape. Rib 1 folded and cracked on the first go around – I was forcing a vee shape a little too tight. Second time around I got some minor cracking at the apex but went with the shape which was still really nicely vee’d. In all six ribs were replaced, some others had minor tears that I was able to repair. For anyone else’s reference I’ve been using 5/16” final rib thicknesses with the bow ribs at 1/4″. Brian was super helpful with a check in on the shaping.
Learning from the canoe, where I waited way too long to do this next step, I was able to throw the stringers and keel onto the ribs right away to get the most out of fairing up the curves of the hull. To do this efficiently I used the zig-zag lashing used on traditional Alaskan kayaks, then once I had more time later in the week to spend on the frame I came back and pulled those off and lashed with the permanent box lashings. I did this so every rib was pinned to the stringers right away, as opposed to clamping just a handful of them. It seems to have paid off and the hull looks to have really clean lines presenting on the stringers and keel.
The stems and ends of the stringers came together nice and easy, with one stupid mistake I made – I knew I had some pretty extreme diving grain concentrated just at one end of the stringers. I oriented this to the stern without thinking. The tension that these pieces are under to align everything promptly cracked the stringer. Fortunately, I was able to save it and flipped these ends to the bow.


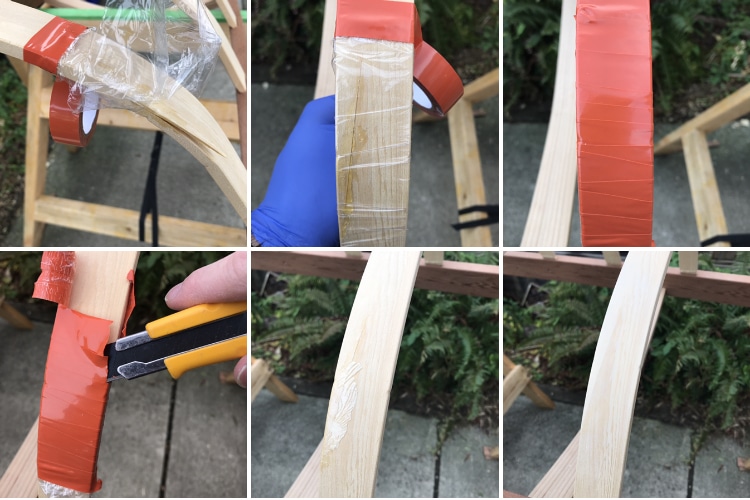
Rib tear out repair
I have found that wrapping with a piece of polyethylene bag and then tightly taping with electrical tape works really nicely to repair a rib tear out with gorilla glue. Of course this only works for a minor grain tear out under ~25% of the rib thickness. The glue doesn’t adhere to the bag once it cures and it keeps everything clamped with an even pressure all around.
A tangent on bending yellow cedar…not much on the internet is documented on free-bending yellow cedar, especially around this dimension so I thought I would put some words here on it, for green and air-dried stock. I’ve seen a piece of kiln-dried yellow cedar recently and it looked destroyed in comparison – I doubt you could steam bend kiln-dried stuff. What I’ve found for air-dried is that the ribs need to soak for at least three days submerged in water (no fabric softener tried), after that I keep them damp while working. Without soaking they still bend, but they aren’t as pliable. Soaked ribs end up with a rougher texture after bending, like a rough sanded or cut look, un-soaked ribs maintain a smooth planed surface. For me, each one gets steamed for 2:00 to 2:45 depending on thickness and temperature of the steam box. Too little time and the ribs are still pretty stiff, too much and the inside of the bends collapse and fold unpredictably. If you scribe soaked wood even with a pencil then steam it will crease at that location, which could be used to your advantage. I’ve found backing with a “seatbelt” strap on tight bends works for me, but a leather belt that is wide enough to wrap over the edges of the wood would also work fine. If you don’t capture the edges, the grain tears out there. I’ve found that flat grain is a bit of a minefield. Sometimes it works great, other times the layers of grain just peel off with little stringy fibres between the layers separating like banana peel. Steep and vertical grain, which lines up with some other stuff I’ve recently read, seems to be more predictable. I don’t think you can go much thicker than 3/8” in this kind of application. You can calculate the equivalent stiffness of the chosen wood species vs. another species using the modulus of elasticity or Young’s modulus to get the hull comparable to the plans.
Late October/Early November: dodging Pacific rain storms to chip away at the task list
We’ve had a ton of rain this Fall in Vancouver, BC. More than usual for this time of year. I’ve been trying to line up some free time with breaks in the rain and I’m slowly chipping away at the task list of items left to complete the frame, and dreaming of a barn or other enclosed space where I could work on the boat.
Brian helpfully pointed out that I could improve on my bow stem shaping where it meets the keel during a discussion. I have to say I was focussed very heavily on rib shaping for this boat and completely missed, until he pointed out, the error I’d made with an abrupt transition from the stem to the keel in the bow. I had made a second set of stem blanks for a second boat and so was able to make a complete replacement in a couple of hours. Before and after shot below.
Other things that I’ve so far been able to complete are shaping the end blocks, shaping and mounting the foredeck stringer, tacking on the secondary stringers, installing some special mounts for the foot braces (more on that later), and fairing and lashing on the stringers to the stems. Not many pictures this week as a lot of my work has been by headlamp in the dark!
Also, a happy surprise this week. After about 18 months without any stock anywhere in Canada (as far as I can tell) Watco Danish Oil has hit the shelves of one of our specialist hardwood stores here!! I had used a different finish for the canoe focussing on UV exposure, but I REALLY like the simplicity and the overall finish of the Watco product on red cedar and I’m so glad to see it turn up again right before I needed it.

I would like to say that I am constantly impressed with the level of thought and detail in Brian’s plan sets, designs, and instruction, right down to the smallest details. The below photo is just one example of that but I thought it was a really good one to share. You will notice there is a secondary face on the stringer planed at a taper that grows towards the stern. Note how this exactly aligns with the rib faces and then lands perfectly at the stem with their mating faces parallel. When I watched these pieces come together as I built them I thought it was worth a quick photo as a good example of Brian’s attention to detail.

November: finishing the frame
November has been rough for working outside…or at least wanting to work outside and then not being able to! I think we got about 7 hours in the month without rain. You might have heard of the floods we’ve had around these parts and the rain has been relentless.
Anyway, I’ve been able to complete the frame, tidy it up, install a drain plug mounting surface, get every last thing squared away, plan out and bend a brass bow stem band for later, and oil with some Watco Danish oil. The yellow cedar ribs really contrast the almost purple-coloured red cedar gunwales which is pretty cool. The deck beams are new-growth western red cedar, deck beam 4 is Douglas fir, and the aft deck stringers are white oak. I like that it essentially gives all the longitudinals a dark colour and the cross-members a light one – not really on purpose.
Next step is to think about skin weight. I’m debating bumping up to a 12oz nylon at the cost of ~4 lbs extra to the boat weight. With some travel I likely won’t be skinning the boat until the new year. Below are a few photos of the frame completed.


February 2022: Making toggles
Just a quick update, I finally knocked the dust off some of my tools and got back into the spirit of kayak building this week. After a winter of mostly winter-related wintery things I made two boats’ worth of deck line toggles from HDPE and using far too many power tools at the same time (grinder in jig not pictured)!


End–April: Skinning the boat
After debating with Brian the merits of 12oz vs the 8oz skin I decided on the 8oz, just mostly for repeatability-sake but also having a 40-ish lb vs. 30-ish lb kayak would make a big difference to my wife who will own this one. She was wanting tough-as-possible initially, but we settled on 8oz 840 Xtra Tuff. I don’t think the 12oz skin would be necessary other than around these parts (Southern BC coast) where we have clam and oyster beds. I was chatting with another experienced builder the other day though and realised to myself it’s really not a big deal even in the absolute worst case of cutting open the skin (of which Brian believes has happed what…two times total?). You simply tape up the hole, get home and stitch up a repair.
When I built my tandem canoe, I decided to keep the thing a secret from my wife until the frame was largely done, and reveal it as a surprise. As a result, I ended up steam-bending all the ribs in a thunderstorm under a tarp city in the back yard. I don’t think this build would be true to form therefore without something equally tortuous. This time, I ended up skinning the kayak over an evening, finishing at 3am, convinced I must finish the job as dew started to form about 11pm (likely a false concern). Shying away from the tarps this time I opted for a neighbour’s picnic-style canopy. I liked it so much I’ve bought a second to build a coating booth from the two… It was about 6˚C (43˚F) and pretty damp but actually worked out very well. Work progressed really smoothly and was enjoyable from the initial laying out of the fabric all the way to finishing stitching on the coaming. I was able to get a nice amount of tension into the skin and by the next morning it was pretty drum-tight already.
One thing I find amazing with these builds is the short amount of time it takes to go from a frame, which my brain at least sees as a frame, to what at least my brain perceives as a “boat” with the skin on and sewn up. Picking up what is probably a 23 lb boat at the moment feels magic, compare to the 60-70 lb kayaks we’re used to here, or the monster 90 lb tandem we sometimes borrow. It’s also amazing to be all of a sudden you’re staring there at a boat you’ve just made with your bare hands, and a damn nice looking one at that, looking at the lines flowing nicely into and between each other.


May 2nd: Dyeing the skin
Today I was looking at the weather forecast and realised I really have just one day in the next ten without rain, so hurried to be able to dye the boat this afternoon. The colour we landed on after making a colour palette from a few options we had collected was the “spruce” from the Cape Falcon webstore. This time around (contrast with the canoe, where I basically ended up painting myself yellow!) I only got a single drip of dye on my clothes and things went very smoothly…or so I thought. Pulling the tape it turns out I’ve blotched some dye onto the back of the coaming, which is not such a big deal.
Worse though is I had debated ironing the skin, given it was already nice and tight after the damp sew job, and finally went for it. Unfortunately I have singed the skin black in lots of places on the deck where it contacts frame members. I was moving fast, about double the speed of the video course, kept the skin wet, steam flying out everywhere, but still I managed that. I guess it looks ok and with the coating on might not be so visible, but I’m a little upset at myself for doing so. I’m not really sure what happened, perhaps the hottest setting on my cheapo Black and Decker steam iron is hotter than others, or it doesn’t regulate very well, or it was the dye that burned and not the coating. Anyway…watch out to anyone doing that. Maybe test your iron first, not on the boat. Either way, its just cosmetic thankfully…there are no holes.
The good news is that the colour looks fantastic contrasting between the yellow cedar ribs and coaming, and the red cedar longitudinals of the frame.


Update on colour and ironing…
Oops. So once the dye had dried and I had a chance to look at the boat some more I discovered just how bad my setting of the colour had gone with the iron. After getting the black marks mentioned above (more about them below) I stopped, worried I was burning the skin. As a result the colour has adjusted to a more blue-tint with the heat and the base more green-tint without, in patches all over the deck – see the photos. On top of this, the water dripping from the steam iron (some do this more than others) had left little light spots on the hull.
Having stared at the black areas on the skin I’ve discovered these are areas where the iron has picked up, cooked, and deposited areas of extra dye powder. Getting at this with a fingernail, toothbrush and a vacuum cleaner has taken this effect down by about 50%. I think this is a bigger problem the green “spruce” dye than others but something to know. I also found didn’t pay full attention to masking the back of the coaming and did end up with some dye bleed onto the back of the coaming and also some bled through a space between coaming layers and ended up getting up to the top of the coaming near the rear. Just a typical result of using the dye method I imagine.
Back to the ironed colour variation and how I fixed it. This was bugging me too much, so I set about experimenting with scraps of skin fabric and devised a method and a plan. It worked really well (see below) and I feel could actually be used in place of the iron method, if the kayak was balanced on saw horses resting on the coaming. I suspended the completely dry kayak upside down, overhead in my garage. I then made a splash screen for the smaller of the attachments that come with the Wagner wallpaper steamer out of a piece of skin fabric. Without this you risk spattering little droplets of boiling water all over the skin. Keeping the steamer about 1/2” to 1” away from the fabric I set about re-heating the deck, while periodically pouring out collected water from the steam attachment. This kept the fabric moist while heating it, and also set all the colour on the deck to the same tones, top photos below are before steaming, bottom photos are after. Water from the iron had created paler spots which are a different story and less visible with coating on (speaking from experience with the canoe). The skin was as tight after this job as with after ironing which has me thinking of using this method alone in the future. The steam also helped spread out the buildup of dye on the dark areas. I did not steam the hull, cautious of the lashings.


May 13th: Coating
I’ve been looking for a weather window to coat the kayak for a few weeks and eyed up this day as the only one without 100% rain for the foreseeable forecast. I woke up early to set up a shelter that would keep the boat dry in case of any showers. Over my coffee I started noticing the current weather. Rain. Lots of rain. In a somewhat darkly comedic radio broadcast our local morning presenter was interviewing a lead Environment Canada Meteorologist on the wet spring we’ve been having here on the West Coast (it’s been that wet). The Meteorologist’s honest assessment was that “we’ll probably have a break in the rain by early July.” Screw that! The forecast looked like it was going to improve through the day so I thought I would go for it, rather than risk no kayak until July.
In Vancouver, space is at a real premium. We are very fortunate to have a garage and a back yard here but we don’t have the kind of indoor space I see on other blog posts of 40’ basements, nice dry barns or other options. Even renting a work space to do this kind of work with the coating is nigh-on-impossible here. What I came up with was to gang two 10’x10’ Walmart shade shelters together and fit them with the optional bug screens to avoid the “flypaper” phase of the polyurethane curing working as, well, flypaper.
What made my long-term plan to do this outside harder was rain. Lots of rain. The part A of the coating has chemistry that makes be believe it is highly reactive to water. My assumption is that it would foam horribly with a drop of rain in it. So I set about creating a guttering hung between where the two shelters join (and drain) from some PVC pipe ripped in half on the table saw, and then to be sure the coating would have enough time to set up before it risked getting wet I suspended a 10’x8’ silnylon tarp diagonally through the shelter which covered all but 6” of the bow and stern of the boat. To keep the humidity down from the wet ground I put some plywood scraps on the floor and plastic sheeting where I didn’t have enough. The plan was to have the tarp in an up position to coat, and then tent the boat with it overnight in a lower position. This worked out perfectly, if only a little tight on clearance at the step where you have to pick up and flip the uncured, coated boat to get to the deck. I was happy that I cleared it fine and didn’t glue my favourite tarp to the boat! I tied the screws in the hull to the saw horses to avoid the boat slipping.
What I did differently on the coating:
I used a couple of turkey basters with graduated measures on them to decant the coating rather than pouring it into the mixing container. This allowed me to get pretty accurate on the measures and avoid spilling too much. The risks however were potentially losing count while getting distracted staring at the boat…thankfully didn’t happen…but it might have almost happened once!.. and not waiting enough time for the baster, which I was using like a huge pipette, to drain to the mixing cup between measures.
I coated the whole boat at 10˚C. The whole day didn’t drop or warm up past that. I really wanted to hit at least 13˚C to stick with Brian’s recommendations, but that’s what I had to work with. With the cooler temps I made sure the coating was inside the house until I started to make and use the first batch. This meant it was warm enough to be thin enough to penetrate the nylon completely.
I also biased just a little more part B to aide in curing at the lower temps. I debated if this was a good idea or if it would cause something strange like foaming, brittle coating or other issues. My risk on that one but it seems to be fine.
Some cool temp observations:
As a result of the cooler weather the part B started to cloud up before use, like if you put olive oil in the fridge. On mixing with the part A this went away without issue, but at first I was concerned about moisture until I measured ~55% RH in the workspace. After the house-warmed batch the coating was a little less viscous than it should be which made it more difficult to mix without lots of bubbles, and to roller without going on ever-so-slightly tacky and encapsulating bubbles. I found that using a hairdryer (not heat gun to avoid the risk) on high 2-3” from the boat worked to get these bubbles down and really gloss out the coating nicely.
I did find difference in curing time vs. the canoe (which I did at 20˚C) maybe 50% to 100% longer. Self leveling was therefore great. What I was also finding however was that the coating was going on nice and thick and building well, more was getting absorbed in fresh rollers than I anticipated, and I think some of it started to migrate away from the keel during the hull coats, but when I flipped the boat it seems to have migrated back again with gravity. I was able to stack up 3x full coats on the lower hull in three hours, considering the extended cure time, and also an additional coat on the lower half of the hull.
By the last coats on the deck I was heating the coating in the roller tray with the hairdryer for the last minute of the mixing time, being careful not to warm it too much, but that took out about 75% of the air bubbles pulled in from mixing and got the mixture right to that perfect warm honey consistency for rolling on, which was much nicer to work with and didn’t have the awkward roller-gripping tack of the unheated coats. The deck got three very thick coats and glossed out nicely
I was planning on using some left over partially cured coating to fill the thread pull holes, but once the light started to fade near the end of the day, once the coating I had set aside had cured enough, it was impossible to see the pull holes in the skin from the sewing and the sein twine, so I left those to be filled with aquaseal.
Overnight I put the tarp in the lowered position in case of rain. I’m really glad I had that in the mix as by the next morning we had just a little rain and the amount of water deflected by the tarp onto the floor of the shelter was pretty significant. By 14 hours post rollering the coating has some “skin drag” if you run your fingers on it, but has passed the flypaper phase.
I’ve got half the 16oz/8oz backup order of polyurethane left and I’m undecided if I will put more on the hull right now, or the liquid keel strip I was initially planning. The rain is on again now and the boat is looking good…I may have lost my weather window and I’m installing a brass rub strip anyway.
(Update May 14th)
The sun came out and the humidity dropped the following afternoon so I decided to go for it with the “liquid keel” wear protection. I recall pulling a thicker chunk of fully cured material out of the bottom of my mixing container from the canoe and noting how crazy tough it was, I think it will do really well as a keel wear strip.
I tried balancing the boat on screws put through scraps of wood. Holy $#@* did I have a scare when I picked up the bow to add the screw-point block and the boat tipped off the screw points at the rear and almost punched two holes in the aft deck! I went instead for alu tent pegs laid down on the saw horses. Much safer!
I mixed and pre-cured the polyurethane indoors at ~21˚C to be sure the timing would work. I had about 30 minutes between starting to paint on the keel strip and it becoming totally unworkable, but it was pretty straightforward to get a uniform coat with the masking tape to help guide the edge of the buildup. After 30 minutes of painting, so 45 minutes post-mixing, the material didn’t flow any further but still self-levelled after that really well. I pulled the tape at the recommended time even at 8˚C and that still worked well. Something to note about the process is during curing of really thick coats tiny bubbles tend to form in the otherwise clear coating creating a haze, to milky appearance in areas that is slightly visible from a distance and a little bubbly up close. Apparently, there is no way around that and I’m fine with it especially considering how tough this stuff is, just something to note, especially if not colouring with rare earth pigments.
I also discovered in doing the keel strip that hand mixing in a tall, narrow container introduces way less bubbles than mixing in a shallow wide container that I have been using this whole time. It might seem obvious to some but it wasn’t to me. Next boat I will make sure I have a tall narrow mixing cup that can take the coating with an inch or so of room at the top.
Key takeaway from all this coating work in general is that when you start to get the coating grabbing at the roller to step away, leave it and don’t touch it. Trust that it will self-level. Just watch for a few hours after each coat on the boat for errant drips showing up out of nowhere as the coating slowly pools and flows around at a glacial pace.
And just like that, its a boat! The colour is awesome we really really like it.


End-May: Outfitting
With the boat coated I set about outfitting with the obvious components. Deck lines were relatively straightforward and less challenging than I was expecting which was a nice surprise. I chose to sew the bow and stern grab loops with an awl and may wrap them with Sein twine later. I found it a little difficult to pick a screw location for the brass bow rub strip around the stem-keel joint but eventually settled on a 3” spacing. The brass and the bronze screws were left over from the canoe build and were therefore an obvious choice. I did need to knock down the slight rounded profile of the liquid keel strip at the bow and stern, a block plane and a lot of very careful light passes made this accurate.
I found that screwing the HDPE rub strip to my saw horse made it easier to use the slick plane and shape the front end with a chisel.
Pull holes were filled with Aquaseal using an infant Tylenol syringe and installing the back band was simple. The colour contrasts between the leather, brass, skin colour and bronze are really nice, as are the inside differences between the yellow cedar and the red cedar and the skin. The hull shape looks great! I really cant wait to get this out on the water!
Fully outfitted weigh in is 30.2 lbs.


June 2nd: Initial paddling impressions
Holy $*@# this is a nice kayak! I was able to finally get some time to myself to take the boat out today for a first test. This was a big deal for me as I’ve been waiting to see what it feels like to paddle an F1 for at least a couple of years!
I was paddling around wanting to equate the feeling of paddling this kayak to wearing some expensive item both tailored specifically fit, and made of silk in comparison to a standard sea kayak…I’m not a suit-wearing kind of guy most of the time though, and the only silk item I own is a sleeping bag liner I purchased for a month long camping trip in a desert 15 years ago…so I’m honestly drawing a blank, but hopefully you get the idea.
What was supposed to be a 10-minute evening test paddle, turned into 45 minutes of messing around in the rain. Light wind, calm water close to shore, Greenland paddle, standard day-long trip worth of safety gear mostly to check fit of gear items. The boat is built for my wife, so I am overloading it by about 30 lbs and I’m also 6” taller than her, but regardless it paddles really really nicely.
At a gentle pace all the way up to a cruising speed it is virtually silent on the water. At a sprint it possibly starts to plane a little (?) but at all speeds it is straightforward to maintain tracking with minor pressure on the footrests or slight leans. Leaning it over it carves really clean edge turns and it is really entertaining to just play around in.
By the way, the angled the foot braces downwards for small feet (see frame photos) will be perfect for my wife’s size 5s but felt a little cramped with my size 10s. don’t do this if you are on the fence on foot size. The footbraces in this angled location also interfere a little with pulling the floor mat into place, likely will impact gear bags the same, but nothing unworkable.


November 25, 2022
Very nice color. Thanks for documenting your story. 🙂
May 6, 2023
Hi Rory,
Love your story on the canoe and the F1. I too live in BC and have a ready supply of both WRC and Yellow cedar. I want to use yellow cedar for ribs as you did. What width and thickness dimensions did you settle on for the F1 ribs?
Thanks,
Doug