
This blog charts the build but doesn’t seek to repeat every detail of a process so well documented by Brian. I’ve tried to focus on any significant challenges and solutions and hopefully give an insight into my reasons for it. I will add to this post as and when I gain more experience paddling the F1.
Why skin-on-frame?
I had been vaguely aware of SOF boats shortly after building my first kayak in 2007/2008 but probably subconsciously dismissed the concept as a bit flimsy! So my first boat was the biggest single Cedar strip in One Ocean Kayak’s range, the Cape Ann Expedition.

Bigfoot served me well over the years but as I did less and less camping trips it became apparent that i needed a lower volume boat. About the time I was selling Bigfoot and making a stitch-and-glue Shrike I made a Greenland paddle using Brian’s online course. the Shrike was too tippy for my liking and didn’t really accomodate my UK size 12 feet so I sold that and made a stitch and glue Cirrus, again from One Ocean Kayaks. this is the boat I’m currently paddling. What attracted me to SOF was the really light weight that could be achieved and that got me looking! Many videos later the things that convinced me to make the F1 were firstly the thoroughness and clarity of Brian’s teaching videos and secondly the performance of the F1 in water that I wont be paddling! Needless to say, my wife thinks I’m mad!
Preparation
I would love to be as organised as Brian! However I am somewhat impulsive and alternate between having a clear up and working in a mess! I have accumulated a reasonable selection of hand and power tools over the years so I didn’t have much to buy. I did take Brians advice and bought a thin kerf blade for my budget table saw – a very good decision!
There are a couple of lessons to be learned though. I bought plastic spring clamps instead of metal and whilst they mostly did the job, the plastic swivel ends were quite slippery and were no good for gripping tapered surfaces. Also a couple broke in service. As all my drill bits were metric I decided to convert all measurements to metric. This inevitably led to compromises as there is never an exact metric equivalent. The only imperial drill bit I bought was the 1/16” for piloting the coaming nails and I wish I’d bought all the imperial bits with that order. Finally (for now) I already had a PU woodworking adhesive so assumed it was equivalent to Gorilla glue – it wasn’t. So after making the coaming I bought some Gorilla glue for future use.
The first thing I had to do was source suitable green oak and so I contacted Scottish Timber who had supplied a builder called Chris (posted on this site). I arranged to visit and naively expected to be guided to suitable material once I had explained what I needed. Wrong! Staff were pleasant enough but simply pointed to an area with some small stacks of timber and left me to it. I couldn’t really tell what the grain was doing and then realised that the planks weren’t thick enough! I was on the point of despair when one of the sawyers approached and asked what I was looking for. He was cutting oak so very kindly cut a couple of planks at 40mm thick. I had no idea what it would cost so was mighty relieved that it was less than £50 a plank! I took both of them so perhaps I’ll have a go at making a rocking chair!

Well, Scottish Oak is nothing like American White Oak and I found it difficult to determine what was the grain. As it turned out, the grain wasn’t straight anyway so I’ve had to make the best of it.
The coaming
The first thing to make was the coaming so before committing to that I cut some oak to experiment with. I discovered that by insulating the steaming tube with a bit of old carpet and insulating the steam feed pipe with some corrugated plastic conduit I could achieve 100 deg. C just inside the opening after only about 5 mins after steam first appeared and I believe that this therefore gave a uniform 100 deg. C from end to end.
I didn’t have a suitable leather belt to use as a backing during the bending so I made up a belt of two lengths of webbing side by side backed with duct tape. This did work but wasn’t easy to grip onto the strip of oak and I later bought leather for bending the ribs.
After a few test bends I was ready to make a coaming! I decided that my second attempt was useable and repaired the split with epoxy glue mixed with some sawdust.

When I added the double rim I realised I hadn’t prepared the tapers very well but again deemed them useable. The net result is a coaming that is functional and looks pretty good although there are minor cosmetic issues.
I was relieved to find that the nailing process was sound and glad I had bought the correct drill bit! I’ll just mention here that I drilled the lacing holes with my 3mm bit and although I managed the lacing I’m sure it would have been easier with the larger 1/8” bit!

The Frame
Referring again to the sources listed at the end of Chris’s blog I spoke to Central Scotland Sawmill. I was informed that as their Cedar was UK grown it would be difficult to find clear timber and my heart sank! However, while I was collecting plywood from Rembrand Timber for another project I asked about Western Red Cedar and to my delight they said they would enquire of their sawmill. It turned out that several lengths and sections were available to order so with a leap of faith I placed an order. We went away for a week in the van and collected the Cedar on our return. One tiny knot total!
It wasn’t long before the two lengths had been reduced to the necessary components plus loads of sawdust and offcuts and I set about machining the mortices and making the curved deck beams. I followed Brian’s video instructions closely and made a couple of decisions; I would use my drill rather than the router for the angled mortices and I didn’t invest in a spiral upcut router bit. I made a drill jig for the angled mortices and poked and vacuumed out the routered mortices that were packed with shavings!

Assembly of the deck was pretty uneventful and the day was coming when I’d have to tackle bending the ribs!

I could see myself getting confused so instead of using a measuring stick for the rib lengths I made up a simple spreadsheet to calculate the lengths – its my comfort zone!

Because my previous steaming experiments were inconclusive I decided to steam for 6 mins and after successfully bending the first rib I loaded the steamer with the next half dozen ribs and worked continuously. As with the long steam box for the coaming, I had insulated the rib steam box and I would highly recommend doing that as it totally eliminates any temperature gradients.

The other recommendation is to use a leather back up strap for bending rather than webbing as its easier to grab hold of. Speaking of which, you need reasonably thick gloves! I conducted my bends with cotton gloves with dimpled palm grips and the process was punctuated with audible expressions of pain – once I had started I had to keep going! The one rib that I replaced in a separate session was bent with the benefit of double gloves!
Given the nature of the Oak I had bought, I kept the thickness of the ribs nearer 1/4” and the bending went pretty well. If in time I see a deterioration in the shape of the ribs I feel I will be able to address that. However, I acknowledge that is a risky strategy and I suggest sticking with Brian’s recommendations!

Lashing
Adding the longitudinal members was next on the agenda. After lashing on the keel I discovered I was going to run out of artificial sinew so ordered another two reels (20 yds each). Fortunately they came the next day and so I wasn’t too badly held up. The process was straightforward enough but I found that I had to watch the video several times to get the routing of the sinew correct – an age thing perhaps!
I already had suitable timber for the deck beam behind the cockpit and I found the ideal material for the two rear deck stringers – Ikea bed slats! These are laminated from Birch or Beech and are obviously designed to be load bearing.
Once the lashing was complete I decided to seal the timber with a coat of Bonda Seal. My original idea was to just seal the ribs in an attempt to stabilise and strengthen the wood and mitigate against long term collapse of the ribs. Only time will tell if this is a successful strategy!
Preparation for skinning
In the process of preparing the frame for skinning there were a couple of points I’d like to highlight. Firstly, to avoid having a gap between the skin and the gunwhale at the deck line hole locations I added small cedar pads and planed them in situ to be coplanar with the skin. This enabled me to keep about 10mm of timber above the outer edge of the holes rather than the 1/4” recommended without compromising the sealing of the holes.

Secondly, during the checking process I discovered that a couple of ribs at the stern would foul the skin on one side – asymmetry that I had previously missed. As I had already treated all the frame with PU wood sealer (more on that later) removing ribs was not a good option. Simply planing these ribs was not an option so I decided to laminate a piece of rib stock to the inside of the rib in that location before planing down the hump. Perhaps not ideal and I’m fairly sure that Brian would not have made that call but I felt confident that I’d be able to deal with any consequences down the line. However, I’d strongly recommend carrying out this check before lashing on the stringers so that any offending ribs can be easily replaced!
Skinning
The background to this is the difficulty in sourcing the recommended materials. I tried to go down the route of ordering the nylon and the goop from Skinboats in America but when I had no response to any and all attempts at contact I finally gave up on that source. It turned out weeks later that my emails had ended up in their junk mail but by that time I’d made other plans. After Brian suggested contacting Ant at Shipworks I got in touch and he was very helpful. Turns out that the fabric he supplies is identical to that supplied by the Polish supplier! However, he didn’t have any stock of the ”goop”. After much online research I decided to carry out small scale tests and bought a 250 ml can of Bonda Seal to try. This is sold as a marine grade sealer for wood, brick and metal and is a solvent based moisture curing polyurethane. Very low viscosity so penetrates the fabric well and won’t peel off, needs multiple coats which mustn’t cure before recoating, and stinks! However it is extremely hard wearing and is flexible enough not to crack, even when creasing the fabric and it can be applied in a wide range of environmental conditions. I also decided to finish the boat with a PU marine paint I had previously used, the idea being that I’d see any damage and be able to touch up as necessary. Of course there is no long term experience in this application so use at your own risk!
The fabric could apparently be stitched wet or dry so based on my small scale experiments I chose dry. The PU coating and the paint seem to shrink on curing, thus helping to tighten the skin and I was concerned that any additional shrinkage due to wet stitching would be too much. I’m happy with the results so I’ll just have to wait and see how it performs long term.
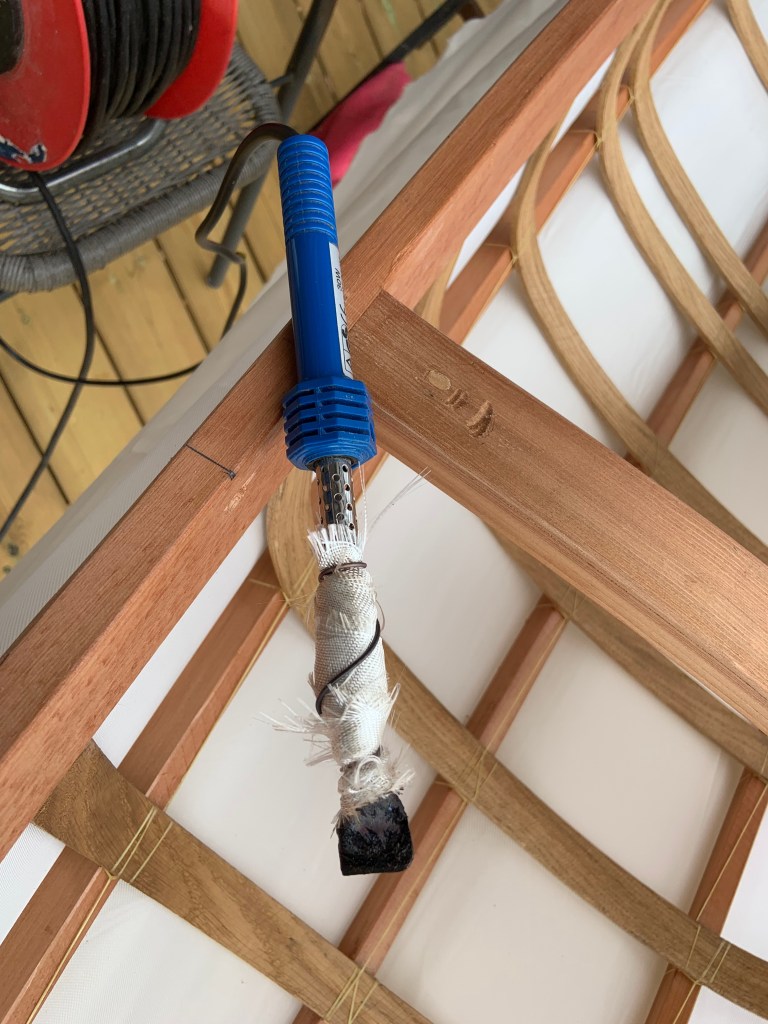
Hot cutting the fabric was done using a hot knife fashioned from copper pipe, a soldering iron and some glass cloth for insulation. It performed pretty well albeit quite slow but it wasn’t worth spending the money for something that wouldn’t be used again
The skinning process was nerve wracking to begin with, given the amount of force that had to be applied to tension the skin. However, it was uneventful and I ended up with a nice tight skin with the exception of a slight slackness either side of the cockpit. I think this could have been avoided by strapping down the coaming even tighter prior to lacing it onto the skin. The other thing i’d want to do better is the stitching which does meander about a bit! I think this has its origins in the lacing distances not being accurate enough, allowing the line of the fabric cut to deviate from the centre line.

Coating
This stage was carried out outdoors. The Bonda Seal gives rise to fumes that are not good to inhale so if working indoors a suitable organic vapour mask would be necessary. 6 coats were applied. The first two penetrated and sealed the nylon and the other four coats created a thin outer layer. I had bought a 2.5 litre can and have something like a litre left. The sealant was applied during the course of one day allowing about 40 mins between coats to ensure a good bond. The entire boat was painted with white PU marine enamel and left overnight before recoating. The paint dries quite quickly but takes around 7 days to fully cure so in my rush to get on the water I have scuffed it in places. That will be easily touched up!

Having got this far I couldn’t resist getting on the water so I went along to our local puddle, Lochore Meadows Country Park, outfitted only with a camping mat to sit on. I did forget to add the two small pieces under my butt so after an hour it was pretty uncomfortable but overall I was delighted. Much more stable that I had expected, beautifully lightweight, loads of room for my big feet and turns on a sixpence!
Outfitting
Based on my first on the water experience I decided on my outfitting priorities. The obvious first step was to sort out the seating! I have now made and installed Brian’s suspended seat which I intend to use in conjunction with the camping mat.
The next step was to fit the leather deck lines. As previously noted, there was no gap behind the skin at the hole locations so finding and melting the fabric through the holes was easy using my soldering iron (not my hot knife version!). I had trimmed down the leather straps which I had ordered 10mm wide (I know, 5/16” – 3/8” is not 10mm!) and stretched and softened them by pulling through holes in oak as recommended. I found this to be much easier than I’d expected, probably due to drilling the gunwhales 6.5mm. I plan to seal these with a PU hybrid polymer caulk so shouldn’t cause a problem. You may notice that I used Oak for the toggles. These are sealed with the Bonda Seal that I used on the nylon and I’m pretty confident that they will last well. The holes are pretty tight though and I hope they will loosen off a bit in time.


I’ve ordered a back band but have held off for now on footrests. As the boat is just for me I wonder if I really need adjustable foot rests. I’ll probably rig up a pair of fixed blocks. My knees locate nicely under the deck fabric and are very comfortable and secure so no knee braces needed. I will probably go down the route of buying a sea sock, which I’ll get made with ties that can be fastened around the ribs, front and back, to keep the sock from potentially tangling up. I’d be interested in hearing your thoughts on that. For buoyancy bags I’m contemplating making shaped bags of waterproof ripstop nylon to contain good quality bubble wrap instead of needing to be inflated. Belt and braces really.
Finally under this section, I’ll be fitting a lightweight keel protection strip consisting of a self adhesive plastic bathtub caulking strip. I was going to cut the strip down the lengthwise crease but Ill probably use the whole strip, wrapping it down each side of the keel.
This was a failure! The adhesive wasn’t nearly strong enough. I’ll probably add coats of Bonda Seal to the keel area and monitor in use.
Conclusions
This is my fourth self built kayak. One Cedar strip, two stitch and glue and my F1. I have no regrets about any of my previous boats though they each had their limitations but I sense already that I have finally found what I’ve been looking for. I come from a fibreglass manufacturing background so generally I’m confident in my ability to solve problems and get out of self inflicted messes! However there is no doubt that with the resource Brian has created and the readily available help just about anyone could tackle this project.
This boat is so light – before coating the skin about 24 lb – that I can lift it onto my car without a specialised lifting rack. With today’s fuel prices, not having to use the campervan just to take the boat to a venue is a major advantage. I fully expect to get out paddling much more and recover some of the confidence lost over the pandemic. I want to get my roll back and indeed develop bracing and rolling so that hopefully I’ll be more comfortable in wind and waves!
Updates
- The leather deck lines have been rubbed with candle wax which has lubricated the toggles and enabled them to be adjusted without sticking.
- The second outing was a coach led skills day on the same small loch as the first. Everyone who saw the F1 was curious about the construction and amazed at the light weight. I see myself as a competent if rusty paddler so the day was for me more about revision and putting the boat through its paces. I didn’t participate fully in the rescue session as I don’t yet have my sea sock or floatation bags, however it was hard not to smile to myself as we went through forward paddling, turning and bracing. The F1 always tracked effortlessly when forward and reverse paddling and I noticed that I was able to keep up with the pack when returning to shore for lunch. As for edging and turning, it felt secure on edge and turned quickly in response to both forward and reverse sweeps. Both bow rudder and hanging draw were really effective and throughout the day I easily out-manoeuvred the standard commercial sea kayaks. When practicing the low brace I couldn’t believe just how far the boat had to be leaned to reach the tipping point and I’m looking forward to getting out in some wind and waves as soon as I’ve got my sea sock!
- Footrests now fitted. I decided on homemade as I had aluminium T slot left over from a previous project and the sliding foot blocks were assembled from offcuts of Birch ply.


- I received my sea sock this morning. Reed Chillcheater only received my coaming template yesterday morning and managed to manufacture and despatch the same day! Now that’s service! I’ll report further once I’ve used it.
- Just popped down to the beach to try out the sea sock and found a 1’ to 2’ onshore wind chop. I’m absolutely delighted with the sea sock and the boat. Firstly, he sea sock is a snug fit, so much so that it was necessary to burp the seal to release some of the surrounding air. With the two clips attached to bungee loops on the deck beam the sock stayed in place during exit. Secondly, this was the first paddle on the sea (and on less than calm conditions) and the boat performed very well. I was able to get in and out whilst floating and without needing to use the paddle for support. The stability is amazing – you just need to trust the boat! I tried paddling parallel to the waves and found that the stability was again rock solid and finally I was able to surf a little on these very modest waves. Of course the icing on the cake was being able to pick my boat up with one hand and walk back to the car, boat over my shoulder!
- I have now particIpated in several wet sessions run by my club and can report that I have got my roll back! I also find that in the pool at least, I can self rescue without a paddle float simply using the paddle as an outrigger secured in the rear deck lines. Also, the huge stability lets me get my feet out and paddle side saddle in wind and small waves – great fun!
- Further update May 2026 – adjustable back band and commercial foot rests fitted. Air bags made of vacuum bagging film have proved successful so no longer use sea sock. There has been no adverse changes to the oak ribs over time.
Sources
As a starting point I used the list very kindly provided by Chris at the end of his blog. So here I’ll just add to or comment on those.
- Green Oak – Scottish Wood – scottishwood.co.uk
- Reasonable prices so bought extra.
- Unfortunately no help from management on the day. The visit was saved by an interested operative.
- Western Red Cedar – Rembrand Timber, Glenrothes Branch, 01592 808370
- willing to help
- decent quality timber
- Artificial sinew (4No. 20 yd bobbins), leather strips (https://www.artisanleather.co.uk/4mm-sedgwicks-bridle-back-strip-black.html), thread (https://www.artisanleather.co.uk/6606.html), needles (pack of repair needles)- artisanleather.co.uk
- Kathy extremely helpful and responsive to queries
- good prices (titandogleads were ridiculously expensive for the leather strips)
- buy one length at 32mm wide and request cut into three strips 3/8” wide. (no extra charge!)
- Bronze nails – https://www.seaware.co.uk/products/gripfast-nails-silicon-bronze
- competitive
- sold by weight
- Nylon fabric – shipshape.works – Ant
- Bonda Seal – https://www.homecareessentials.co.uk/categories/floor-cleaning-and-care/stone-flooring-care-cleaning/sealers/product/bonda-seal-clear-2-5-litre
- PU Marine Enamel – https://www.taindustrialpaints.co.uk/collections/marine-paints/products/marine-boat-enamel-polyurethane-easy-application-brush-roller-or-spray
- Drill bits – ukdrills.com
- Good prices
- excellent ranges
- Gorilla glue – Toolstation – Toolstation.com
- Dowels – https://www.ebay.co.uk/itm/143713940159?hash=item217604b2bf:g:DSQAAOSw6o9fiAJW
- Sea Sock – Reed Chillcheater.


